In this lesson, we take the remote control of the LEDS as a routine, because almost all of our robots are equipped with WS 2812 LED modules. This routine helps beginners understand how the desktop GUI program communicate with Raspberry Pi.
You can use the program with a graphical interface written by yourself to communicate with the Raspberry Pi on other devices to achieve the purpose of controlling the Raspberry Pi.
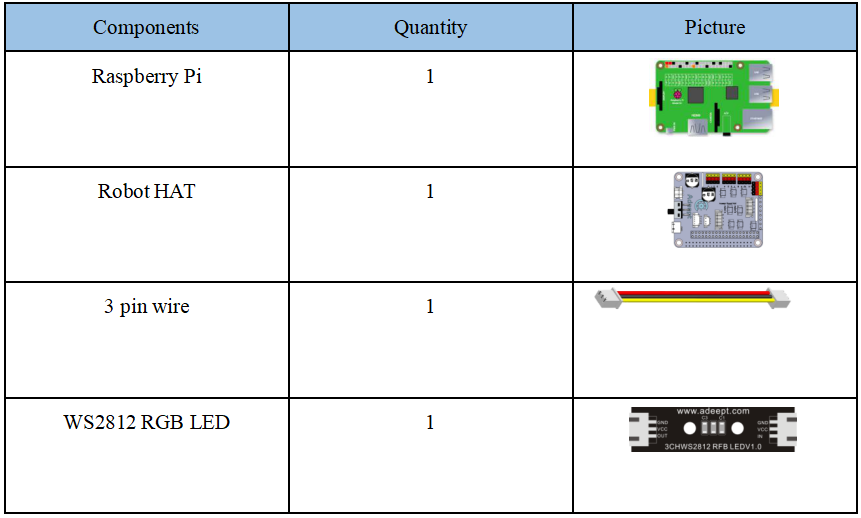
13.1 Components used in this course
13.2 About Tkinter and Socket
The GUI programming method introduced in this chapter is completely done by Python language, specifically, the Tkinter library is used.Tkinter is Python's standard GUI library. Python uses Tkinter to quickly create GUI applications. Because Tkinter is built into the Python installation package, as long as Python is installed, you can import the Tkinter library, and IDLE is also written in Tkinter. For simple graphical interface Tkinter can still cope with it.
We use the Socket library to communicate between devices. Socket is also called "socket". Applications usually send requests to the network or answer network requests through the "socket", so that the process between the host or a computer can communicate
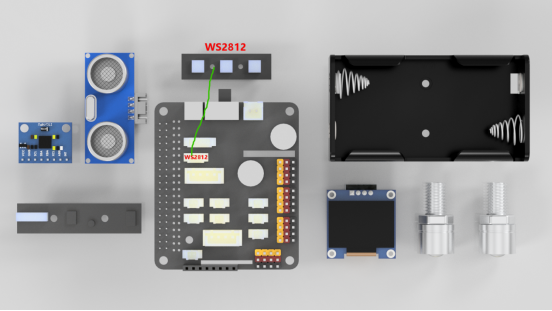
13.3 Wiring diagram (Circuit diagram)
When the WS2812 LED is in use, the IN port needs to be connected to the WS2812 port on the RobotHAT driver board, as shown in the figure below:
13.4 How to remotely control WS2812 LED module
For the introduction and control of WS2812 LED module, you can refer to "Lesson 5 How to Control WS2812 LED". Remember to install the Python library used to control the WS2812 LEDS, you can use the following command in the Raspberry Pi console to install:
sudo pip3 install rpi_ws281x
The Raspberry Pi serves as the server and the PC as the client.
13.4.1 Run the tcpPI.py program in the Raspberry Pi first
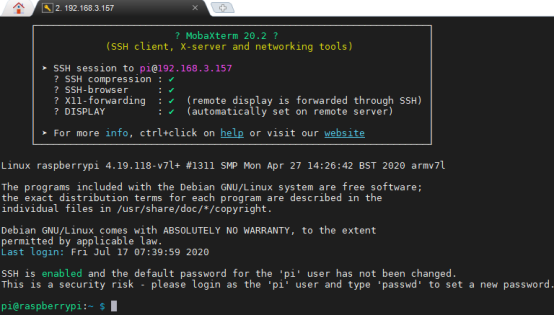
1. Open the terminal software MobaXterm:

2. Log in to your Raspberry Pi (the way to log in to Raspberry Pi has been introduced in Lesson 1):
3. Enter the Course Code folder, this folder stores the sample code program to control the robot, enter the following command:
cd adeept_alter/02CourseCode/01ComponentCode

4. Enter the command to display the contents of the current directory:
ls

5. The 12TCP_LED folder stores the sample code of this course. Enter the command to enter this folder:
cd 12TCP_LED

6. Enter the command to display the contents of the current directory:
ls

7. When using the WS2812 module, we need to install the Python dependency library needed to control the WS2812 module, and enter the following command in the console of the command window:
sudo pip3 install rpi-ws281x

8.Then run the tcpPI.py program on the Raspberry Pi, and directly enter the following commands to run this program on the Raspberry Pi:
sudo python3 tcpPI.py

9.After running the program successfully, you also need to run the tcpPC.py program on the PC according to "13.3.2 Run the tcpPC.py program on the PC".
13.4.2 Run the tcpPC.py program on the PC
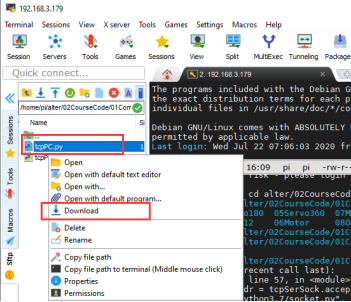
1. In the directory:
adeept_alter/02CourseCode/01ComponentCode/12TCP_LED
Download the file tcpPC.py to the PC and remember the path of this file.
2. Use MobaXterm or other IDE to open the tcpPC.py file on your computer. You need to modify the IP address in the SERVER_IP line of code and change it to the IP of your Raspberry Pi (please check the IP address of the Raspberry Pi in lesson one), so that the PC can establish a connection with the Raspberry Pi.

3. After the modification is completed, you can directly double-click to open the tcpPC.py file. After opening, as shown below, there are two buttons "ON" and "OFF". When you click the "ON" button, the LED of WS2812 will be on; when you click the "OFF" button, the LED of WS2812 will be off.

13.5 Studying the program code of tcpPI.py and tcpPC.py
13.5.1 Learning tcpPI.py program code
Import the socket library used for TCP communication.

Next is the configuration related to TCP communication. PORT is the defined port number. You can freely choose numbers from 0-65535. It is recommended to choose the numbers after 1023, which needs to be consistent with the port number defined by the client in the PC.
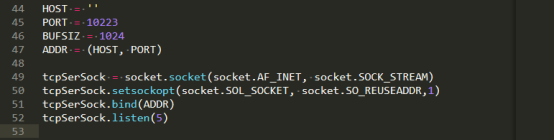
Start monitoring the client connection, and start receiving the information sent from the client after the client connection is successful.

Receive information from the client, turn on the light if the information content is on, and turn off the light if the information content is off.

Finally, print out the received data, and continue to monitor the next message sent by the client.

13.5.2 Learning tcpPC.py program code
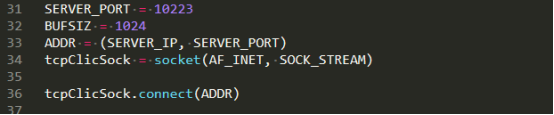
Import the socket library used for TCP communication.

Python uses Tkinter to quickly create GUI applications and instantiate them while importing them.

Call this method to send the light-on command 'on'.

Call this method to send the light off command 'off'.

Enter the IP address of the Raspberry Pi here (you need to change it to your Raspberry Pi IP address when you use it).

Next is the configuration related to TCP communication. PORT is the defined port number. You can freely choose numbers from 0-65535. It is recommended to choose a number after 1023, which needs to be consistent with the port number defined by the server in the Raspberry Pi.
Define a GUI window.

Set the title of the window.

The size of the window, the middle x is the English letter x.

Define the background color of the window.

Use Tkinter's Button method to define a button, the button is on the root window, the name on the button is 'ON', the text color of the button is #E1F5FE, and the background color of the button is #0277BD. When the button is pressed, it will call lights_on( )function.

Choose a location to place this button.

Define another button in the same way. The difference is that the text on the button is changed to'OFF'. When the button is pressed, the lights_off() function is called.

Finally, start the message loop.
