19.1 Using Raspberry Pi for the first time
We have developed a WEB application to control the robot to lower the threshold for the use of the robot.The WEB app is developed for common users to control the robot in an easier way. It's convenient to use WEB app; you may use it to wirelessly control the robot on any device with a web browser (Google Chrome was used for testing).
Generally Raspberry Pi will auto run `webServer.py` when booting and establish a web server in the LAN. You may then use any other computer, mobile or tablet in the same LAN to visit the web page and control the robot.
How to tell whether the robot has run the `webServer.py` or not: If the WS2812-LED lights up with the breathing effect, it means the robot has booted and runs the program automatically.
If the program is not run when the robot is booted, try to connect Raspberry Pi via SSH, manually run `webServer.py` with code and check the errors. Refer to the Q&A below or email us for help (before manually running `webServer.py`, you need to end the program possibly auto run in the back end to release resources.
sudo killall python3
sudo python3 [RobotName]/server/webServer.py
If the `webServer.py` is auto run successfully, open a web browser (here Google Chrome), type in the IP address of the Raspberry Pi, with `:5000` added to the end, and go to the next step, as shown below:
192.168.3.157:5000
If no image is displayed, try manual running `webServer.py` as described in the step above.
If image is shown, you can control the robot to move now. You may check the description for keyboard shortcuts `Instruction` at the bottom and control the robot based on its general functions with the keyboard.
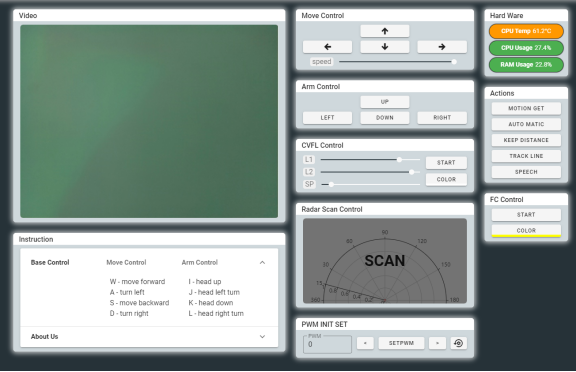
`Video` window: shows the image captured by the robot's camera in real time.
`Move Control` window: is to control the basic movements of the robot.
`Arm Control`: controls the robot's limb movement(Alter Dog):
UP DOWN: controls the robot to stand up and squat.
LEFT RIGHT: controls the robot to tilt left and right.
CVFL Control window: is used to control the robot's visual line-following function. More information about this function will be explained in detail in the subsequent OpenCV chapters. Here we only briefly introduce the function usage:
START: is used to turn on the visual tracking function, if you press this button again, the visual tracking function will be turned off.
COLOR: is used to switch the mode of searching for white lines on black background or black lines on white background. Default search mode for white lines on black background.Click it to find black lines on white background.
This line-following function analyzes the pixel information of two horizontal lines to perform line-following. The positions of the two horizontal lines are L1 and L2 respectively.
SP: is the threshold value that the visual analysis result is applied to the steering command. The larger the SP value, the greater the error. A too small SP value will cause the robot to be unable to aim at the target direction and stagnate.
After the visual patrol function is turned on, the real-time video screen will automatically become the result of binarization, so that the robot's visual analysis process will be more intuitive.
Hard Ware window: is used to display the CPU temperature, CPU usage and memory usage of the Raspberry Pi.
Actions window: is used to control the special functions of the robot:
MOTION GET:based on the motion detection function of OpencCV. When there is an object moving in the camera screen, the program will circle the moving part in the Video window, and the LED on the robot will also change accordingly.
AUTO MATIC:Ultrasonic-based automatic obstacle avoidance function. When the robot ultrasonic wave detects an obstacle in front, it will automatically turn left to avoid the obstacle. If the obstacle is too close, the robot will move backward to avoid the obstacle.
KEEPDISTANCE:based on the distance keeping function of the ultrasonic module.The robot will move backward when the object in front of the robot is too close. On the contrary, the robot will move forward when the object is too far away.
TRACK LINE:based on the line tracking function of the three-way infrared line tracking module. The default is to find the black line on the white background (the white background is a plane that reflects infrared light, and the black line is a line that does not reflect infrared light, and the width is about 1cm), depending on the material of the plane and line and the different height of the robot's chassis , you may need to use a Phillips screwdriver to adjust the potentiometer on the line-following module to achieve the best performance.
SPEECH:the robot will play the default emoji animation.
FC Control window: is used to control the color lock function of the robot:
START: is used to turn on the color search and tracking function. When this function is turned on, it will be turned off if we click it again.
COLOR: is used to select the color to be traced.When this function is turned on, the robot will automatically lock a certain color object in the camera screen.The default is bright yellow.You can choose the color that needs to be locked.When the object is locked, the LED on the robot body will light up. If you are interested, you can add the motor control part according to the subsequent OpenCV chapter, so that the robot can be horizontally locked.