This lesson introduces the use of multithreading to achieve some effects related to WS2812 LED.
27.1 Introduction to Multithreading
This course introduces the use of multithreading to achieve some effects related to WS2812 LED. Multithreading is a very common operation we use in robot projects, because robots have high requirements for real-time response. When performing a certain task,we try not to block the main thread communication.
Multithreading is similar to executing multiple different programs or tasks at the same time. Multithreading has the following advantages:
1. Use threads to put time-consuming tasks in the background for processing.
2. Improve the operating efficiency of the program. The subsequent real-time video and OpenCV processing video frames use multithreading to greatly increase the frame rate.
3. The encapsulated multithreading task is more convenient to call, similar to the non-blocking control method, that is, the control method of the servo is encapsulated by multithreading.
We use Python's threading library to provide thread-related work. A thread is the smallest unit of work in an application. The current version of Python does not yet provide multithreading priority, thread groups, and threads cannot be stopped, suspended, resumed, or interrupted.
27.2 Preparation
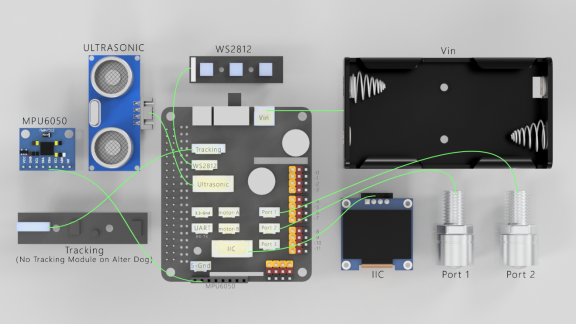
You need to prepare a robot in Alter that has been assembled, and make sure that the robot has been connected to the WS2812 LED module.
27.3 Realize WS2812 LED effect with multithreading
27.3.1 Code program for warning lights/breathing LED
We use the following code to implement multithreading control of LEDS, and when the LED does not change, we keep the thread blocked to avoid wasting CPU resources.
Here we use Subline IDE to view and edit the code program of this course. Please refer to the content of Lesson 2 for the specific method. Here, the wait() method is used to block the thread. From the realization of the need to control the thread, the specific code and comments are as follows:
Use the Threading module to create a thread, inherit directly from threading.Thread, and then rewrite the __init__ method and run method.

Some settings related to LEDS are initialized here.

Set the brightness of the three color channels of RGB.There is no need to change the value, for these values will be automatically set after the subsequent call of the breathing LED function.

Mode variable,'none' will cause the thread to be blocked and suspended, and the light will not change;'police' is the warning light mode, red and blue flashing alternately;'breath' breathing LED, you can set the specified color.

Create a NeoPixel object with the appropriate configuration.

Initialize the library (must be called once before other functions).

Set the color of all lights.

Set the color of some lights, the ID is an array of the serial numbers of the lights.

Call this function, set __flag to False to block the thread.

Call this function, set __flag to True to start the thread.

Call this function to turn on the warning light mode.

The concrete realization of the warning light mode.

Blue flashes 3 times.
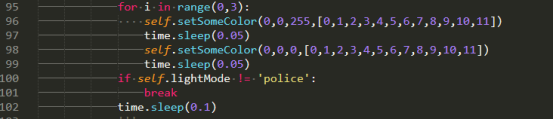
Red flashes 3 times.

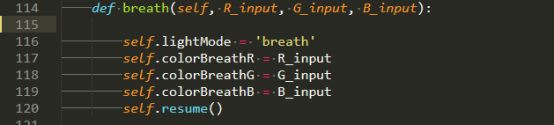
To call this function to turn on the breathing LED mode, you need to enter three parameters, namely the brightness of the three color channels of RGB, which will be the color when the brightness of the breathing LED is at its maximum.
The concrete realization method of breathing LED.

All the lights gradually brighten.

All lights gradually dim.

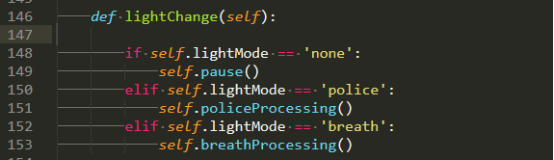
This function is used to select tasks to execute.
Functions for multithreading tasks.

In the main function, instantiate the object that controls the LED and start the thread.

Start breathing LED mode and stop after 15 seconds.

Pause for 2 seconds.

Start the warning light mode and stop after 15 seconds.

27.3.2 Run the code program of warning light/breathing LED
1. Open the terminal software MobaXterm:

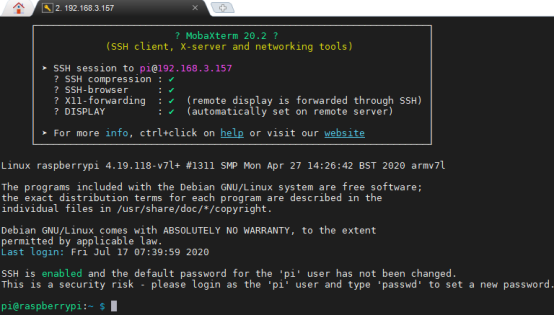
2. Log in to your Raspberry Pi (the way to log in to Raspberry Pi has been introduced in Lesson 1):
3. Enter the Course Code folder, this folder stores the sample code program to control the robot, enter the following command:
cd adeept_alter/server

4. Enter the command to display the contents of the current directory:
ls

5. When using the WS2812 module, we need to install the Python dependency library needed to control the WS2812 module. Enter the following command in the console of the command window:
sudo pip3 install rpi-ws281x

6.robotLight.py is the sample code of this lesson, enter the command to run this program:
sudo python3 robotLight.py

7.After successfully running the program, you will observe that the lights of WS2812 will change. First, the blue breathing LED effect will appear, and then the warning light effect will appear.