In Alter products, Alter Racing Car and Alter Classic Car robot both have OpenCV visual line patrol function, which is used to patrol the line with the picture collected by the camera. This lesson will explain how to use OpenCV to analyze the location of the black or white lines in the screen, so as to realize the machine vision line tracking.
39.1 Image Binarization
In the process of realizing machine vision, we used image binarization.What is image binarization?
Image Binarization is the process of setting the gray value of pixels on the image to 0 (black) or 255 (white), which is the process of presenting the entire image with a clear black and white effect.
Image binarization is the most common and most important processing method in image analysis and processing. In digital image processing, binary images occupies a very important position. Image binarization greatly reduces the amount of data in the image, which can highlight the outline of the target.
The 256 brightness levels of grayscale images are selected by appropriate thresholds to obtain binarized images that can still reflect the overall and local characteristics of the image. In digital image processing, binary images occupies a very important position. First of all, image binarization is conducive to further image processing, making the image simpler, and reducing the amount of data, which can highlight the outline of the target of interest . Secondly, to process and analyze the binary image, the grayscale image must be binarized first to obtain the binary image.
All pixels whose grayscale is greater than or equal to the threshold are determined to belong to a specific object, and their grayscale value is 255, otherwise these pixels are excluded from the object area, and the grayscale value is 0, which indicates the background or exception object area.
39.2 Principle of Image Binarization
The image binarization process is to set the gray value of the points on the image to 0 or 255, that is, to present the entire image with a clear black and white effect. That is to say, a grayscale image with 256 brightness levels is selected with an appropriate threshold to obtain a binarized image that can still reflect the overall and local characteristics of the image. In digital image processing, binary images occupies a very important position. Especially in practical image processing, there are many systems that are realized by binary image processing. To process and analyze binary images, we must first binarize the grayscale image to obtain a binarized image. This is conducive to the further processing of the image. The collective nature of the image is only related to the position of the point with the pixel value of 0 or 255, and no more pixels are involved. The level value makes the processing simple, and the amount of data processing and compression is small. In order to obtain an ideal binary image, a closed, connected boundary is generally used to define a non-overlapping area. All pixels whose grayscale is greater than or equal to the threshold are judged to belong to a specific object, and their grayscale value is 255, otherwise these pixels are excluded from the object area, and the grayscale value is 0, which indicates the background or exception object area. If a specific object has uniform gray values inside, and it is in a uniform background with other gray values, the threshold method can be used to obtain a comparative segmentation effect. If the difference between the object and the background is not in the grayscale value (for example, the texture is different), you can convert this difference feature into a grayscale difference, and then use the threshold selection technology to segment the image. Dynamically adjusting the threshold to realize the binarization of the image, which can dynamically observe the specific results of the image segmentation.
39.3 Learn the code program of visual line inspection
We put the code program for visual line inspection in the directory:
adeept_alter/server
You can find three code programs in the CVFL_flask_streaming folder: app.py, base_camera.py and camera_opencv.py. When using the OpenCV function , these three files need to be used in the same folder.
Here we use Subline IDE to view and edit the code program of this lesson.Please see the content of lesson 2 for specific methods. The specific code and comments are as follows:
In the file manager of the MobaXterm terminal, find the directory:
alter/01SoftwarePackage/server
And open the code folder of this lesson: CVFL_flask_streaming.
There are three code programs in the CVFL_flask_streaming folder: app.py, base_camera.py and camera_opencv.py. The difference between different functions is only in the code in camera_opencv.py. Let's learn the code program of camera_opencv.py together.
1. Import dependencies and initialize.
1. import os
2. import cv2
3. from base_camera import BaseCamera
4. import numpy as np
5.
6. '''''
7. Set the color of the line, 255 is white line, 0 is black line
8. '''
9. lineColorSet = 255
10. '''''
11. Set the reference horizontal position, the larger the value, the lower the position, but it cannot be greater than the vertical resolution of the video (default 480)
12. '''
13. linePos = 380
2. Rewrite the frame function.
1. @staticmethod
2. def frames():
3. camera = cv2.VideoCapture(Camera.video_source)
4. if not camera.isOpened():
5. raise RuntimeError('Could not start camera.')
6.
7. while True:
8. _, img = camera.read() #Get the picture captured by the camera
9.
10. '''''
11. Convert the picture to black and white, and then binarize (the value of each pixel in the picture is either 0 or 255)
12. '''
13. img = cv2.cvtColor(img, cv2.COLOR_BGR2GRAY)
14. retval, img = cv2.threshold(img, 0, 255, cv2.THRESH_OTSU)
15. img = cv2.erode(img, None, iterations=6) #Use corrosion denoising
16. colorPos = img[linePos] #Get the array of pixel values of linePos
17. try:
18. lineColorCount_Pos = np.sum(colorPos == lineColorSet) #Get the number of pixels of the line color (line width)
19. lineIndex_Pos = np.where(colorPos == lineColorSet) #Get the line's end point in the horizontal position of linePos
20. '''''
21. Use the endpoint position and line width to calculate the position of the center point of the line.
22. '''
23. left_Pos = lineIndex_Pos[0][lineColorCount_Pos-1]
24. right_Pos = lineIndex_Pos[0][0]
25. center_Pos = int((left_Pos+right_Pos)/2)
26.
27. print('The position of the center point of the line is:%d'%center_Pos)
28. except:
29. '''''
30. If the line is not detected, it will cause an error if we use a line width of 0 as the denominator above, so we know that no line has been detected.
31. '''
32. center_Pos = 0
33. print('No line detected')
34.
35. '''''
36. Draw horizontal reference lines.
37. '''
38. cv2.line(img,(0,linePos),(640,linePos),(255,255,64),1)
39. if center_Pos:
40. '''''
41. If a line is detected, draw the center point of the line.
42. '''
43. cv2.line(img,(center_Pos,linePos+300),(center_Pos,linePos-300),(255,255,64),1)
44.
45.
46. # Convert to jpg format and output.
47. yield cv2.imencode('.jpg', img)[1].tobytes()
39.4 Start video streaming
Open the browser with a device in the same LAN as the Raspberry Pi, enter the IP address of the Raspberry Pi in the address bar, and access port 5000.

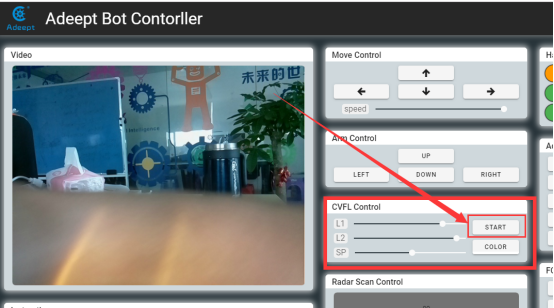
After logging in, you will enter the interface of Adeept Bot Contorller, click START: to turn on the visual line tracking function, and then press this button to turn off the visual line tracking function.
Click COLOR: switch between searching for white lines on black background or black lines on white background. By default, searching for white lines on black background, click to find black lines on white background.