In Alter products, Alter Dog, Alter Racing Car and Alter Classic Car robots all have OpenCV color recognition function. Based on OpenCV, when a color object in the screen is detected, the robot will circle the object in the real-time screen.This lesson will explain how to use OpenCV for color recognition.
40.1 Color Recognition and Color Space
1.For the development preparation and operation of OpenCV function, please refer to lesson 37.
2.Create camera_opencv.py in the folder where app.py and base_camera.py in Lesson 37 are located. The code related to the OpenCV color tracking function introduced in this lesson is written in camera_opencv.py.
3.For safety reasons, this routine does not control the motor or servo motion, and only outputs OpenCV calculation results.
4.We use OpenCV for color recognition using the HSV color space. Before introducing the code, we first need to understand the color space and why we use the HSV color space instead of the more common RGB color space for color recognition.
Color space:
Color space is how colors are organized. With the help of color space and tests for physical devices, fixed analog and digital representations of colors can be obtained. The color space can be defined by just picking some colors at random, for example, the Pantone system just takes a specific set of colors as samples, and then defines the name and code for each color; it can also be based on a strict mathematical definition, such as Adobe RGB , SRGB.
RGB color space:
RGB uses an additive color mixing method because it describes the ratio of various "lights" to produce colors. The light is continuously superimposed from dark to produce color. RGB describes the values of red, green and blue light. RGBA is to add alpha channel to RGB to achieve transparency effect.
Common color spaces based on RGB mode are sRGB, Adobe RGB, and Adobe Wide Gamut RGB.
HSV color space:
HSV (Hue: Hue, Saturation: Saturation, Brightness; Value), also known as HSB (B refers to Brightness) is commonly used by artists, because compared with the term of addition and subtraction, the use of hue, saturation and other concepts to describe color is more natural and intuitive. HSV is a variant of the RGB color space, its content and color scale are closely related to its source-RGB color space
Using the HSV color space in OpenCV's color recognition function can make the recognition result more accurate, less affected by ambient light, and it is very convenient to define the color range, because what you are looking for during color recognition is not a certain color, but a certain one Range of colors, so use the HSV color space that is more in line with human eye habits for color recognition.
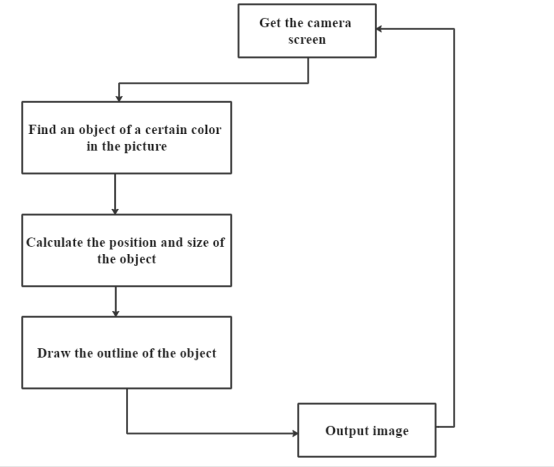
40.2 Process of Color Identifying and Tracking
We can use this function to control the servo to make the camera aim at the object (with color) you need to track. The general tracking process is as follows:
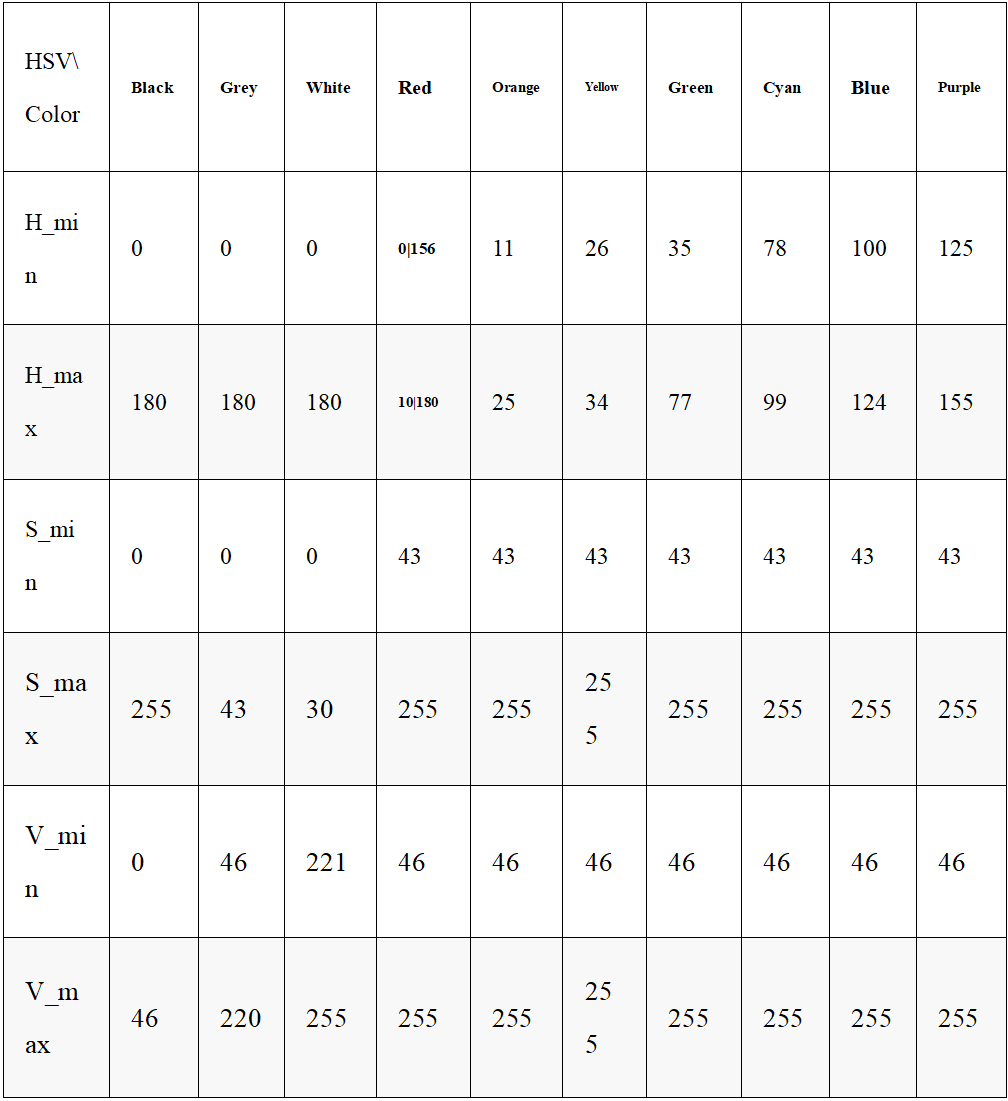
40.3 HSV Color Component Range in OpenCV
40.4 Learn the code program of visual line inspection
We put the code program for visual line inspection in the directory:
adeept_alter/server
You can find three code programs in the ColorFind_flask_streaming folder: app.py, base_camera.py and camera_opencv.py. When using the OpenCV function , These three files need to be used in the same folder.
Here we use Subline IDE to view and edit the code program of this lesson.Please see the content of lesson 2 for specific methods. The specific code and comments are as follows:
In the file manager of the MobaXterm terminal, find the directory:
alter/01SoftwarePackage/server
And open the code folder of this lesson: ColorFind_flask_streaming.
There are three code programs in the ColorFind_flask_streaming folder: app.py, base_camera.py and camera_opencv.py. The difference between different functions is only in the code in camera_opencv.py. Let's learn the code program of camera_opencv.py together.
1. Import dependencies and initialize.
1. import os
2. import cv2
3. from base_camera import BaseCamera
4. import numpy as np
5.
6. '''''
7. Set the target color, HSV color space
8. '''
9. colorUpper = np.array([44, 255, 255]) # Track the upper limit of the color range.
10. colorLower = np.array([24, 100, 100]) # Track the lower limit of the color range.
11.
12. font = cv2.FONT_HERSHEY_SIMPLEX
2. Rewrite the frame function.
1. @staticmethod
2. def frames():
3. camera = cv2.VideoCapture(Camera.video_source)
4. if not camera.isOpened():
5. raise RuntimeError('Could not start camera.')
6.
7. while True:
8. _, img = camera.read() #Get the picture captured by the camera.
9.
10. hsv = cv2.cvtColor(img, cv2.COLOR_BGR2HSV) #Convert the captured image to HSV color space.
11. mask = cv2.inRange(hsv, colorLower, colorUpper) #Traverse the colors in the target color range in the HSV color space screen, and turn these color blocks into masks.
12. mask = cv2.erode(mask, None, iterations=2) #Corrosion of small blocks of mask (noise) in the picture (small blocks of color or noise disappear)
13. mask = cv2.dilate(mask, None, iterations=2) #13. Expansion, the large mask that was reduced in the previous step back to its original size
14. cnts = cv2.findContours(mask.copy(), cv2.RETR_EXTERNAL,
15. cv2.CHAIN_APPROX_SIMPLE)[-2] #Get the numbers of masks in the screen.
16. center = None
17. if len(cnts) > 0: #If the number of entire masks in the screen is greater than one,
18. '''''
19. Get the center point coordinates of the object of the target color and the size of the object in the screen.
20. '''
21. c = max(cnts, key=cv2.contourArea)
22. ((box_x, box_y), radius) = cv2.minEnclosingCircle(c)
23. M = cv2.moments(c)
24. center = (int(M["m10"] / M["m00"]), int(M["m01"] / M["m00"]))
25. X = int(box_x)
26. Y = int(box_y)
27. '''''
28. Get the center point coordinates of the target color object and output.
29. '''
30. print('The target color object is detected')
31. print('X:%d'%X)
32. print('Y:%d'%Y)
33. print('-------')
34.
35. '''''
36. Write text on the screen:Target Detected
37. '''
38. cv2.putText(img,'Target Detected',(40,60), font, 0.5,(255,255,255),1,cv2.LINE_AA)
39. '''''
40. Draw a frame around the target color object.
41. '''
42. cv2.rectangle(img,(int(box_x-radius),int(box_y+radius)),(int(box_x+radius),int(box_y-radius)),(255,255,255),1)
43. else:
44. cv2.putText(img,'Target Detecting',(40,60), font, 0.5,(255,255,255),1,cv2.LINE_AA)
45. print('The target color object is not detected')
46.
47. # Convert to jpg format and output.
48. yield cv2.imencode('.jpg', img)[1].tobytes()
【Attention】
You can set the color you want to recognize by changing the colorUpper and colorLower in the code. It should be noted that the H value (hue) of the normal HSV color space is 0-360, but in OpenCV, the H value range is 0-180.

40.5 Start video streaming
Open the browser with a device in the same LAN as the Raspberry Pi, enter the IP address of the Raspberry Pi in the address bar, and access port 5000.

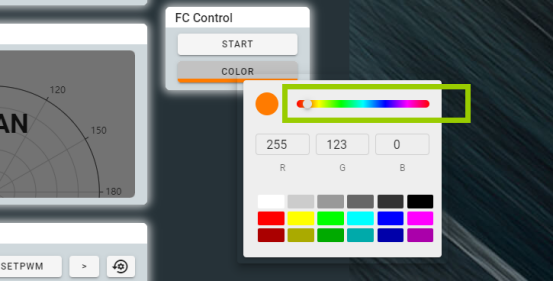
After logging in, you will enter the interface of Adeept Bot Contorller, click START: to turn on the color recognition function, and a quadrilateral recognition box will appear at this time, press this button again to turn off the color recognition function.
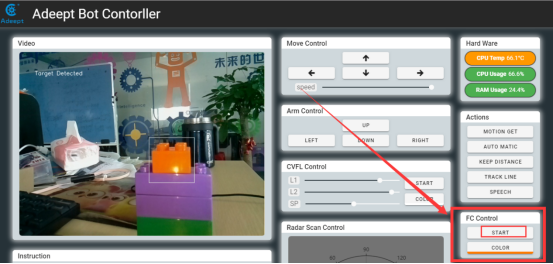
After clicking "START" and then clicking the "COLOR" button, an RGB color interface will pop up. In this interface, you can select the color of the object you need to recognize by sliding the dots in the position below, for example, we want to recognize orange , then slide to the orange position, so that the recognition frame will frame the color object that you set to recognize, and the LED on the robot body will light up when the object is locked.