Lesson 2 Introduction of Motor HAT
2.1 Motor HAT
When you get the robot product, you will see a board with its name printed onside: Adeept Motor HAT, which is an important part of the robot. There are many interfaces on the Motor HAT. You can connect sensors and electronic hardware modules to the board by those interfaces to realize more functions. This robot works on the Raspberry Pi. Let's first get to know the Motor HAT.
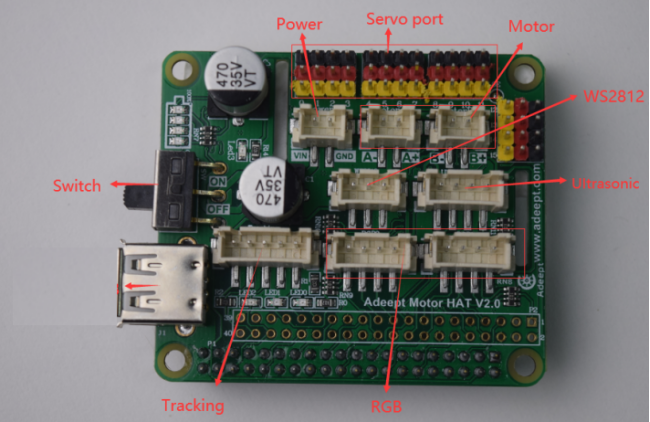
[Power]: The vin interface is an interface for external power supply.
[Switch]: Switch is to turn the Motor HAT ON/OFF.
[Tracking]: The pin interface of Tracking Module.
[WS2812]: The pin interface of WS2812 Module.
[Servo port]: Servo interface.
[motor]: Divided into motor 1 and motor 2 interfaces.
[Ultrasonic]: Ultrasonic interface.
2.2 Precautions for Using the Motor HAT
When you are performing software installation, structural assembly or program debugging, you can use a USB cable to power the Raspberry Pi. If the Raspberry Pi is equipped with Motor HAT, you can connect the USB cable to the USB port on the Motor HAT. Motor HAT will power the Raspberry Pi by the GPIO interface.
Different Raspberry Pi models have specific requirements for current. For example, the Raspberry Pi 3B needs at least 2A to boot up, yet the Raspberry Pi 4 needs 3A to boot normally. When you use the power adapter to power the Raspberry Pi, you can check the specifications on your power adapter.
When Motor HAT is connected to a load, such as a motor or a few servos, a high-current power supply is required to connect to Vin on the Motor HAT. You can use two high-current 18650 batterie for power supply. The Adeept robot provides a dual 18650 battery box with a 2-pin interface for you to supply power to the Motor HAT.
If your robot reboots automatically after booting, or disconnects and reboots at the moment it starts to move after normal booting, it is likely that your power supply does not provide enough current as the robot automatically runs the program to control all servos to rotate to the center position when booting – it then drops the voltage on the Raspberry Pi and causes a reboot.
We've tested when powering with 7.4V, the peak current of the robot would be around 3.75A, which means you need to connect batteries with a 4A output.
You may also power the Motor HAT with high energy li-ion battery; Motor HAT can be supplied by a power source under 15V.
When assembling the servo rocker arm, you can use a USB cable to power the Motor HAT. After the Raspberry Pi with the robot software is installed, it will control the Motor HAT to set all the servo ports to output a signal of rotating to the center position. You can connect the servo to any port. The servo shaft will rotate to the center position, and then you can install the servo rocker arm at the specified angle. After the rocker arm is assembled, you can disconnect the servo from the Motor HAT. To connect the rocker arm for another servo, just wire the servo to any servo port on the Motor HAT.