Lesson 7 How to Control RGB LED
In this lesson, we will learn how to control warm color LED with Raspberry Pi.
7.1 Components used in this course
Components | Quantity | Picture |
Raspberry Pi | 1 |
|
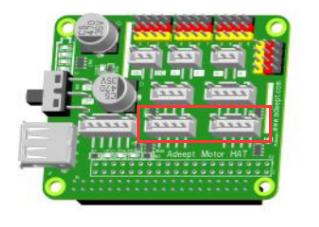
Motor HAT | 1 |
|
RGB LED | 1 |
|


7.2 Introduction of RGB LED
Using RGB LEDs, you can produce red, green and blue light, and by configuring the intensity of each LED, you can also produce other colors. For example, to produce pure blue light, you can set the red LED to the highest intensity, and the green and blue LEDs to the lowest intensity. For white light, replace with all three LEDs set to the highest intensity. To produce other colors, you can combine the three colors with different intensities. To adjust the intensity of each LED, you can use a PWM signal. Because the LEDs are very close to each other, what our eyes see is the result of the color combination, not the divided three colors.
The following chart. This is the simplest color mixing diagram.

7.3 Wiring diagram (Circuit diagram)
Use a 4pin cable to connect the RGB LED to RGB1 or RGB2 of Motor HAT.
7.4 How to control the RGB LED
Run the program of this course
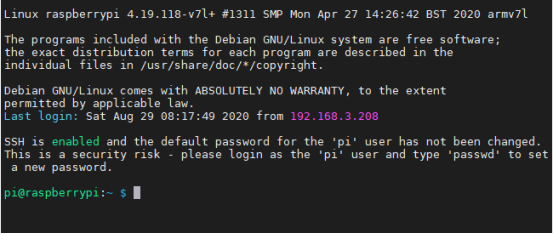
1. Log in to your Raspberry Pi via SSH (the method to log in to the Raspberry Pi has been introduced in Lesson 3):
2. Run the command to enter the adeept_picarpro/server folder. This folder stores the sample code program for controlling the robot. Enter the following command and press Enter:
cd adeept_picar-b/server

3. Enter the command to view the contents of the current directory:
ls
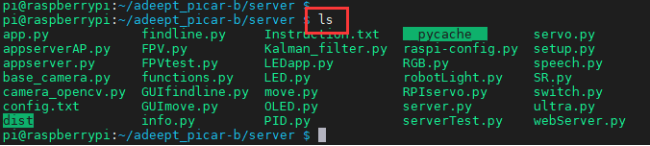
4. RGB.py is a python program, you can run this program on the Raspberry Pi by directly typing the following commands:
sudo python3 RGB.py

5. After successfully running the program, you can observe that the RGB led will light up in different colors and turn off the RGB led after a short period of time. When you want to terminate the running program, you can press the shortcut key "Ctrl + C" on the keyboard.
7.5 Main code program
The complete code reference file RGB.py.
1. import RPi.GPIO as GPIO 2. import time 3. import threading |
First import the library used to control the Raspberry Pi GPIO, and instantiate it as a GPIO while importing it. Import the time library for code delay.
1. left_R = 22 2. left_G = 23 3. left_B = 24 4. 5. right_R = 10 6. right_G = 9 7. right_B = 25 |
The RGB LED is connected to the pin number of the Raspberry Pi, here we use BCM coding.
1. class RGBctrl(threading.Thread): 2. def __init__(self): 3. pass 4. 5. def setupTest(self, Rpin, Gpin, Bpin): 6. global pins 7. global pwmR, pwmG, pwmB 8. pins = {"pin_R":Rpin, "Pin_G":Gpin, "pin_B":Bpin} 9. GPIO.setmode(GPIO.BCM) 10. for i in pins: 11. GPIO.setup(pins[i], GPIO.OUT) # Set the pin mode to output 12. GPIO.output(pins[i], GPIO.LOW) # Set the pin to low(0V) to off led 13. 14. pwmR = GPIO.PWM(pins['pin_R'], 50) # Set Frequece to 50Hz 15. pwmG = GPIO.PWM(pins['Pin_G'], 50) 16. pwmB = GPIO.PWM(pins['pin_B'], 50) 17. 18. pwmR.start(0) # Initial duty Cyle = 0(leds off) 19. pwmG.start(0) 20. pwmB.start(0) 21. 22. def map(self, x, in_min, in_max, out_min, out_max): # Map 0-255 to 0-100 23. return (x - in_min) / (in_max - in_min) * (out_max - out_min) +out_min 24. 25. def off(self): 26. for i in pins: 27. GPIO.output(pins[i], GPIO.LOW) 28. def setColor(self, col): # Col is a 6-digit hexadecimal number. E.g: 0X112233 29. R_val = (col & 0xff0000) >> 16 # Extract the value of the highest two digits. E.g: 11 30. G_val = (col & 0x00ff00) >> 8 31. B_val = (col & 0x0000ff) >> 0 # Extract the value of the lowest two digits. E.g: 33 32. 33. R_val = self.map(R_val, 0, 255, 0, 100) # Map 0-255 to 0-100. 34. G_val = self.map(G_val, 0, 255, 0, 100) 35. B_val = self.map(B_val, 0, 255, 0, 100) 36. 37. pwmR.ChangeDutyCycle(R_val) # Change the duty cycle,change rhe color brightness. 38. pwmG.ChangeDutyCycle(G_val) 39. pwmB.ChangeDutyCycle(B_val) 40. 41. def destroy(self): 42. pwmR.stop() # Turn off PWM. 43. pwmG.stop() 44. pwmB.stop() 45. self.off() # Turn off all leds. 46. GPIO.cleanup() # Reset GPIO status. |
Define related functions.
1. if __name__ == "__main__": 2. try: 3. RGBCtrl_1 = RGBctrl() 4. RGBCtrl_1.setupTest(left_R, left_G, left_B) # Set RGB pin number. 5. while True: 6. RGBCtrl_1.setColor(0xff0000) 7. time.sleep(1) 8. RGBCtrl_1.setColor(0x00ff00) 9. time.sleep(1) 10. except KeyboardInterrupt: 11. RGBctrl().destroy()
|
Instantiate the function and cycle the RGB lights to different colors.