Lesson 8 How to Control WS2812 LED
In this lesson, we will learn how to control WS2812 LED.
8.1 Components used in this course
Components | Quantity | Picture |
Raspberry Pi | 1 |
|
Motor HAT | 1 |
|
3 pin wire | 1 |
|
WS2812 RGB LED | 1 |
|


8.2 Introduction of WS2812 RGB LED
WS2812 RGB module is a low-power RGB tri-color lamp with integrated current control chip. Its appearance is the same as a 5050LED lamp bead, and each element is a pixel. The pixel contains an intelligent digital interface data latch signal shaping amplifier driving circuit, and also contains a high-precision internal oscillator and a 12V high-voltage programmable constant current control part, which effectively guarantees that the color of the pixel light is highly consistent.
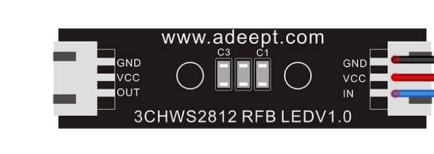
WS2812 LED is a very commonly used module on our robot products. There are three WS2812 LEDS on each module. Pay attention to the direction of the signal line when connecting. The signal line needs to be connected to the “IN” port of WS2812 LED after being led from the Raspberry Pi. When the next WS2812 LED needs to be connected, we connect a signal wire drawn from the "OUT" port of the previous WS2812 LED with the "IN" port of the next WS2812 LED.
When using the Raspberry Pi to install the driver board RobotHAT, the WS2812 LED can be connected to the WS2812 interface on the RobotHAT using a 3pin cable.
We use a third-party library [rpi_ws281x] to control the WS2812 LED. You can learn about it via https://github.com/richardghirst/rpi_ws281x.
If you connect the WS2812 LED to the WS2812 interface of RobotHAT, the signal line is equivalent to connecting to the GPIO 12 of the Raspberry Pi.
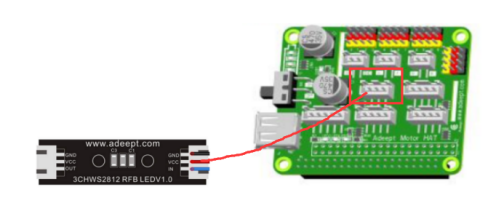
8.3 Wiring diagram (Circuit diagram)
When the WS2812 LED is in use, the IN port needs to be connected to the WS2812 port on the Motor HAT driver board, as shown in the figure below:
8.4 How to control WS2812 LED
Run the code
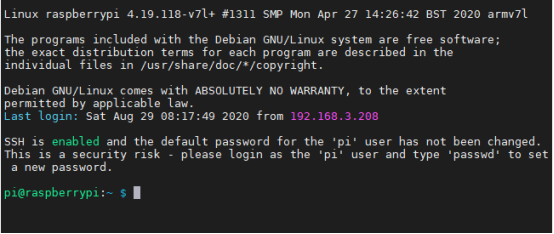
1. Remotely log in to the Raspberry Pi terminal.
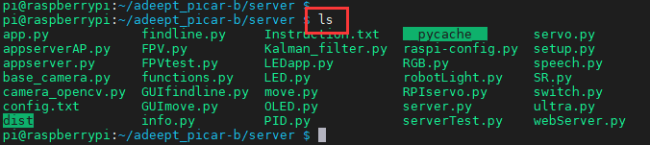
2. Enter the command and press Enter to enter the folder where the program is located:
cd adeept_picar-b/server/

3. View the contents of the current directory file:
ls
4. Enter the command and press Enter to run the program:
sudo killall python3

If an error is reported when running the LED.py program, please check the Q&A of this tutorial.
sudo python3 LED.py

5. After running the program successfully, you will observe that the WS2812 alternately flashing red, green and blue lights.
6. When you want to terminate the running program, you can press the shortcut key "Ctrl + C" on the keyboard.
7.5 Main code program
For the complete code, please refer to the file LED.py.
1. import time 2. from rpi_ws281x import * |
Import dependency.
1. class LED: 2. def __init__(self): 3. self.LED_COUNT = 16 # Set to the total number of LED lights on the robot product, which can be more than the total number of LED lights connected to the Raspberry Pi 4. self.LED_PIN = 12 # Set as the input pin number of the LED lamp group 5. self.LED_FREQ_HZ = 800000 6. self.LED_DMA = 10 7. self.LED_BRIGHTNESS = 255 8. self.LED_INVERT = False 9. self.LED_CHANNEL = 0 10. 11. # Use the configuration items above to create a strip 12. self.strip = Adafruit_NeoPixel( 13. self.LED_COUNT, 14. self.LED_PIN, 15. self.LED_FREQ_HZ, 16. self.LED_DMA, 17. self.LED_INVERT, 18. self.LED_BRIGHTNESS, 19. self.LED_CHANNEL 20. ) 21. self.strip.begin() 22. 23. def colorWipe(self, R, G, B): # This function is used to change the color of the LED 24. color = Color(R, G, B) 25. for i in range(self.strip.numPixels()): # Only one LED light color can be set at a time, so a cycle is required 26. self.strip.setPixelColor(i, color) 27. self.strip.show() # After calling the show method, the color will really change |
Build LED control class.
1. if __name__ == '__main__': 2. led= LED() 3. try: 4. while 1: 5. led.colorWipe(25, 0, 0) #All lights turn red 6. time.sleep(1) 7. led.colorWipe(0, 25, 0) # All lights turn green 8. time.sleep(1) 9. led.colorWipe(0, 0, 25) # All lights turn blue 10. time.sleep(1) 11. except: 12. LED.colorWipe(0,0,0) #Turn off all lights |
The above code will control all the WS2812 lights to switch among the three colors, press CTRL+C to exit the program.
If you want to control the color of a single light, you can use the following code to achieve, where i is the serial number of the light, the serial number of the first light connected to the signal line from the driver board is 0, and the serial number of the second light is 1. , And so on, R, G, B are the brightness corresponding to the three color channels:
LED.strip.setPixelColor(i, Color(R, G, B))
LED.strip.show()
Note: You must use the Color() method to pack the RGB value, and then pass it to setPixelColor().
7.6 Q&A
l If an error message appears after running the program: RuntimeError: ws2811_init failed with code -5.(mmap() failed)
Please use "sudo" to run the program.
l If an error message appears after running the program: RuntimeError: ws2811_init failed with code -3 (Hardware revision is not supported)
1. Run in the Raspberry Pi command line:
cd ../..
sudo pip3 install rpi_ws281x --upgrade
2. Then run the product program:
sudo python3 adeept_picar-b/server/LED.py
Test whether it can be used. If you can run the program normally, please skip all the steps below. if an error occurs, if an error occurs,please continue with the following operations.
RuntimeError: ws2811_init failed with code -3 (Hardware revision is not supported)
3. Delete the rpi_ws281x library file:
sudo pip3 uninstall rpi_ws281x
4. Download the libraries needed to manually install the dependent libraries:
sudo apt-get update
sudo apt-get install gcc make build-essential python-dev scons swig
5. Download the ws2812 source code:
git clone https://github.com/jgarff/rpi_ws281x.git
6. View the CPU information of the Raspberry Pi.
sudo nano //proc/cpuinfo
Find the last few lines in the file
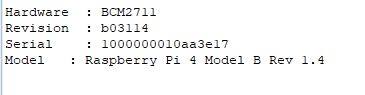
Information to remember: (used for the file to be modified next)
Revision:b03114 Model : Raspberry Pi 4 Model B Rev 1.4 |
Exit via "Ctrl + X".
The above information can know the version number of the Raspberry Pi CPU: b03114
7. Modify the downloaded rpi_ws281x file.
sudo nano rpi_ws281x/rpihw.c
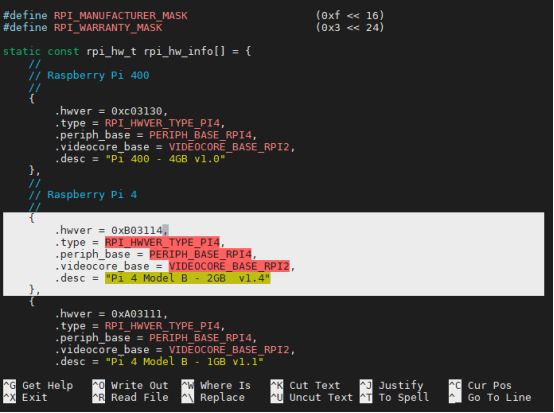
Add the following information, the red part needs to be modified to your Raspberry Pi CPU information.
{ .hwver = 0x+Revision, .type = RPI_HWVER_TYPE_PI4, .periph_base = PERIPH_BASE_RPI4, .videocore_base = VIDEOCORE_BASE_RPI2, .desc = "Pi 4 Model B - 2GB v1.4" }, |
CPU information "Model: Raspberry Pi 4 Model B Rev 1.4" so write v1.4 in .desc
If your "Model: Raspberry Pi 4 Model B Rev 1.2" write v1.2 in .desc.
For example: (the white part is newly added)
Save and exit with "Ctrl + X", "Y", "Enter". (文件中已有的树莓派CPU版本号是官方已经兼容的)
8. Compile the downloaded code.
cd rpi_ws281x/
sudo scons
9. Install rpi_ws281x dependency library.
cd python
sudo python3 setup.py build
sudo python3 setup.py install
10. Update dependent libraries.
sudo pip3 install rpi-ws281x --upgrade
11. Run the program code:
cd ../..
sudo python3 adeept_picar-b/server/LED.py
If the above method is not compatible with your Raspberry Pi version (for example: c03114), you need to wait for the compatibility update of ws281x dependent libraries, so this module is temporarily not available. This module needs to be shielded in order not to affect other functions of the robot.
Modify the adept_picar-b/server/robotLight.py file to the following content.
#!/usr/bin/env python3 # Description : Control lights import time import RPi.GPIO as GPIO import sys # from rpi_ws281x import * import threading
class RobotLight(threading.Thread): def __init__(self, *args, **kwargs): self.LED_COUNT = 16 # Number of LED pixels. self.LED_PIN = 12 # GPIO pin connected to the pixels (18 uses PWM!). self.LED_FREQ_HZ = 800000 # LED signal frequency in hertz (usually 800khz) self.LED_DMA = 10 # DMA channel to use for generating signal (try 10) self.LED_BRIGHTNESS = 255 # Set to 0 for darkest and 255 for brightest self.LED_INVERT = False # True to invert the signal (when using NPN transistor leve shift) self.LED_CHANNEL = 0 # set to '1' for GPIOs 13, 19, 41, 45 or 53
self.colorBreathR = 0 self.colorBreathG = 0 self.colorBreathB = 0 self.breathSteps = 10
self.lightMode = 'none' #'none' 'police' 'breath'
GPIO.setwarnings(False) GPIO.setmode(GPIO.BCM) GPIO.setup(5, GPIO.OUT) GPIO.setup(6, GPIO.OUT) GPIO.setup(13, GPIO.OUT)
# Create NeoPixel object with appropriate configuration. # self.strip = Adafruit_NeoPixel(self.LED_COUNT, self.LED_PIN, self.LED_FREQ_HZ, self.LED_DMA, self.LED_INVERT, self.LED_BRIGHTNESS, self.LED_CHANNEL) # Intialize the library (must be called once before other functions). # self.strip.begin()
super(RobotLight, self).__init__(*args, **kwargs) self.__flag = threading.Event() self.__flag.clear()
# Define functions which animate LEDs in various ways. def setColor(self, R, G, B): # """Wipe color across display a pixel at a time.""" # color = Color(int(R),int(G),int(B)) # for i in range(self.strip.numPixels()): # self.strip.setPixelColor(i, color) # self.strip.show() pass
def setSomeColor(self, R, G, B, ID): # color = Color(int(R),int(G),int(B)) # #print(int(R),' ',int(G),' ',int(B)) # for i in ID: # self.strip.setPixelColor(i, color) # self.strip.show() pass
def pause(self): # self.lightMode = 'none' # self.setColor(0,0,0) # self.__flag.clear() pass
def resume(self): # self.__flag.set() pass
def police(self): # self.lightMode = 'police' # self.resume() pass
def policeProcessing(self): # while self.lightMode == 'police': # for i in range(0,3): # self.setSomeColor(0,0,255,[0,1,2,3,4,5,6,7,8,9,10,11]) # time.sleep(0.05) # self.setSomeColor(0,0,0,[0,1,2,3,4,5,6,7,8,9,10,11]) # time.sleep(0.05) # if self.lightMode != 'police': # break # time.sleep(0.1) # for i in range(0,3): # self.setSomeColor(255,0,0,[0,1,2,3,4,5,6,7,8,9,10,11]) # time.sleep(0.05) # self.setSomeColor(0,0,0,[0,1,2,3,4,5,6,7,8,9,10,11]) # time.sleep(0.05) # time.sleep(0.1) pass
def breath(self, R_input, G_input, B_input): # self.lightMode = 'breath' # self.colorBreathR = R_input # self.colorBreathG = G_input # self.colorBreathB = B_input # self.resume() pass
def breathProcessing(self): # while self.lightMode == 'breath': # for i in range(0,self.breathSteps): # if self.lightMode != 'breath': # break # self.setColor(self.colorBreathR*i/self.breathSteps, self.colorBreathG*i/self.breathSteps, self.colorBreathB*i/self.breathSteps) # time.sleep(0.03) # for i in range(0,self.breathSteps): # if self.lightMode != 'breath': # break # self.setColor(self.colorBreathR-(self.colorBreathR*i/self.breathSteps), self.colorBreathG-(self.colorBreathG*i/self.breathSteps), self.colorBreathB-(self.colorBreathB*i/self.breathSteps)) # time.sleep(0.03) pass
def frontLight(self, switch): # if switch == 'on': # GPIO.output(6, GPIO.HIGH) # GPIO.output(13, GPIO.HIGH) # elif switch == 'off': # GPIO.output(5,GPIO.LOW) # GPIO.output(13,GPIO.LOW) pass
def switch(self, port, status): # if port == 1: # if status == 1: # GPIO.output(5, GPIO.HIGH) # elif status == 0: # GPIO.output(5,GPIO.LOW) # else: # pass # elif port == 2: # if status == 1: # GPIO.output(6, GPIO.HIGH) # elif status == 0: # GPIO.output(6,GPIO.LOW) # else: # pass # elif port == 3: # if status == 1: # GPIO.output(13, GPIO.HIGH) # elif status == 0: # GPIO.output(13,GPIO.LOW) # else: # pass # else: # print('Wrong Command: Example--switch(3, 1)->to switch on port3') pass
def set_all_switch_off(self): # self.switch(1,0) # self.switch(2,0) # self.switch(3,0) pass
def headLight(self, switch): # if switch == 'on': # GPIO.output(5, GPIO.HIGH) # elif switch == 'off': # GPIO.output(5,GPIO.LOW) pass
def lightChange(self): # if self.lightMode == 'none': # self.pause() # elif self.lightMode == 'police': # self.policeProcessing() # elif self.lightMode == 'breath': # self.breathProcessing() pass
def run(self): # while 1: # self.__flag.wait() # self.lightChange() pass
if __name__ == '__main__': # RL=RobotLight() # RL.start() # RL.breath(70,70,255) # time.sleep(15) # RL.pause() # RL.frontLight('off') # time.sleep(2) # RL.police() pass |
If you want to use this module, modify adept_picar-b/server/robotLight.py to:
https://github.com/adeept/adeept_picar-b/blob/master/server/robotLight.py