Lesson 9 How to Control the Ultrasonic Module
In this lesson, we will learn how to read the data of the RGB ultrasonic ranging module.
9.1 Components used in this course
Components | Quantity | Picture |
Raspberry Pi | 1 |
|
Robot HAT | 1 |
|
ultrasonic module | 1 |
|
4 pin wire | 1 |
|


9.2 Introduction of RGB ultrasonic ranging module
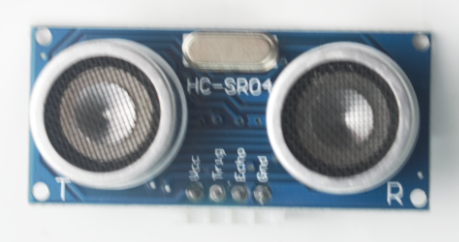
The ultrasonic ranging module used in our PiCarPro product has four pins, namely VCC, GND, Echo and Trig. The HC-SR04 can provide a non-contact distance sensing function of 2cm-400cm, and the ranging accuracy can reach 3mm; The module includes an ultrasonic transmitter, receiver and control circuit. The basic working principle is as follows:
Use IO port TRIG to trigger distance measurement, and give a high level signal of at least 10us.
The module automatically sends eight 40khz square waves, and automatically detects whether there is a signal return.
There is a signal return, and a high level is output with the IO port ECHO. The duration of the high level is the time from emission to return of the ultrasonic wave.
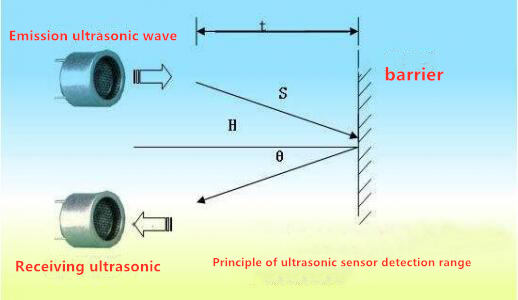
The principle of distance detection by ultrasonic ranging sensor: the method of detecting distance by ultrasonic is called echo detection method, that is, the ultrasonic transmitter emits ultrasonic waves in a certain direction, and the timer starts timing at the same time as the launch time. The ultrasonic waves propagate in the air and encounter obstacles on the way. When the object surface (object) is blocked, it will be reflected back immediately, and the ultrasonic receiver will immediately stop timing when the reflected ultrasonic wave is received. The propagation speed of ultrasonic waves in the air is 340m/s. According to the time t recorded by the timer, the distance s from the launch point to the obstacle surface can be calculated, namely: s=340t/2. Using this principle of ultrasound, the ultrasonic ranging module is widely used in practical applications, such as car reversing radar, unmanned aerial vehicle, and smart car.
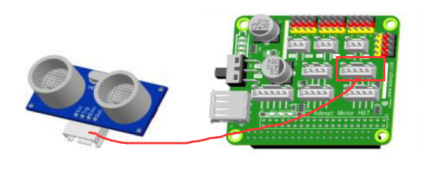
When using Robot HAT driver board, the ultrasonic sensor needs to be connected to the Ultrasonic interface on the driver board, and must not be connected to the IIC port to avoid burning the ultrasonic module. (IIC is an interface used to connect I2C devices, and the pin positions of VCC and GND are different from Ultrasonic).
9.3Wiring diagram (Circuit diagram)
When using Robot HAT driver board, you need to connect the ultrasonic sensor to the Ultrasonic interface on the driver board. Do not connect it to the IIC port to avoid burning the ultrasonic module. (IIC is an interface used to connect I2C devices, and the pin positions of VCC and GND are different from Ultrasonic).
9.4 Obtain data from ultrasonic sensors
Run the code
1. Remotely log in to the Raspberry Pi terminal.
2. Enter the command and press Enter to enter the folder where the program is located:
cd adeept_picar-b/server/

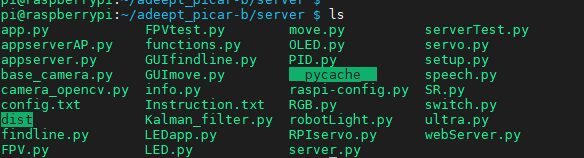
3. View the contents of the current directory file:
ls
4. Enter the command and press Enter to run the program:
sudo python3 ultra.py
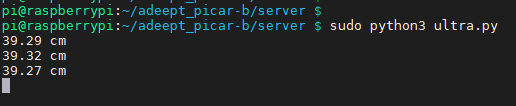
5. After successfully running the program, the command window will display the distance data of the obstacle detected by the ultrasonic sensor. When you use an object to approach it directly in front of the ultrasonic sensor, the detected distance data will change.
6. When you want to terminate the running program, you can press the shortcut key "Ctrl + C" on the keyboard.
9.5 The main code program of this lesson
For the complete code, please refer to the file ultra.py.
1. import RPi.GPIO as GPIO 2. import time 3. 4. Tr = 11 # The pin number of the input end of the ultrasonic module 5. Ec = 8 # Pin number of the output end of the ultrasonic module 6. 7. GPIO.setmode(GPIO.BCM) 8. GPIO.setup(Tr, GPIO.OUT,initial=GPIO.LOW) 9. GPIO.setup(Ec, GPIO.IN) |
Import the dependent library and initialize it.
1. def checkdist(): 2. GPIO.output(Tr, GPIO.HIGH) # Set the input terminal of the module to high level and send out an initial sound wave. 3. time.sleep(0.000015) 4. GPIO.output(Tr, GPIO.LOW) 5. 6. while not GPIO.input(Ec): # When the module no longer receives the initial sound wave ① 7. pass 8. t1 = time.time() # Write down the time when the initial sound wave was emitted. 9. while GPIO.input(Ec): # When the module receives the return sound wave. 10. pass 11. t2 = time.time() # Write down the time when the return sound wave was captured. 12. 13. return (t2-t1)*340/2 # Calculate the distance. |
Define the ranging function. When the ultrasound module captures ultrasound, its output terminal will output high frequency. The GPIO.input method can determine whether the output terminal is outputting high-frequency signals.
1. if __name__ == '__main__': 2. while 1: 3. distance = checkdist()*100 4. print("%.2f cm" %distance) 5. time.sleep(1) |
The ultrasonic module measures the distance and displays the data on the console.