Lesson 5 Introduce automatic obstacle avoidance function
In this lesson, we will learn how to use PiCar-b to achieve automatic obstacle avoidance.
5.1 Introduction to Automatic Obstacle Avoidance
Since the camera used by our Raspberry Pi robot is a monocular camera and cannot collect depth information, many of our robot products use ultrasonic ranging modules to obtain depth information and detect whether there are obstacles in a certain direction to get the distance of the obstacle.
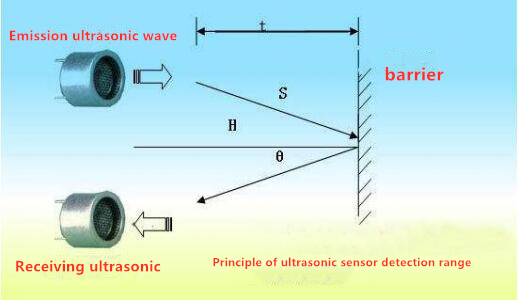
The principle of distance detection by ultrasonic ranging sensor: the method of detecting distance by ultrasonic is called echo detection method, that is, the ultrasonic transmitter emits ultrasonic waves in a certain direction, and the timer starts timing at the same time as the launch time. The ultrasonic waves propagate in the air and encounter obstacles on the way. When the object surface (object) is blocked, it will be reflected back immediately, and the ultrasonic receiver will immediately stop timing when the reflected ultrasonic wave is received. The propagation speed of ultrasonic waves in the air is 340m/s. According to the time t recorded by the timer, the distance s from the launch point to the obstacle surface can be calculated, namely: s=340t/2. Using this principle of ultrasound, the ultrasonic ranging module is widely used in practical applications, such as car reversing radar, unmanned aerial vehicle, and smart car.
5.2 Turning on Automatic Obstacle Avoidance function
Running the Automatic Obstacle Avoidance program
1. Turn on PiCar-b, the boot time is about 30s-60s.
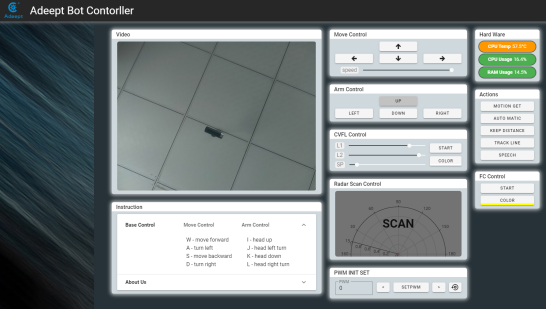
2. After PiCar-b is turned on, enter the IP address of your Raspberry Pi with the Google browser of your mobile phone or computer, and access port 5000, for example: 192.168.3.44:5000 . The web controller will then be displayed on the browser.
3. Place the car on the prepared patrol track.
4. After clicking "AUTO MATIC", the robot will automatically avoid obstacles when encountering obstacles. .
5. When you want to terminate the Automatic Obstacle Avoidance function, you can click "AUTO MATIC" again.
5.3 The main code program of this lesson
For the complete code, please refer to the file functions.py.
Import dependencies and initialize.
1. import time 2. import RPi.GPIO as GPIO 3. import json 4. import Adafruit_PCA9685 5. 6. pwm = Adafruit_PCA9685.PCA9685() 7. pwm.set_pwm_freq(50) 8. 9. Tr = 11 #Pin No. of Ultrasonic Module Input 10. Ec = 8 # Pin number of the output end of the ultrasonic module 11. servoPort = 1 #The number of the servo that controls the horizontal rotation of the ultrasonic module 12. servoMiddle = 330 #The middle position of the servo 13. servoLeft = 180 #Left position of the servo 14. servoRight = 480 #The right position of the servo 15. rangeKeep = 0.3 #Avoidance distance 16. 17. scanDir = 1 #Scan direction, 1 is from left to right, -1 is from right to left 18. scanPos = 1 #Store the current scan position (1 is the left, 2 is the middle, and 3 is the right) 19. scanNum = 3 #The number of scan positions (left, middle, and right, these are three positions) 20. 21. scanList = [0,0,0] #Save scan results 22. 23. GPIO.setmode(GPIO.BCM) 24. GPIO.setup(Tr, GPIO.OUT,initial=GPIO.LOW) 25. GPIO.setup(Ec, GPIO.IN) |
Main logic code
1. def checkdist(): 2. ''' Refer to the realization of basic functions-ultrasonic module ''' 3. 4. while 1: 5. print('Automatic obstacle avoidance mode') 6. if scanPos == 1: 7. pwm.set_pwm(servoPort, 0, servoLeft) 8. time.sleep(0.3) 9. scanList[0] = checkdist() 10. elif scanPos == 2: 11. pwm.set_pwm(servoPort, 0, servoMiddle) 12. time.sleep(0.3) 13. scanList[1] = checkdist() 14. elif scanPos == 3: 15. pwm.set_pwm(servoPort, 0, servoRight) 16. time.sleep(0.3) 17. scanList[2] = checkdist() 18. 19. scanPos = scanPos + scanDir 20. 21. if scanPos > scanNum or scanPos < 1: 22. if scanDir == 1:scanDir = -1 23. elif scanDir == -1:scanDir = 1 24. scanPos = scanPos + scanDir*2 25. print(scanList) 26. 27. if min(scanList) < rangeKeep: 28. if scanList.index(min(scanList)) == 0: #The shortest distance detected on the left 29. ''' 30. Turn right 31. ''' 32. print('Turn right') 33. elif scanList.index(min(scanList)) == 1: #The shortest distance detected in the middle 34. if scanList[0] < scanList[2]: 35. ''' 36. If the detected distance on the left is shorter than the right, turn to the right 37. ''' 38. print('Turn right') 39. else: 40. ''''' 41. Otherwise, turn left 42. ''' 43. print('Turn left') 44. elif scanList.index(min(scanList)) == 2: #The shortest distance detected on the right 45. ''' 46. Turn Left 47. ''' 48. print('Turn Left') 49. if max(scanList) < rangeKeep: 50. ''' 51. If the distances in the left, center, and right directions are all closer than rangeKeep, reverse 52. ''' 53. print('reverse') 54. else: 55. ''' 56. All three directions are farther than rangeKeep 57. ''' 58. print('Go forward') |