Lesson 11 Performing Color Detection with OpenCV
In this tutorial we will learn how to detect colors using OpenCV.
11.1 Color Detection & Color Space
l Refer to Lesson 10 for preparations and running operations for OpenCV function
l The code of the color detection function to be explained here is included in the camera_opencv.py file which was created in the same folder with the app.py and base_camera.py files.
l For safety reason, in this lesson we will not control the motor or serve to move but just obtain the results calculated with OpenCV.
l HSV color space is adopted for color detection with OpenCV. Before learning the code, first you need to know what color space is and why HSV is used here instead of the more commonly seen RGB color space.
Color Space
Color space refers to a method of organizing colors. With the help of color space and tests of physical devices, we can get a certain analog and digital representation of colors. Color space can be defined by random colors. For example, Pantone series uses a group of specific colors as sample, and define each color with a name and code. Or, define it mathematically like Adobe RGB, sRGB, etc.
RGB Color Space
RGB uses additive colors as it describes a specific proportion by which various kinds of "light" produces colors. Starting from black, light keeps mixing to generate different colors. RGB means the value of red, green, and blue; RGBA produces a transparent color based on RGB with the alpha channel.
Common color spaces based on the RGB mode include sRGB, Adobe RGB and Adobe Wide Gamut RGB.
HSV Color Space
HSV, or hue, saturation, and value, also referred to as HSB (B for brightness), is commonly used by artists because it's more understandable to describe color by hue and saturation compared with terms of additive or subtractive color mixing. HSV is a variant of RGB color space and closely related in content and color standards as it derives from RGB.
HSV color space is used for color detection with OpenCV since it's less effected by ambient light and brings more accurate detection results. Besides, it's easy to define color range with HSV. During color detection, the code is to recognize some range of colors instead of some color. Therefore, the HSV color space is used for color detection since it is similar to the human perception of color.
Here we use this function to aim the camera at a target of a specific color with the function. The process is as follows:
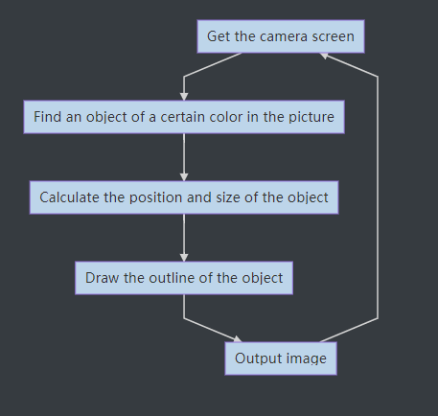
11.2 Running Color Detection
Power on the robot; it may take 30s-50s (it will automatically run the webServer.py when booting up).
After booting up, open a Google Chrome web browser on your mobile or computer, enter the address of your Raspberry Pi and ":port number". For example, 192.168.3.44:5000, and then the web controller will be shown on the browser.
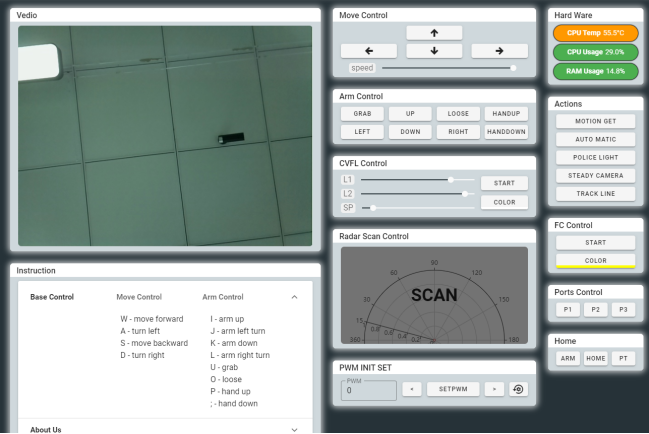
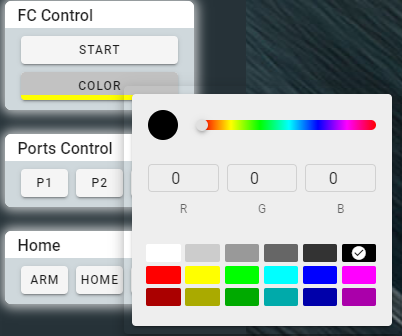
1. Click the COLOR button in the FC Control section, select the color to be detected (yellow is selected by default).
2. After selecting the color, click START to start the color detection.
3. Click START again to end the detection.
11.3 Main Program
Refer to the camera_opencv.py file for more details.
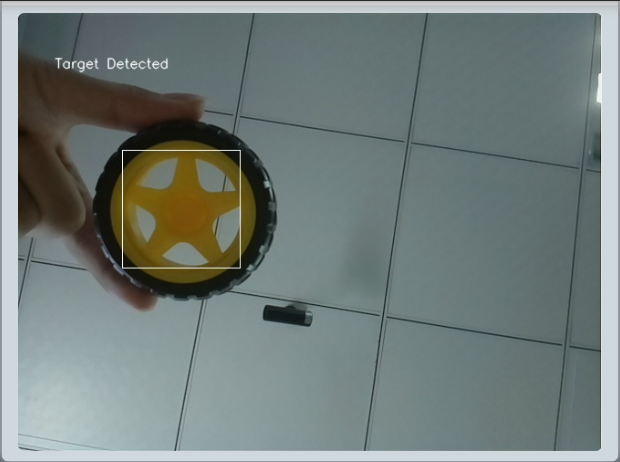
1. import os 2. import cv2 3. from base_camera import BaseCamera 4. import numpy as np 5. 6. ''''' 7. Configure target color and HSV color space 8. ''' 9. colorUpper = np.array([44, 255, 255]) 10. colorLower = np.array([24, 100, 100]) 11. 12. font = cv2.FONT_HERSHEY_SIMPLEX 13. 14. class Camera(BaseCamera): 15. video_source = 0 16. 17. def __init__(self): 18. if os.environ.get('OPENCV_CAMERA_SOURCE'): 19. Camera.set_video_source(int(os.environ['OPENCV_CAMERA_SOURCE'])) 20. super(Camera, self).__init__() 21. 22. @staticmethod 23. def set_video_source(source): 24. Camera.video_source = source 25. 26. @staticmethod 27. def frames(): 28. camera = cv2.VideoCapture(Camera.video_source) 29. if not camera.isOpened(): 30. raise RuntimeError('Could not start camera.') 31. 32. while True: 33. # read current frame 34. _, img = camera.read() #Obtain images captured by the camera 35. 36. hsv = cv2.cvtColor(img, cv2.COLOR_BGR2HSV) #Transfrom the images to HSV color space 37. mask = cv2.inRange(hsv, colorLower, colorUpper) #Loop to detect the color based on the target color range in the HSV color space, and turn the color blocks into masks 38. mask = cv2.erode(mask, None, iterations=2) #Erode and diminish the small masks (hot pixels) in the image (eliminate small color blocks or hot pixels) 39. mask = cv2.dilate(mask, None, iterations=2) #Dilate, to resize the large masks eroded in the previous line to the original 40. cnts = cv2.findContours(mask.copy(), cv2.RETR_EXTERNAL, 41. cv2.CHAIN_APPROX_SIMPLE)[-2] #Find masks in the image 42. center = None 43. if len(cnts) > 0: #If the number of masks is more than 1, 44. ''''' 45. Find the coordinate of the center and size of the target color object in the image 46. ''' 47. c = max(cnts, key=cv2.contourArea) 48. ((box_x, box_y), radius) = cv2.minEnclosingCircle(c) 49. M = cv2.moments(c) 50. center = (int(M["m10"] / M["m00"]), int(M["m01"] / M["m00"])) 51. X = int(box_x) 52. Y = int(box_y) 53. ''''' 54. Obtain and output the coordinate of the center of the target color object 55. ''' 56. print('Target color object detected') 57. print('X:%d'%X) 58. print('Y:%d'%Y) 59. print('-------') 60. 61. ''''' 62. Show the text "Target Detected" in the image 63. ''' 64. cv2.putText(img,'Target Detected',(40,60), font, 0.5,(255,255,255),1,cv2.LINE_AA) 65. ''''' 66. Mark the target with a frame 67. ''' 68. cv2.rectangle(img,(int(box_x-radius),int(box_y+radius)), 69. (int(box_x+radius),int(box_y-radius)),(255,255,255),1) 70. else: 71. cv2.putText(img,'Target Detecting',(40,60), font, 0.5,(255,255,255),1,cv2.LINE_AA) 72. print('No target color object detected') 73. 74. # encode as a jpeg image and return it 75. yield cv2.imencode('.jpg', img)[1].tobytes() |
You can select the color to be detected by changing the colorUpper and colorLower. Note that the H value of general HSV color space is 0-360, but in OpenCV it's 0-180.
11.4 HSV Color Component Range in OpenCV
Generally the H (hue) value of HSV color space ranges from 0-360, yet 0-180 in OpenCV.
HSV\Color | Black | gray | white | red | orange | yellow | green | cyan | blue | purple | |
H_min | 0 | 0 | 0 | 0 | 156 | 11 | 26 | 35 | 78 | 100 | 125 |
H_max | 180 | 180 | 180 | 10 | 180 | 25 | 34 | 77 | 99 | 124 | 155 |
S_min | 0 | 0 | 0 | 43 | 43 | 43 | 43 | 43 | 43 | 43 | |
S_max | 255 | 43 | 30 | 255 | 255 | 255 | 255 | 255 | 255 | 255 | |
V_min | 0 | 46 | 221 | 46 | 46 | 46 | 46 | 46 | 46 | 46 | |
V_max | 46 | 220 | 255 | 255 | 255 | 255 | 255 | 255 | 255 | 255 | |