Lesson 1 Introducing Web Controller UI
1.1 Running webServer.py Program
l Raspberry Pi will automatically run the program of the robot every time it reboots. Specifically, it will run adeept_rasptank/server/webServer.py, but if the Raspberry Pi camera or the driver board Motor HAT is not connected, webServer.py will not run. It's normal because the program of the robot needs to use the camera and PCA9685 chip. The Adeept Motor HAT controls servo via PCA9685, while the Raspberry Pi communicates with PCA9685 through I2C. If Motor HAT is not installed on the Raspberry Pi, when instantiating the dependent library of PCA9685, a communication failure will occur with a program error.
l You can power off the Raspberry, install the camera module and Motor HAT, and reboot. Then webServer.py can run successfully.
l Under normal circumstances, you don't need to manually run webServer.py since the Raspberry Pi will automatically run the program when booting.
l If you failed to open the page, you can remotely log into the Raspberry Pi via SSH and type in the command as shown below to disable all auto-run programs to release resource. Otherwise, there may be issues like camera initialization failure or occupied port.
sudo killall python3

l Type in the following code to run webServer.py:
sudo python3 adeept_rasptank/server/webServer.py
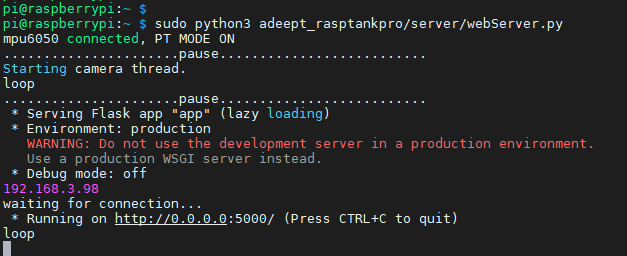
l You can access the Raspberry Pi by IP address through a web browser only when it can successfully run webServer.py.
1.2 Getting Access to Web Controller
l A web controller is a web interface to control the robot product to perform various actions and it can be applied on any device that is able to run a browser, including PC, mobile phones, tablets, etc.
l If you've completed all installations based on the instructional document, it will be quite easy to open a web controller.
1. Check that your device is under the same LAN with the Raspberry Pi.
2. Obtain the Raspberry Pi's IP address (refer to the Software Installation section).
3. Open a web browser (recommended to use Chrome in case of any possible incompatibility with other browsers), enter the Raspberry Pi's IP address with the port :5000, for instance: 192.168.3.44:5000

Then the web controller will be loaded into the browser.
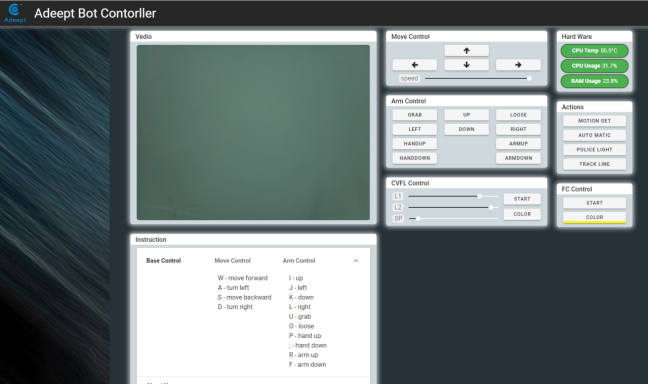
Modules on the web controller may vary from products. Most of them are explained below with the method for application. You can check modules on your web controller accordingly to better understand their functions and how to use them.
1.3 Function Overview of Web Controller
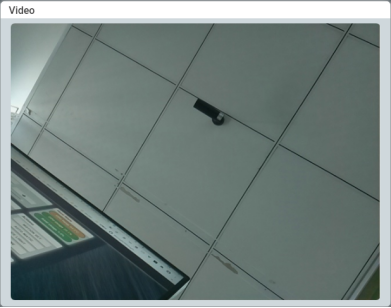
1. Video Module
Display the image captured by the camera.
2. Hard Ware Module
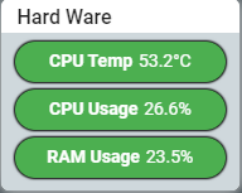
l CPU Temp: Shows the temperature of the Raspberry Pi CPU.
l CPU Usage: Shows the usage of the Raspberry Pi CPU
l RAM Usage: Shows the usage of the Raspberry Pi memory
3. Move Control Module
Control the movement of the robot towards the front, back, left, and right. (To turn left, you need to press "forward" and "left",To go back to the left, you need to press "back" and "left". The same to the right)
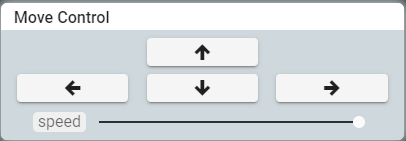
Speed: Slide to adjust the speed of the robot's movement.
4. Arm Control Module
Control the robotic's movements:

l UP: The camera rotates upward.
l DOWN: The camera rotates downward.
l GRAB: clamp the chuck.
l LOOSE: Loosening the chuck.
l LEFT: The chuck turns to the left.
l RIGHT: The chuck turns to the right.
l HAND UP: The robotic hand rotates upward.
l HAND DOWN: The robotic hand rotates downward.
l ARM UP: The robotic arm rotates upward.
l ARM DOWN: The robotic arm rotates downward.
5. Actions Module
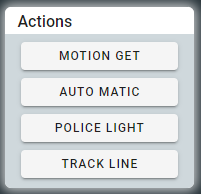
l MOTION GET: switching watchdog mode. In this mode, the robot product stops moving and reacts to the moving objects detected in the camera, and the moving objects are framed in the video of the Vedio module.
l AUTO MATIC: Obstacle avoidance function based on ultrasonic. When the ultrasonic module on the robot detects an obstacle, it will automatically turn left, and take a step backward before turning if it's too close to the obstacle.
l POLICE LIGHT: WS2812-LED light control based on multi-threading. It makes the WS2812-LED light on the robot blink red and blue alternately.
l TRACK LINE: Line tracking function by using the 3-channel infrared module. By default it tracks black lines on a white surface (a white background that reflects infrared, and 1-cm wide black lines that do not reflects infrared). Performance of the line tracking varies from surface and line materials as well as the height of the robot chassis; you may need a cross screwdriver to adjust the potentiometer on the line tracking module.
The line patrol module is converted to the robot's line patrol function design. The three-channel infrared line patrol module contains 3 groups of sensors, where each group of sensors consists of an infrared emitting LED and an infrared sensor photoelectric Transistor composition, the robot determines whether there is a line detected by detecting the infrared light intensity detected by the infrared sensor phototransistor. It can detect the white line (reflected infrared light) on a black background (non-reflected infrared light), and can also detect a white background The black line on (reflects infrared light) (does not reflect infrared light).
Since the Raspberry Pi can only read digital signals, the three-channel infrared tracking module is equipped with a potentiometer. You can use a cross screwdriver to adjust the potentiometer on the infrared tracking module to adjust the sensitivity of the infrared sensor phototransistor.
Our program defaults to finding black lines on a white background (reflecting infrared light) (not reflecting infrared light).
Before using the three-channel infrared line patrol module, you need to connect it to the Tracking interface on Robot HAT using a 5-pin cable.
The three-way infrared line patrol module has an arrow pattern on the back of the sensor. The direction of the arrow is the direction of the robot.
6. FC Control Module
Control the color detection function on/off and color setup.
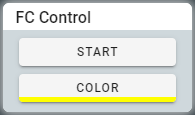
l COLROR: Select the color to be detected.
l START: Turn on/off the color detection function.
1.4 Q&A
l After the Raspberry Pi boots, I can't access the web controller page via "Raspberry Pi's IP address + :5000 (port number)" (e.g., 192.168.3.230:5000)
Take the following steps:
1. Type in the command "sudo killall python3", run the webServer.py program by "sudo python3 <your path of the webserver.py file>"
(e.g., sudo python3 adeept_rasptank/server/webServer.py)
2. If error happens when running webServer.py, please check whether the camera is connected appropriately (metals of the camera flex cable and camera module should be in contact with each other)
l After the Raspberry Pi boots, I got access the web controller page via "Raspberry Pi's IP address + :5000 (port number)", but I saw a non-real-time, static video and couldn't control the robot to move.
Take the following steps:
1. Check whether the Raspberry Pi has rebooted or not. If it has, the "Connect Failed" message would be prompted within 1 minute on the web controller page, and the terminal logged into Raspberry Pi via SSH would not respond.
2. Possible reason for this issue: Low power of the battery. It's suggested to change high power batteries for controlling the robot via web controller.
3. Use 18650 battery with "high rate discharge" mark or that can support large current output of up to 4A.