In this lesson, we will learn how to install and remotely log in to the Raspberry Pi system under Windows. And we will download the code program to control the robot.
1.1 Preparation
(1) When studying this lesson, you need to prepare the following components first:
One SD card that has been formatted (we recommend using an SD card with memory above 16G), 1 card reader, Raspberry Pi development board.
(2) You need to insert the SD card into the card reader first, and then connect the card reader to the computer.
1.2 Downloading the Raspberry Pi system Raspbian
Raspbian is the official OS of the Raspberry Pi Foundation. It is customized based on Debian GNU/Linux and can run on all versions of the Raspberry Pi motherboard. According to the experience, Raspbian combines Raspberry Pi the best. It is stable, powerful, and easy to use. It can basically meet the needs of various applications. This course uses Raspbian as the preferred OS for the Raspberry Pi. Next, we will teach you how to download the Raspberry Pi OS Raspbian. Now there are two ways to download Raspbian for Raspberry Pi OS (we recommend Method One).
Method One :
Raspberry Pi officially provides a Raspberry Pi OS - Raspberry Pi OS (Legacy) for educational and industrial users. The operating system has stable compatibility, and there will be no incompatibility with specific dependencies due to the update of the Raspberry Pi system. It also avoids frequent revision of the tutorial.
Raspberry Pi official description of the Raspberry Pi OS (Legacy):
https://www.raspberrypi.com/news/new-old-functionality-with-raspberry-pi-os-legacy/
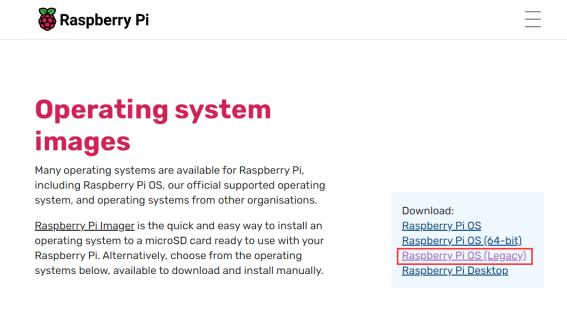
1. visit the official website of the Raspberry Pi through a browser to download Raspbian:
https://www.raspberrypi.com/software/operating-systems/
After entering the Raspberry Pi official website page, click "Raspberry Pi OS (Legacy)" to jump to the corresponding location, or you can find the location of Raspberry Pi OS (Legacy) by sliding the page.
2. Select the Raspberry Pi OS (Legacy) with desktop version, which contains a complete desktop system and recommended software packages.
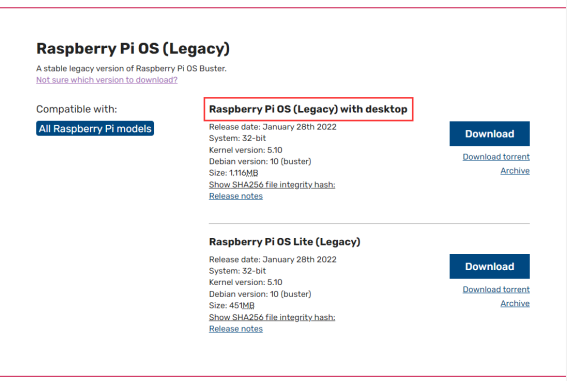
3. Click "Download", download the ".ZIP" file, and wait for the download to complete: (remember where the file is saved).
4. Find the ".ZIP" file you just downloaded, and extract it. The uncompressed file format of the file is ".img". Pay attention, you must name the path of the uncompressed .img file all English letters without special characters.

Method Two:
Due to compatibility issues with the latest Raspberry Pi official image file and the camera. It may cause an error when the Raspberry Pi runs the program. We recommend downloading the official older version of the Raspberry Pi image.(This image file will not change and has been tested in detail and successfully).
Using this image is a good idea to try if you run into problems with dependent libraries in the following lessons.
Raspberry Pi old version image file (2021-5-07) download address:
https://downloads.raspberrypi.org/raspios_armhf/images/raspios_armhf-2021-05-28/
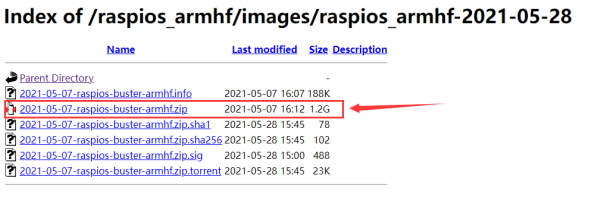
After the download is successful, extract the ZIP file and get a ".img" file.
Method Three:
Downloading the image file we provide.
The image downloaded according to the method one is the official version of Raspbian and comes with some pre-installed software. At the same time, the normal operation of the robot product requires many other dependent libraries, although we provide a script to install these simple methods of relying on libraries (will be introduced in detail later), occasionally encountering dependent library updates may cause the installation of dependent libraries to fail, so we provide a Raspbian mirror file pre-installed with dependent libraries. The disadvantage of this method is that the mirror files and related dependent libraries we provide cannot be kept updated at any time. Only when you encounter a very difficult problem, you can try this method to solve it.Download the Raspbian image file address we provide:https://www.adeept.com/learn/detail-51.html
The content of the PDF "xxx image" on the page is the download address of the image file. After the download is complete, decompress it. The path of the decompressed” .img” file must be all English letters and no special characters.
1.3 Burning the downloaded Raspberry Pi system to the SD card
We recommend using the Raspberry Pi Imager tool officially provided by the Raspberry Pi. Raspberry Pi Imager is a new image burning tool launched by the Raspberry Pi Foundation. Users can download and run this tool on Windows, macOS and Ubuntu to burn the system image for the Raspberry Pi. Its usage is similar to Etcher and win32diskimager.
1.3.1 Downloading Raspberry Pi Imager
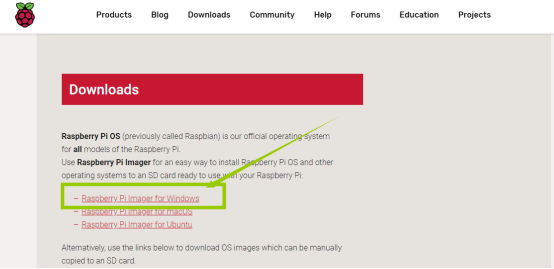
(1) Visit the official website of Raspberry Pi to download through a browser:
https://www.raspberrypi.org/downloads/
Click "Raspberry Pi Imager for Windows" to download. Wait for the download to complete.
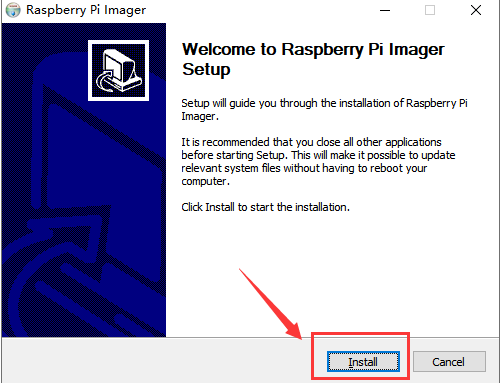
(2) Open the downloaded file "imager.exe" and click "Install".
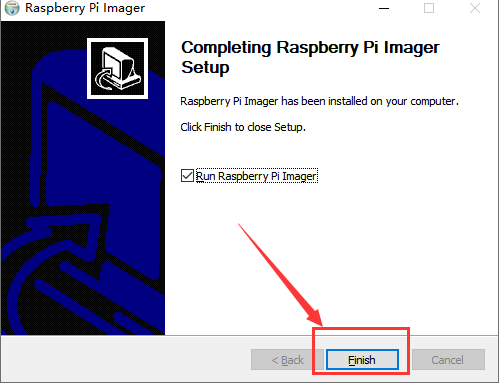
(3) Then click "Finish".
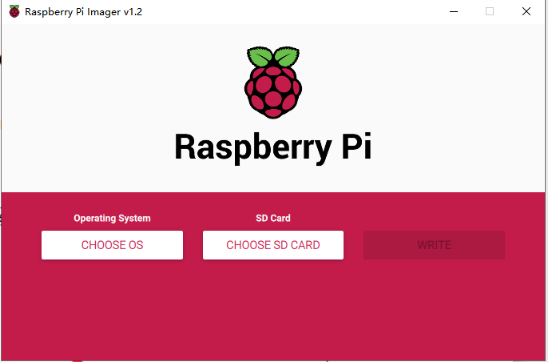
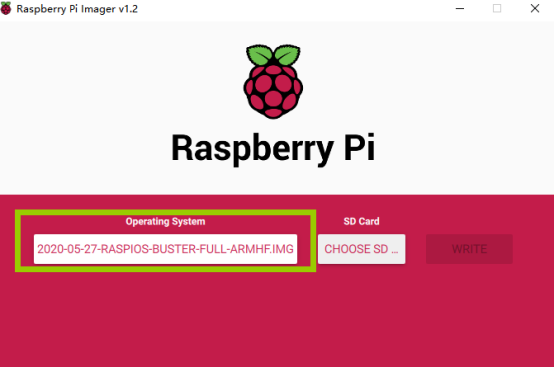
(4) The software interface after opening is as shown below:
1.3.2 Burning Raspberry Pi system to SD card with Raspberry Pi Imager
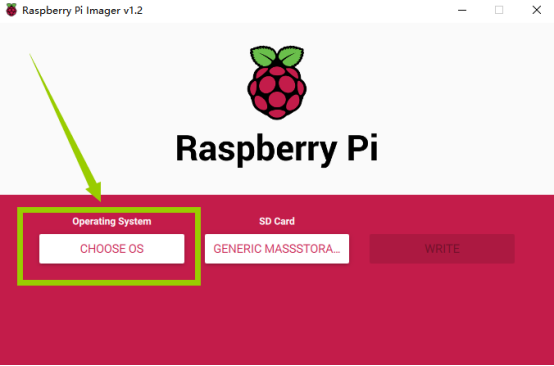
(1) Click "CHOOSE OS" on the opened Raspberry Pi Imager software interface.
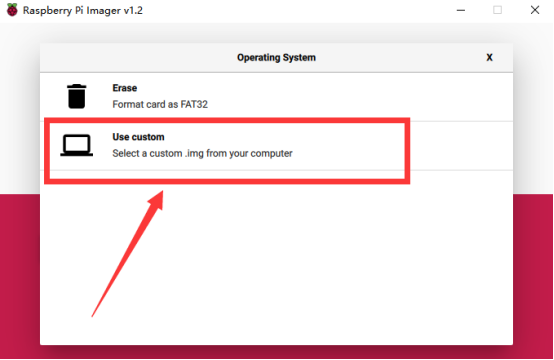
(2) Click "Use custom" and select a custom ".img" file from your computer, which is the ".img" file of the Raspberry Pi system that we downloaded and decompressed before.
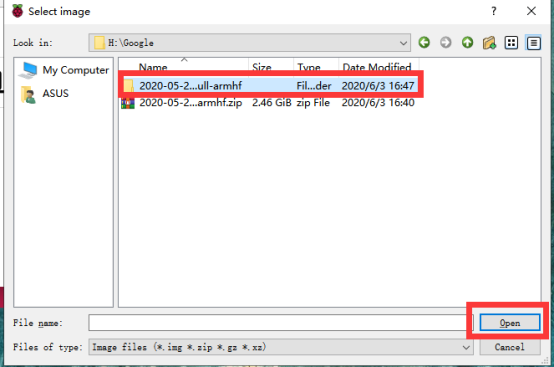
(3) Find the ".img" file of the Raspberry Pi system that we downloaded and decompressed before. Click "Open".
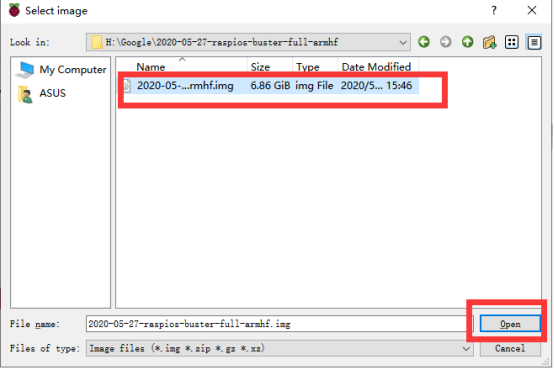
(4) Select the ".img" file and click "Open".
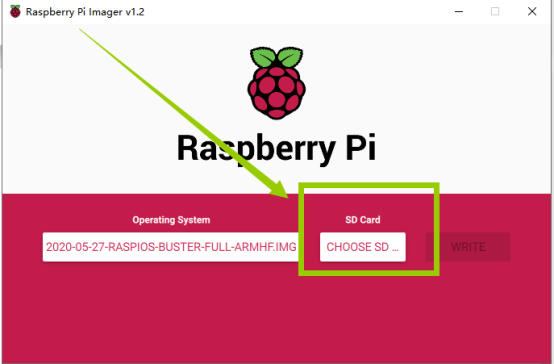
(5) Then on the interface of Raspberry Pi Imager, the ".img" file of our selected Raspberry Pi system will appear.
(6) Click "CHOOSE SD".
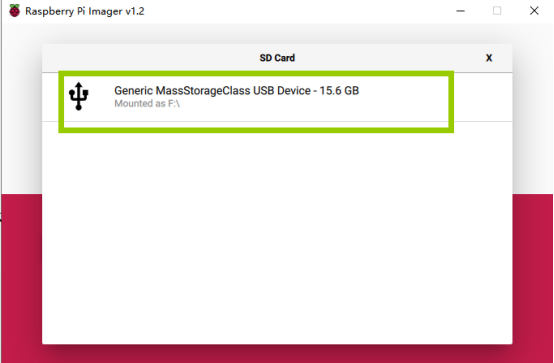
(7) Then select the SD card we need to burn.
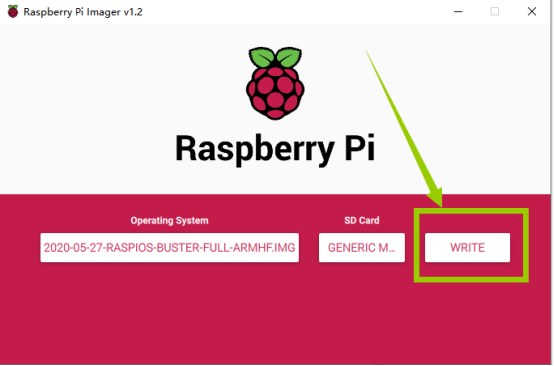
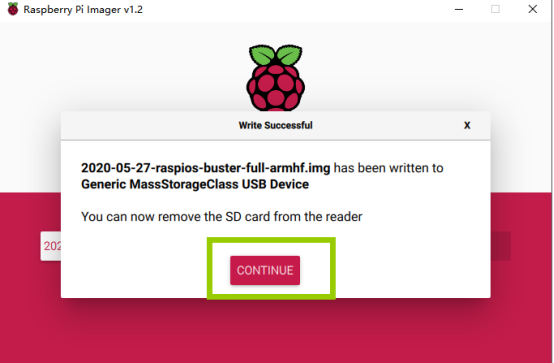
(8) Click "WRITE" to write it to the SD card. Wait for the burn to complete.
(9) After the burning is completed, the following message will be prompted,indicating that the burning is finished, click "CONTINUE".
【Note】:
Don't remove the SD card after burning! After the Raspberry Pi Imager is burned, the memory card will be ejected in the program. This will cause the subsequent copy operation to prompt that the SD card has not been found. You can unplug the card reader from the computer and then plug it into the computer again.It is necessary to configure SSH and WIFI connection later. At this time, once the SD card is put into the Raspberry Pi to boot, it may cause subsequent headless WIFI configuration failure.
1.4 Starting the Raspberry Pi SSH service
SSH is a protocol designed to provide security for remote login sessions and other network services. Through the SSH service, you can remotely use the command line of the Raspberry Pi on another machine. In the subsequent operations and the process of using the Raspberry Pi, you can control the Raspberry Pi through another machine in the same local area network without connecting the mouse, keyboard and monitor to the Raspberry Pi. After 2016, Raspbian distributions disable the SSH service by default, so we need to manually enable it.
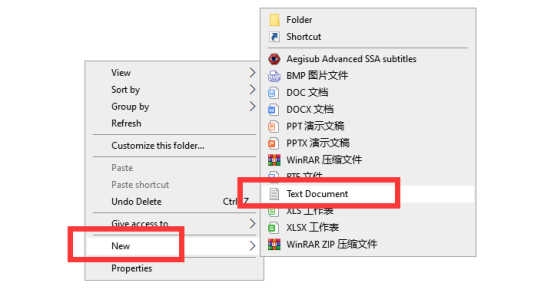
(1) We first enter the driver D of the computer, click "View" in the upper left corner, and select "File Extension", as shown below:

(2) Right-click on the blank space of the D drive, select "New", and select "Text Document".
(3) Name the file "ssh", as shown below:

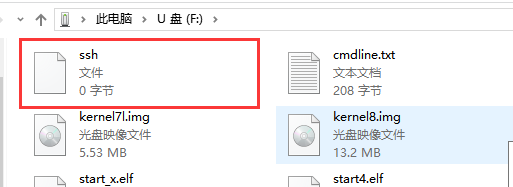
(4) Then delete the suffix ".txt". We will get an ssh file without any extension. As shown below:

(5) Copy this ssh file to the root directory of the SD card of the Raspberry Pi system. When the Raspberry Pi starts, it will automatically find this ssh file. If it is found, it will start SSH. This method only needs to be used once. After that, every time you start the Raspberry Pi, it will automatically start SSH without repeating the above operations. Copy the ssh file to the Raspberry Pi as shown below:
1.5 Setting up Raspberry Pi WIFI wireless connection
Next, we also need to set up a WIFI wireless connection for the Raspberry Pi.
(1) Create a new file named wpa_supplicant.conf in the root directory of the D driver of the computer.

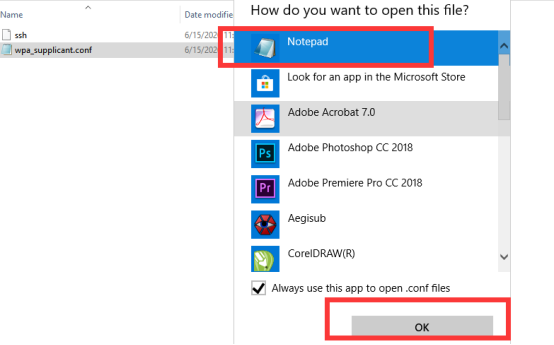
(2) Click to select the wpa_supplicant.conf file, right-click the mouse, and select "Open Mode (H)".
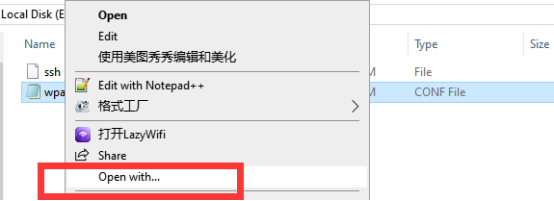
(3) Select "Notepad" to open it.
(4) Write the following contents:
country=US
ctrl_interface=DIR=/var/run/wpa_supplicant GROUP=netdev
update_config=1
network={
ssid="WIFI"
psk="PASSWORD"
key_mgmt=WPA-PSK
priority=1
       }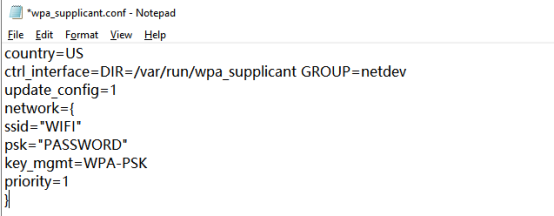
"Country" is your country code, do not modify it, the default is US; "ssid" needs to be changed to the name of the WIFI you want to connect; "psk" needs to be changed to the password of the WIFI you want to connect; other parts do not need to do any modifications.
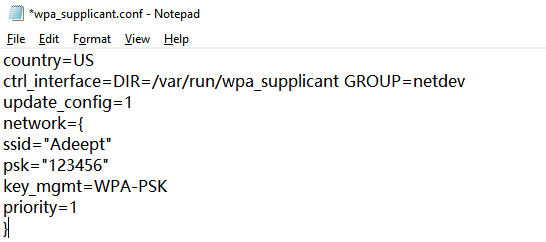
For example, our company's WIFI name is Adeept, WIFI password is 123456, and the modified wpa_supplicant.conf file is as shown below:
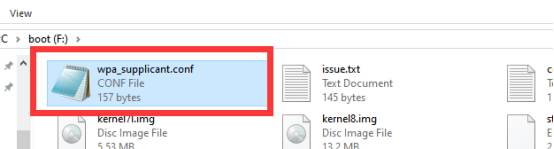
(5) Save the set wpa_supplicant.conf file, and then copy it to the root directory of the SD card of the Raspberry Pi system. As shown below:
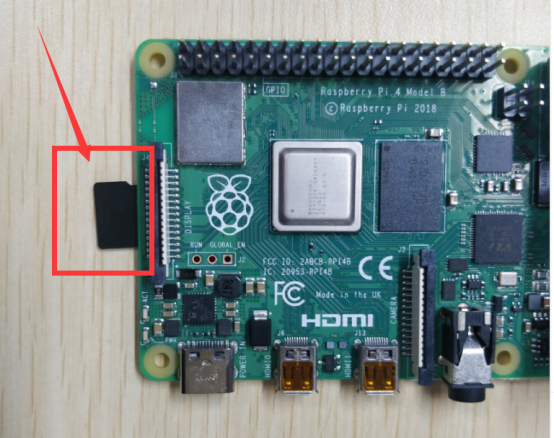
(6) Now we can take out the SD card and put it into the "MICRO SD CARD" card slot on the Raspberry Pi development board, and use the Type-C data cable to supply power to the Raspberry Pi. And then the Raspberry Pi will start up and run.
1.6 Remotely logging in to the Raspberry Pi system
1.6.1 Download and install MobaXterm software
MobaXterm is a terminal tool software that can be used to remotely control the Raspberry Pi.
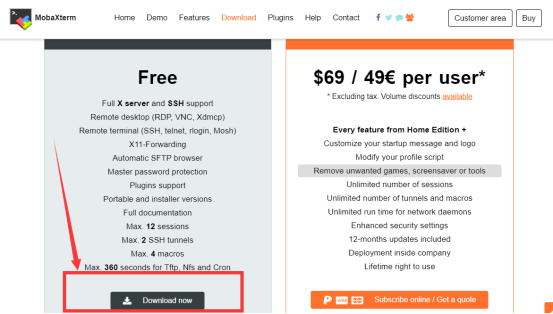
(1)Log in to the official website through a browser to download:
https://mobaxterm.mobatek.net/download.html
Select Free version to download.
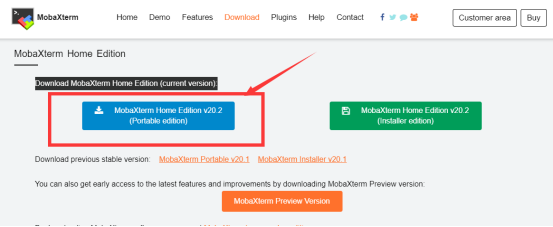
(2) Download the Portable edition of MobaXterm Home Edition (current version):
(3) Find the downloaded file MobaXterm_Portable_v20.2.zip, double-click to open it, extract it to get a new file.


(4) Open the unzipped folder, there is a file MobaXterm_Personal_20.2.exe.

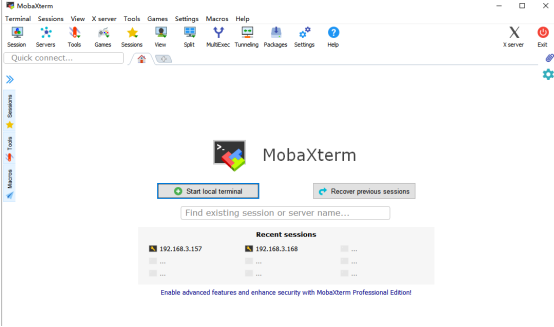
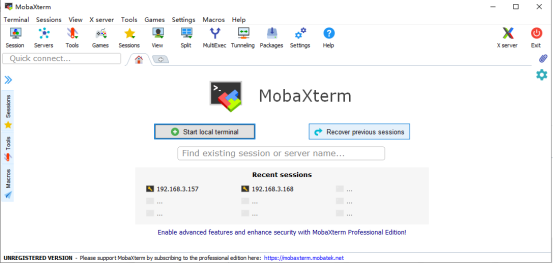
(5) Double-click to open MobaXterm_Personal_20.2.exe to directly open the MobaXterm software. The interface is as shown below:
1.6.2 Obtaining the IP address of the Raspberry Pi
1.6.2.1 Using the Pi with a display
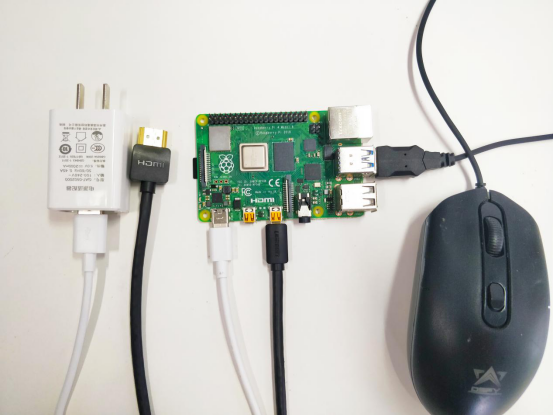
We provide a simple and fast way to get the Raspberry Pi IP address. You need to prepare the following components:
(1) One Type-C data cable: used to supply power to the Raspberry Pi.
(2) One HDMI cable: used to connect the monitor.
(3) One mouse: used to operate.
(4) One monitor
(5) One Raspberry Pi
Connect the HDMI cable to the HDMI port of the monitor:
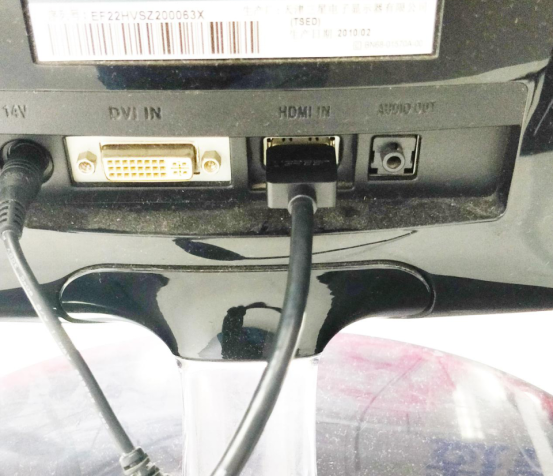
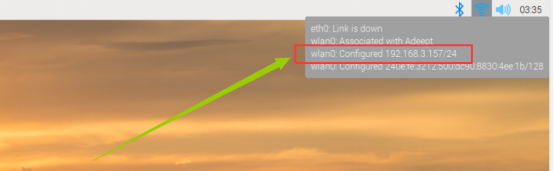
Turn on the monitor switch, and connect the mouse to the USB port of the Raspberry Pi, supply power to the Raspberry Pi with the Type-C data cable, then the Raspberry Pi starts. After entering the system interface, we move the mouse cursor to the "  " in the upper right corner, then it will display the IP address of the Raspberry Pi: 192.168.3.157 (the IP address of each Raspberry Pi is different). It is necessary for you to record this IP address for it is needed to log in to the Raspberry Pi system later.
2.You can also open the command window of the Raspberry Pi and enter the following command to view the following IP address, you need to write it down:
hostname -I

1.6.2.2 Getting the IP address of a Pi using your smartphone
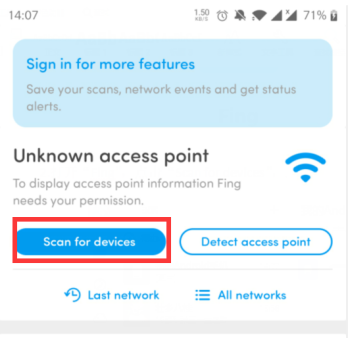
1.You need to download an APP called "Fing" on your phone, as shown below:

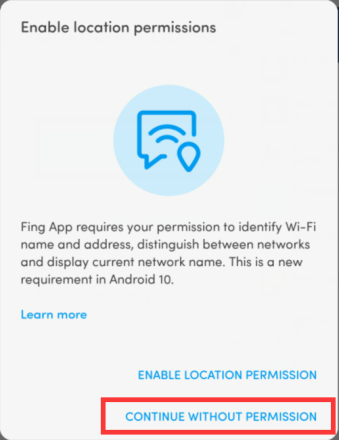
2.After the download is complete, your phone and Raspberry Pi need to be in the same local area network, that is, your phone and Raspberry Pi are connected to the same WIFI, then open "Fing" and click "Scan for devices":
Click“CONTINUE WITHOUT PERMISSION”:
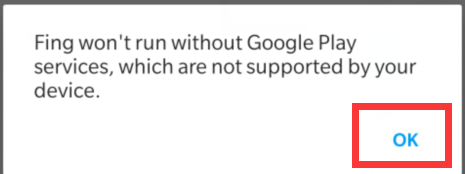
Click OK:
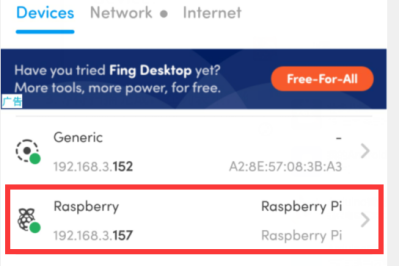
3.Wait for the scan to complete. In the list, you find a device named "Raspberry Pi". In the lower left corner, you will see the IP address of the Raspberry Pi: 192.168.3.157. You need to write down this IP address.
1.6.3 Remotely logging in to the Raspberry Pi system
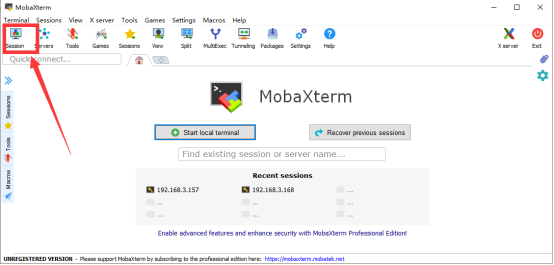
(1) Open the software on the desktop, as shown below:
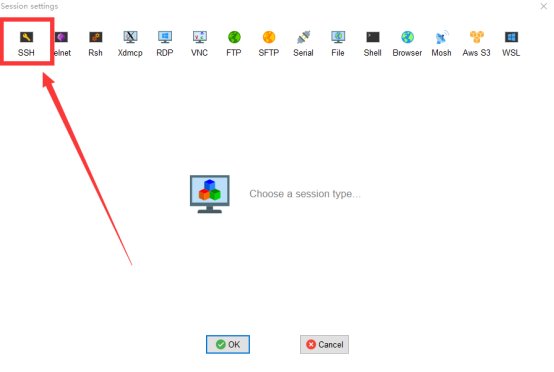
(2) Click "Session" in the upper left corner.
(3) Click "SSH".
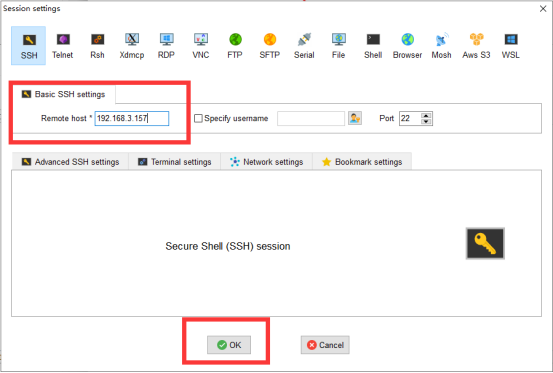
(4) Enter the IP address of the Raspberry Pi previously queried: 192.168.3.157, and confirm with "OK".
(5) Enter the default account of Raspberry Pi: pi, then press Enter, and then enter the default password of Raspberry Pi: raspberry. Press Enter to log in to the Raspberry Pi system.
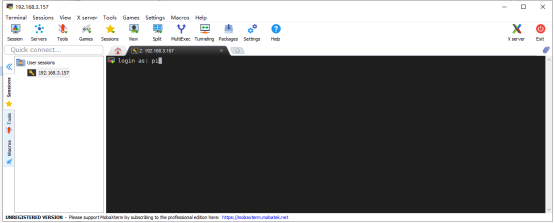
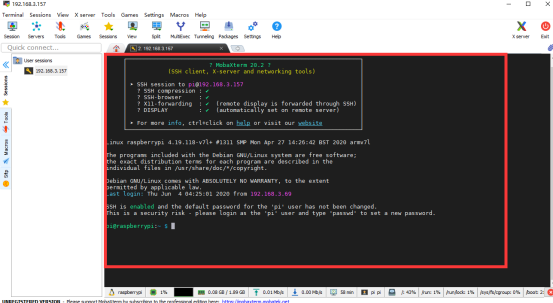
(6) After successfully logging into the Raspberry Pi system, the following interface will appear as shown below:
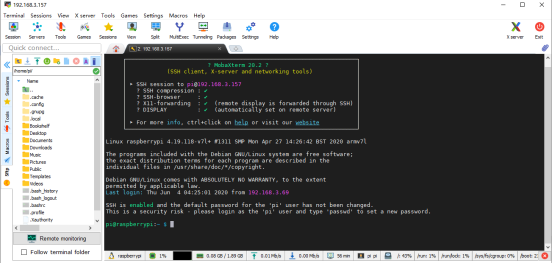
(7) The red box in the figure below is the command window, where you can control the Raspberry Pi by entering commands.
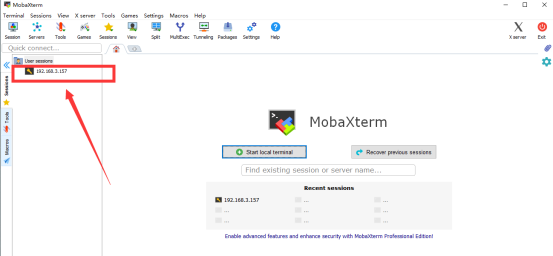
(8) When we close the MobaXterm software and then open it to connect to the Raspberry Pi, we can double-click the IP address under the "User sessions" on the left: 192.168.3.157, enter the account name: pi. Then the Raspberry Pi will be directly connected.
1.7 Download the code program to control the robot
After successfully logging in to the Raspberry Pi, we need to download the code program to control the robot. We enter the following command in the console:
sudo git clone https://github.com/adeept/adeept_alter.git
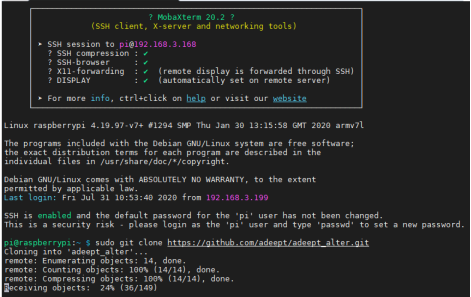
After the download is successful, you will see a new folder adeept_alter in the file resource list on the left. This folder stores some very important program codes. We will teach you how to use it in detail in the following courses.
1.8 Installing the relevant dependency libraries of the robot
1. We have prepared a script program (setup.py) to install the dependent libraries needed by the robot and set up operations such as turning on the camera and automatically running at startup. This script program is in the directory of the adeept_alter folder you downloaded. You need to enter the following command in the command window of the Raspberry Pi to run it:
sudo python3 adeept_alter/setup.py

Press the "Enter" button and wait for the download and installation to complete.
2. After the download is complete, the following prompt will appear:

3. After the installation is complete, the Raspberry Pi will automatically disconnect the SSH connection and restart. At this time, if you are using the Raspberry Pi to connect with Putty, MobaXterm and other software, there will be an error message such as Network error: Software caused connection abort.Just close the prompt.
1.9 Running the program of the Raspberry Pi robot
Raspberry Pi will automatically run the program of the robot product every time it restarts. Specifically, every time it restarts, it will run [RobotName]/server/webServer.py. Replace [RobotName] with the name of your robot product program folder, but if without connecting the Raspberry Pi camera and the driver board RobotHAT, webServer.py will not run successfully. This is a normal phenomenon, because the program of the robot product needs to use the camera and the PCA9685 chip. Our RobotHAT uses PCA9685 to control the servo.Raspberry Pi communicates with PCA9685 with I2C. If RobotHAT is not installed on Raspberry Pi, communication failure will occur when instantiating PCA9685's dependent library, which will cause program error.
We can turn off the Raspberry Pi, install the camera module and RobotHAT, and turn it on again, so that webServer.py can run successfully.
Under normal circumstances, there is no need for people to manually run webServer.py, because every time the Raspberry Pi is turned on, webServer.py will be run automatically.
You can open Google Chrome, enter the IP address of the Raspberry Pi and add: 5000 after it, press enter to jump to the Raspberry Pi web page, an example is shown below:
If the page fails to open, you can log in to the Raspberry Pi by using SSH, and use the following command to end the robot program that automatically runs on startup to release resources. Otherwise, problems such as camera initialization failure or port occupation will occur. Enter the following command in the command window:
sudo killall python3
Use the following command to manually run webServer.py:
sudo python3 adeept_alter/server/webServer.py
2.0 Editing the code program in Raspberry Pi
To view and edit the code program in the Raspberry Pi on the MobaXterm terminal software, we provide two methods for reference.
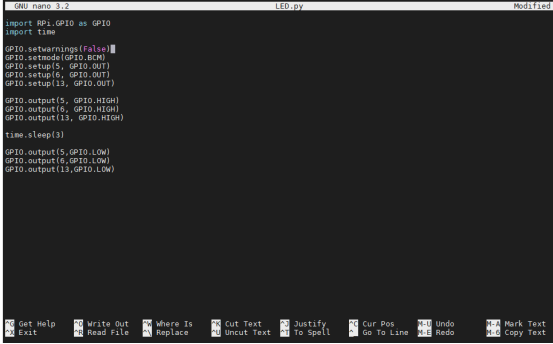
The first is to use Linux commands. For example, if you need to view the code program LED.py in this section of the course, then you can enter the following commands in the console of the MobaXterm terminal:
sudo nano LED.py

1. In this way, you can view our code program. You can modify and edit the code with the direction keys on the keyboard to realize the control function you want. But you need to learn and search about the command operation method of Linux nano. Here we provide several common operation commands about nano:
1. To save the modified program, you need to press the shortcut key Ctrl+O on the keyboard
2. To exit the code editing interface, you need to press the shortcut key Ctrl+X on the keyboard
3. To cut a line of code, you can use Ctrl+K
4. Paste the code, you can use Ctrl+U
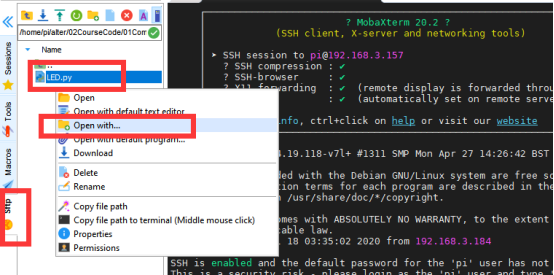
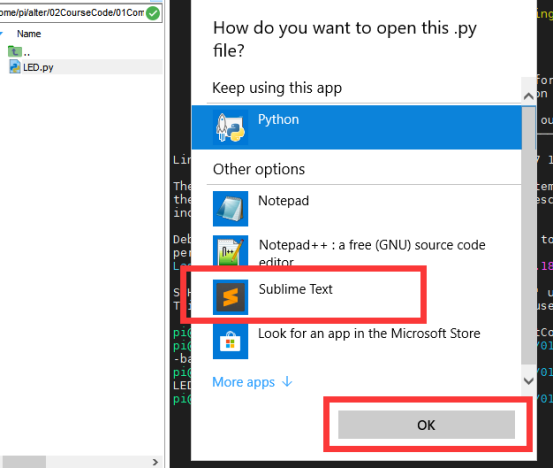
The second method is to use a third-party IDE tool to view and edit the code program of this lesson. You can find the file you want to edit in the file resource management system on the left side of MobaXterm, right-click the file, and click Open with , Choose your IDE, we recommend you to use Sublime Text IDE, you need to download it to edit files in the Raspberry Pi After editing: http://www.sublimetext.com/3
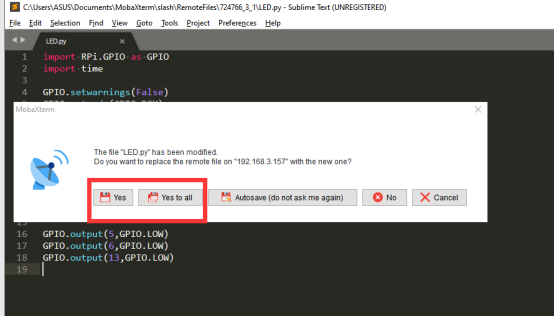
In this way, you can use your favorite IDE to edit the files in the Raspberry Pi. After editing, CTRL+S can save the files.
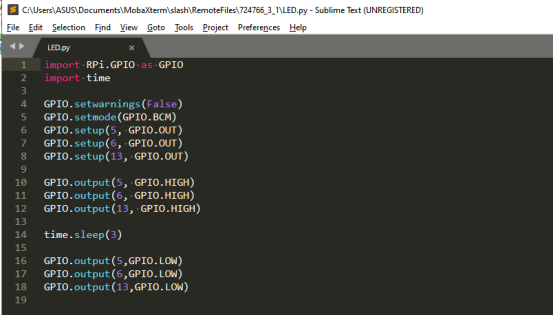
When you need to save the modified file, you can press the shortcut key CTRL+S, and then select Yes or Yes to all.