Lesson 12 Transmit Image in Real Time
This tutorial introduces how to transmit images in real time via the Raspberry Pi.
12.1 Components & Parts
Components | Quantity | Picture |
Raspberry Pi | 1 |
|
Robot HAT | 1 |
|
Camera | 1 |
|
Camera Flex Cable (black) | 1 |
|


12.2 Transmitting via Flask-Video-Streaming
The Raspberry Pi robot features the real-time video and OpenCV functions. There are many methods of transmitting videos captured by the Raspberry Pi camera via network in a real time manner, and this tutorial introduces an open source project following the MIT License on Github:
https://github.com/miguelgrinberg/flask-video-streaming
The project uses Flask and related dependencies which have been included in the installation scripts for the Adeept robot. You may need to install them if your Raspberry Pi has run the script before.
sudo pip3 install flask
sudo pip3 install flask_cors
The OpenCV part will not be involved here; the tutorial only introduces how to view the image of the Raspberry Pi camera on other devices in real time. First, download the flask-video-streaming project. You can clone on Github or download on your computer and transfer to the Raspberry Pi, using the command on Raspberry Pi Command Line:
sudo git clone https://github.com/miguelgrinberg/flask-video-streaming.git
When the Raspberry Pi is configured with the robot software, the Raspberry Pi will automatically run the webServer.py program. If you need to use the camera in other programs, you need to terminate this program. Termination command:
sudo killall python3
After flask-video-streaming is downloaded on the Raspberry Pi or transferred, run the file app.py in the project:
cd flask-video-streaming
sudo python3 app.py
Pay attention not to run by the command "sudo python3 flask-video-streaming/app.py", or there will be an error of unfound *.jpeg file.
Open a web browser (Chrome for example) on a device on the same LAN of the Raspberry Pi, enter in the address bar the Raspberry Pi's IP address and the video stream port number ":5000", as shown below:
192.168.3.157:5000
Then you can view the webpage created by the Raspberry Pi on your mobile or computer. Note that by default, images of 3 numbers 1, 2, and 3 will loop instead of anything from the Raspberry Pi.
|
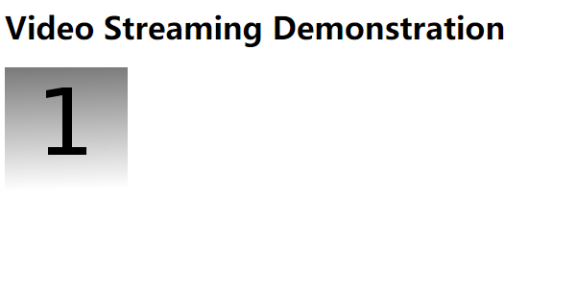
If you can log into the page and 1, 2, and 3 images loop display, it indicates the flask program runs well. Then you can change the file app.py to display videos collected by the Raspberry Pi's camera.
Here we use the nano built in Raspbian to open and edit the app.py. There's no need to edit in other IDEs as only commenting or uncommenting involved.
sudo nano app.py
1. Uncomment the code after opening app.py:
1. if os.environ.get('CAMERA'): 2. Camera = import_module('camera_' + os.environ['CAMERA']).Camera 3. else: 4. from camera import Camera |
2. Add "#" at the beginning of the lines, or insert "'''" at the beginning and end of the paragraph to comment. The code is changed as follows:
1. # if os.environ.get('CAMERA'): 2. # Camera = import_module('camera_' + os.environ['CAMERA']).Camera 3. # else: 4. # from camera import Camera |
Or
1. ''' 2. f os.environ.get('CAMERA'): 3. Camera = import_module('camera_' + os.environ['CAMERA']).Camera 4. lse: 5. from camera import Camera 6. ''' |
3. At last, uncomment the code Camera imported from camera_pi by deleting "#" – pay attention to delete the space after "#".
Code before change:
1. # from camera_pi import Camera |
Code changed:
1. from camera_pi import Camera |
4. Complete code of app.py changed as follows:
1. #!/usr/bin/env python 2. from importlib import import_module 3. import os 4. from flask import Flask, render_template, Response 5. 6. # import camera driver 7. ''''' 8. if os.environ.get('CAMERA'): 9. Camera = import_module('camera_' + os.environ['CAMERA']).Camera 10. else: 11. from camera import Camera 12. ''' 13. 14. # Raspberry Pi camera module (requires picamera package) 15. from camera_pi import Camera 16. 17. app = Flask(__name__) 18. 19. 20. @app.route('/') 21. def index(): 22. """Video streaming home page.""" 23. return render_template('index.html') 24. 25. 26. def gen(camera): 27. """Video streaming generator function.""" 28. while True: 29. frame = camera.get_frame() 30. yield (b'--frame\r\n' 31. b'Content-Type: image/jpeg\r\n\r\n' + frame + b'\r\n') 32. 33. 34. @app.route('/video_feed') 35. def video_feed(): 36. """Video streaming route. Put this in the src attribute of an img tag.""" 37. return Response(gen(Camera()), 38. mimetype='multipart/x-mixed-replace; boundary=frame') 39. 40. 41. if __name__ == '__main__': 42. app.run(host='0.0.0.0', threaded=True) |
5. Press CTRL+X to exit after editing. A prompt will be shown asking you whether to save to not. Type in Y and press Enter to save.
6. Next, run app.py.
sudo python3 app.py
7. Open a web browser (here we use Chrome as an example) on a device on the same LAN of the Raspberry Pi, enter in the address bar the Raspberry Pi's IP address and the video stream port number ":5000", as shown below:
192.168.3.157:5000
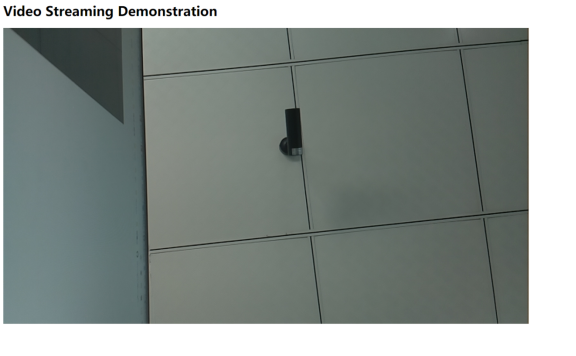
8. Now you can view the webpage created by the Raspberry Pi on your mobile or computer. After data is loaded successfully, it'll display the videos captured by the Raspberry Pi in real time.
|
9. This function is based on the flask-video-streaming project from GitHub:
https://github.com/miguelgrinberg/flask-video-streaming
12.3Processing Video Frames
Principle of Multithreaded Video Frames Processing
The OpenCV function is based on the flask-video-streaming project on GitHub; here we just changed the camera_opencv.py file for operations with OpenCV.
Single threaded video frames processing
Here we start with single threading for you to better understand why multithreading is needed for processing OpenCV video frames. The process for single threading is as follows:

Process explanation: First, capture an image frame from the camera, analyze the frame with OpenCV, generate the information to be drawn, like the central position of the target or the text to be displayed on the screen, draw accordingly, and then display the image which has been processed and drawn on the webpage.
This whole process is inefficient as it needs to wait the OpenCV to implement the processing and display on the screen for each frame before starting the next frame processing. It may cause a stuck video transmission.
Multi-threaded video frames processing
The process is as shown below:
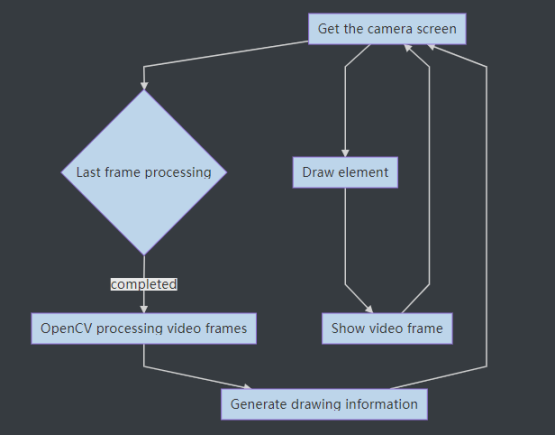
Process explanation: To increase frame rate, here we separate the analyzing of video frames from the collection-display process and run on background thread to generate image drawing information.
The code camera_opencv.py is changed as below: (the OpenCV function is not included here to explain the multi-threaded processing principle; refer to the camera_opencv.py file in the zip file downloaded)
1. import os 2. import cv2 3. from base_camera import BaseCamera 4. import numpy as np 5. import datetime 6. import time 7. import threading 8. import imutils 9. 10. class CVThread(threading.Thread): 11. ''''' 12. This class is used to process OpenCV's task of analyzing video frames in the background 13. ''' 14. def __init__(self, *args, **kwargs): 15. self.CVThreading = 0 16. 17. super(CVThread, self).__init__(*args, **kwargs) 18. self.__flag = threading.Event() 19. self.__flag.clear() 20. 21. 22. def mode(self, imgInput): 23. ''''' 24. This method is used to pass in video frames that need to be processed 25. ''' 26. self.imgCV = imgInput 27. self.resume() 28. 29. 30. def elementDraw(self,imgInput): 31. ''''' 32. Draw elements on the screen 33. ''' 34. return imgInput 35. 36. def doOpenCV(self, frame_image): 37. ''''' 38. Add content to be processed by OpenCV here 39. ''' 40. self.pause() 41. 42. 43. def pause(self): 44. ''''' 45. Block the thread and wait for the next frame to be processed 46. ''' 47. self.__flag.clear() 48. self.CVThreading = 0 49. 50. def resume(self): 51. ''''' 52. Resuming the thread 53. ''' 54. self.__flag.set() 55. 56. def run(self): 57. ''''' 58. Processing video frames in a background thread 59. ''' 60. while 1: 61. self.__flag.wait() 62. self.CVThreading = 1 63. self.doOpenCV(self.imgCV) 64. 65. 66. class Camera(BaseCamera): 67. video_source = 0 68. 69. def __init__(self): 70. if os.environ.get('OPENCV_CAMERA_SOURCE'): 71. Camera.set_video_source(int(os.environ['OPENCV_CAMERA_SOURCE'])) 72. super(Camera, self).__init__() 73. 74. @staticmethod 75. def set_video_source(source): 76. Camera.video_source = source 77. 78. @staticmethod 79. def frames(): 80. camera = cv2.VideoCapture(Camera.video_source) 81. if not camera.isOpened(): 82. raise RuntimeError('Could not start camera.') 83. ''''' 84. Instantiate CVThread() 85. ''' 86. cvt = CVThread() 87. cvt.start() 88. 89. while True: 90. # read current frame 91. _, img = camera.read() 92. 93. if cvt.CVThreading: 94. ''''' 95. If OpenCV is processing video frames, skip 96. ''' 97. pass 98. else: 99. ''''' 100. If OpenCV is not processing video frames, give the thread that processes the video frame a new video frame and resume the processing thread 101. ''' 102. cvt.mode(img) 103. cvt.resume() 104. ''''' 105. Draw elements on the screen 106. ''' 107. img = cvt.elementDraw(img) 108. 109. # encode as a jpeg image and return it 110. yield cv2.imencode('.jpg', img)[1].tobytes() |
That's the code for multi-threaded OpenCV processing. In the subsequent part of introducing details of the OpenCV function, we will only explain the method of video frame processing with OpenCV and skip this part.
12.4 OpenCV Function
– First, create two .py files in a same folder of the Raspberry Pi (they are already included in the product download package for the Adeept Robot; refer to app.py and base_camera.py), with code as shown below:
App.py
1. #!/usr/bin/env python3 2. 3. from importlib import import_module 4. import os 5. from flask import Flask, render_template, Response 6. 7. from camera_opencv import Camera 8. 9. app = Flask(__name__) 10. 11. def gen(camera): 12. while True: 13. frame = camera.get_frame() 14. yield (b'--frame\r\n' 15. b'Content-Type: image/jpeg\r\n\r\n' + frame + b'\r\n') 16. 17. @app.route('/') 18. def video_feed(): 19. return Response(gen(Camera()), 20. mimetype='multipart/x-mixed-replace; boundary=frame') 21. 22. 23. if __name__ == '__main__': 24. app.run(host='0.0.0.0', threaded=True) |
base_camera.py
1. import time 2. import threading 3. try: 4. from greenlet import getcurrent as get_ident 5. except ImportError: 6. try: 7. from thread import get_ident 8. except ImportError: 9. from _thread import get_ident 10. 11. 12. class CameraEvent(object): 13. """An Event-like class that signals all active clients when a new frame is 14. available. 15. """ 16. def __init__(self): 17. self.events = {} 18. 19. def wait(self): 20. """Invoked from each client's thread to wait for the next frame.""" 21. ident = get_ident() 22. if ident not in self.events: 23. # this is a new client 24. # add an entry for it in the self.events dict 25. # each entry has two elements, a threading.Event() and a timestamp 26. self.events[ident] = [threading.Event(), time.time()] 27. return self.events[ident][0].wait() 28. 29. def set(self): 30. """Invoked by the camera thread when a new frame is available.""" 31. now = time.time() 32. remove = None 33. for ident, event in self.events.items(): 34. if not event[0].isSet(): 35. # if this client's event is not set, then set it 36. # also update the last set timestamp to now 37. event[0].set() 38. event[1] = now 39. else: 40. # if the client's event is already set, it means the client 41. # did not process a previous frame 42. # if the event stays set for more than 5 seconds, then assume 43. # the client is gone and remove it 44. if now - event[1] > 5: 45. remove = ident 46. if remove: 47. del self.events[remove] 48. 49. def clear(self): 50. """Invoked from each client's thread after a frame was processed.""" 51. self.events[get_ident()][0].clear() 52. 53. 54. class BaseCamera(object): 55. thread = None # background thread that reads frames from camera 56. frame = None # current frame is stored here by background thread 57. last_access = 0 # time of last client access to the camera 58. event = CameraEvent() 59. 60. def __init__(self): 61. """Start the background camera thread if it isn't running yet.""" 62. if BaseCamera.thread is None: 63. BaseCamera.last_access = time.time() 64. 65. # start background frame thread 66. BaseCamera.thread = threading.Thread(target=self._thread) 67. BaseCamera.thread.start() 68. 69. # wait until frames are available 70. while self.get_frame() is None: 71. time.sleep(0) 72. 73. def get_frame(self): 74. """Return the current camera frame.""" 75. BaseCamera.last_access = time.time() 76. 77. # wait for a signal from the camera thread 78. BaseCamera.event.wait() 79. BaseCamera.event.clear() 80. 81. return BaseCamera.frame 82. 83. @staticmethod 84. def frames(): 85. """"Generator that returns frames from the camera.""" 86. raise RuntimeError('Must be implemented by subclasses.') 87. 88. @classmethod 89. def _thread(cls): 90. """Camera background thread.""" 91. print('Starting camera thread.') 92. frames_iterator = cls.frames() 93. for frame in frames_iterator: 94. BaseCamera.frame = frame 95. BaseCamera.event.set() # send signal to clients 96. time.sleep(0) 97. 98. # if there haven't been any clients asking for frames in 99. # the last 10 seconds then stop the thread 100. if time.time() - BaseCamera.last_access > 10: 101. frames_iterator.close() 102. print('Stopping camera thread due to inactivity.') 103. break 104. BaseCamera.thread = None |
When developing any function related with OpenCV in the following tutorial, you only need to include the respective camera_opencv.py file in the same folder with app.py and base_camera.py and run app.py in the Raspberry Pi command line.
Open a web browser on the device under the same LAN with the Raspberry Pi, enter the Raspberry Pi's IP address with the port :5000, as shown below:
192.168.3.157:5000
12.5 Real-time video display on the web page
The video display in real time by web controller is implemented based on the OpenCV function as mentioned above. A web controller is a web interface to control the robot product to perform various actions and it can be applied on any device that is able to run a browser, including PC, mobile phones, tablets, etc.
If you've completed all installations based on the instructional document, it will be quite easy to open a web controller.
l Check that your device is under the same LAN with the Raspberry Pi.
l Obtain the Raspberry Pi's IP address.
l If you terminate the Raspberry Pi auto-run program, you need to re-run the program, run the command:
sudo python3 adeept_picarpro/server/webServer.py
l Open a web browser (recommended to use Chrome in case of any possible incompatibility with other browsers), enter the Raspberry Pi's IP address with the port :5000, for instance: 192.168.3.44:5000

Then the web controller will be loaded into the browser.

The video window on the top left corner shows the images from the Raspberry Pi camera. Modules on the web controller may vary from products. More details of the modules will be explained subsequently.