Lesson 3 Installing and Configuring Raspberry Pi System
In this lesson, we will learn how to install and remotely log in to the Raspberry Pi system under Windows. And we will download the code program to control the robot.
3.1 Preparation
l To install the system, you need to prepare the following components first:
One SD card that has been formatted (we recommend using an SD card above 16G), a card reader, Raspberry Pi development board.
l You need to insert the SD card into the card reader first, and then connect the card reader to the computer.
3.2 Downloading the Raspberry Pi System Raspbian
Raspbian is the official operating system of the Raspberry Pi Foundation. It is customized based on Debian GNU/Linux and can run on all versions of the Raspberry Pi motherboard. According to the experience, Raspbian combines Raspberry Pi the best. It is stable, powerful, and easy to use. It can basically meet the needs of various applications. This tutorial uses Raspbian as the preferred operating system for Raspberry Pi. Next, we will introduce how to download the Raspberry Pi system, Raspbian. Now there are two ways to download (we recommend method one).
Note: When running the program "setup.py" to install the dependent library is unsuccessful, in order to save your time, please use method three.
Method One :
Raspberry Pi officially provides a Raspberry Pi OS - Raspberry Pi OS (Legacy) for educational and industrial users. The operating system has stable compatibility, and there will be no incompatibility with specific dependencies due to the update of the Raspberry Pi system. It also avoids frequent revision of the tutorial.
Raspberry Pi official description of the Raspberry Pi OS (Legacy):
https://www.raspberrypi.com/news/new-old-functionality-with-raspberry-pi-os-legacy/
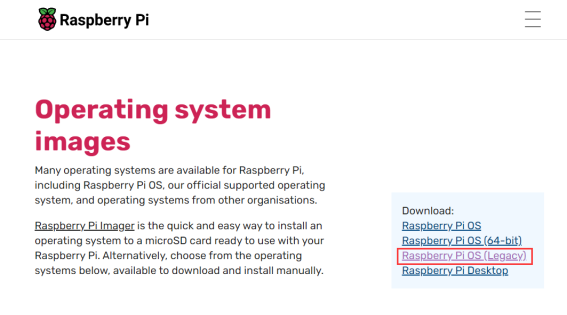
1. visit the official website of the Raspberry Pi through a browser to download Raspbian: https://www.raspberrypi.com/software/operating-systems/
After entering the Raspberry Pi official website page, click "Raspberry Pi OS (Legacy)" to jump to the corresponding location, or you can find the location of Raspberry Pi OS (Legacy) by sliding the page.
2. Select the Raspberry Pi OS (Legacy) with desktop version, which contains a complete desktop system and recommended software packages.
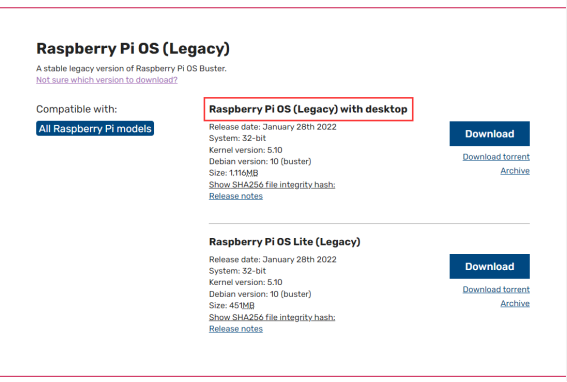
3. Click "Download", download the ".ZIP" file, and wait for the download to complete: (remember where the file is saved).
4. Find the ".ZIP" file you just downloaded, and extract it. The uncompressed file format of the file is ".img". Pay attention, you must name the path of the uncompressed .img file all English letters without special characters.

Method Two:
Due to compatibility issues with the latest Raspberry Pi official image file and the camera. It may cause an error when the Raspberry Pi runs the program. We recommend downloading the official older version of the Raspberry Pi image.(This image file will not change and has been tested in detail and successfully).
Using this image is a good idea to try if you run into problems with dependent libraries in the following lessons.
Raspberry Pi old version image file (2021-5-07) download address:
https://downloads.raspberrypi.org/raspios_armhf/images/raspios_armhf-2021-05-28/
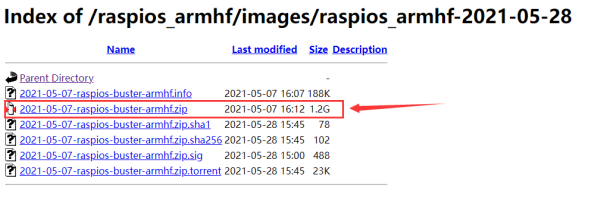
After the download is successful, extract the ZIP file and get a ".img" file.
Method Three:
Downloading the image file we provide.
The image downloaded by method one is the latest official version of Raspbian and comes with some pre-installed software. At the same time, the normal operation of the robot product requires many other dependent libraries. Although we provide a script to install these simple methods of dependent libraries (refer to the following tutorials for more), occasionally there may be some dependent library updates and it may cause the installation to fail. Therefore, we provide a Raspbian image file pre-installed with dependent libraries. The disadvantage of this method is that the image files and related dependent libraries we provide cannot keep up to date all the time. In case you encounter some issues during installation, you may try this method. Download the Raspbian image file at this link: https://www.adeept.com/learn/detail-38.html
After the download is completed, unzip the file. The path of the extracted ".img” file should be all letters or numbers without special characters.
3.3 Burning Raspberry Pi System to SD Card
We recommend using the Raspberry Pi Imager tool officially provided by the Raspberry Pi. Raspberry Pi Imager is a new image burning tool launched by the Raspberry Pi Foundation. Users can download and run this tool on Windows, macOS and Ubuntu to burn the system image for the Raspberry Pi and apply like Etcher and win32diskimager.
.3.1 Downloading Raspberry Pi Imager
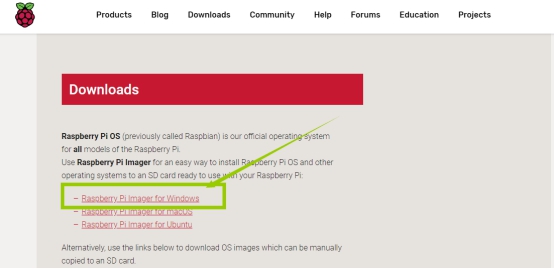
1. Visit the official website of Raspberry Pi to download through a browser: https://www.raspberrypi.org/downloads/
l For Windows system, click "Raspberry Pi Imager for Windows" to download.
l For Mac OS, click "Raspberry Pi Imager for macOS" to download.
l For Linux system, click "Raspberry Pi Imager for Ubuntu" to download.
After the download is completed, install the software, and burn the Raspberry Pi system.
Now take Windows as an example.
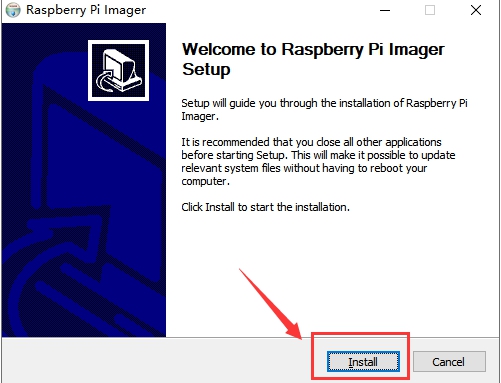
2. Click to open the downloaded file "imager.exe" and click "Install".
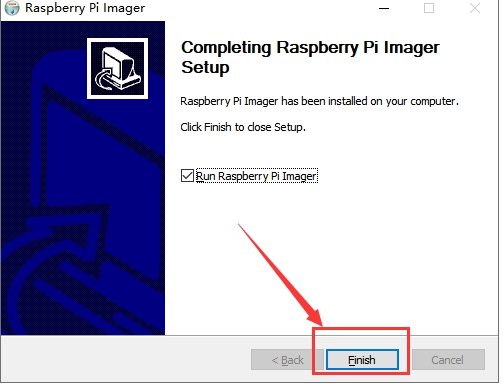
3. After the installation is completed, click "Finish".
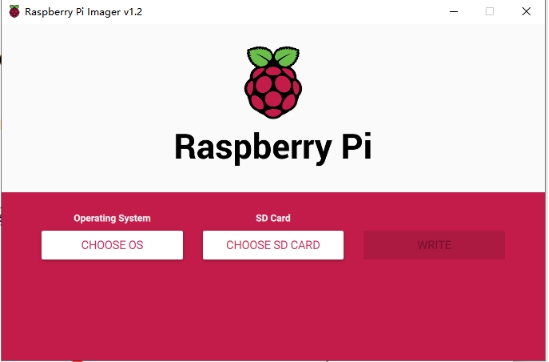
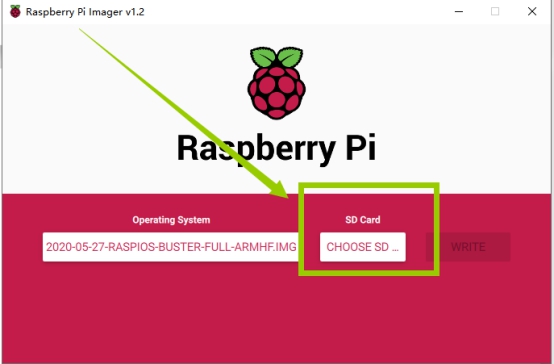
4. The software interface after starting is as shown below:
3.3.2 Burning Raspberry Pi system to SD card with Raspberry Pi Imager
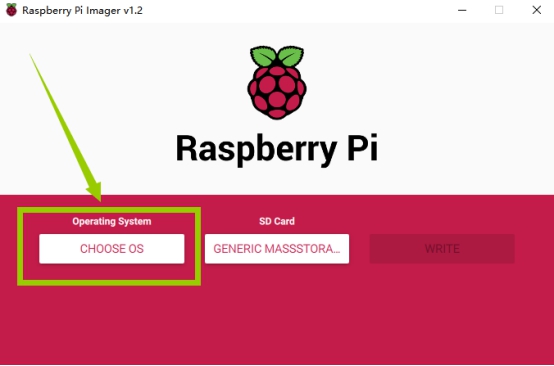
1. Click "CHOOSE OS" on the Raspberry Pi Imager interface.
.
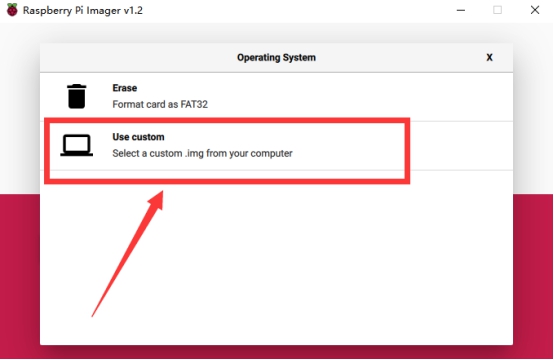
2. Click "Use custom" and select a custom ".img" file from your computer, which is the ".img" file of the Raspberry Pi system that we downloaded and extracted previously.
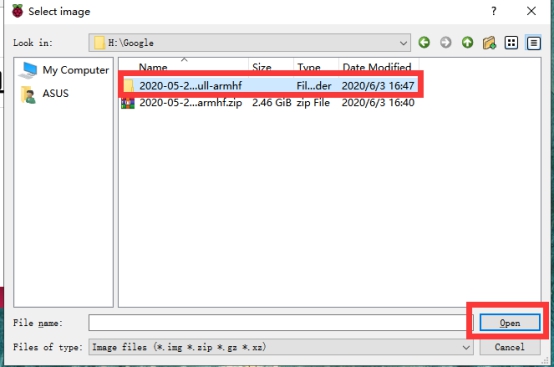
3. Find the ".img" file of the Raspberry Pi system extracted, click on it to select, and click "Open".
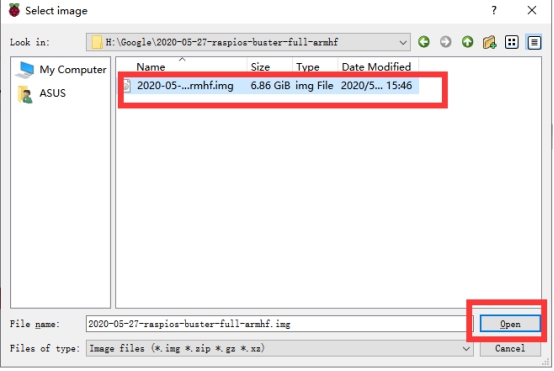
4. Select the ".img" file and click "Open".
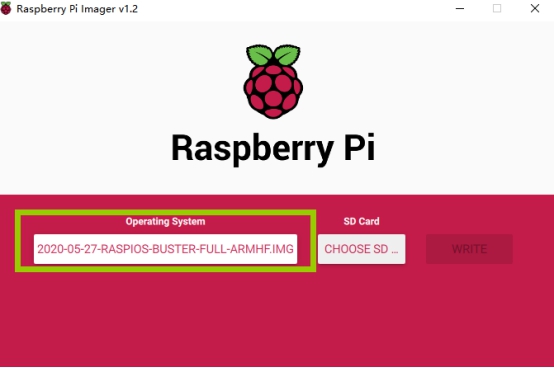
5. Then on the interface of Raspberry Pi Imager, the ".img" file of our selected Raspberry Pi system will appear.
6. Click "CHOOSE SD".
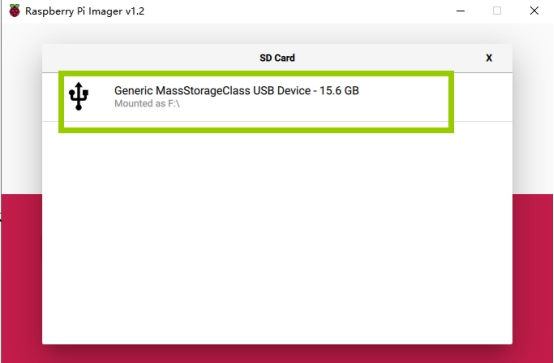
7. Then select the SD card we need to burn.
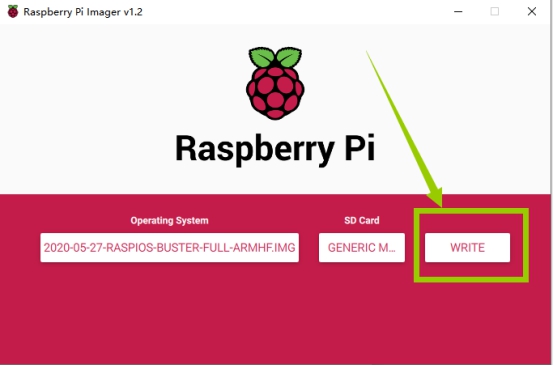
8. Click "WRITE" to write it to the SD card. Wait for the burn to complete.
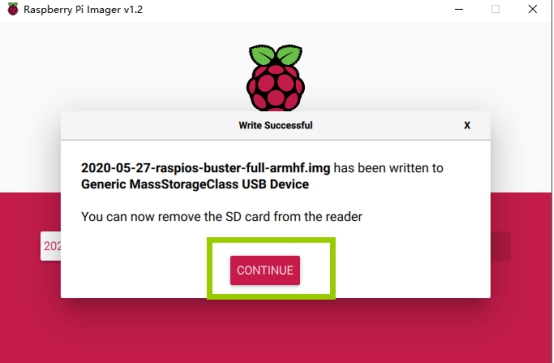
9. After the burning is completed, the following message will be prompted, indicating that the burning is finished. Click "CONTINUE".
Note:
DO NOT remove the SD card after burning! After the Raspberry Pi Imager is burned, the memory card will be ejected in the program. This will cause the subsequent copy operation to prompt that the SD card has not been found. You can unplug the card reader from the computer and then plug it into the computer again. It is needed for configuring SSH and WIFI connection later. At this time, once the SD card is put into the Raspberry Pi to boot, it may cause a failure during headless WIFI configuration.
3.4 Starting the Raspberry Pi SSH Service
SSH is a protocol designed to provide security for remote login sessions and other network services. Through the SSH service, you can remotely use the command line of the Raspberry Pi on another machine. In the subsequent operations and the process of using the Raspberry Pi, you can control the Raspberry Pi through another machine in the same local area network without connecting the mouse, keyboard and monitor to the Raspberry Pi. After 2016, Raspbian distributions disable the SSH service by default, so we need to manually enable it.
1. First, go to the D: drive of the computer, click the "View" menu in the upper left corner, and tick the box to select "File Extension", as shown below:

2. Right-click on the blank space of the D: drive, select "New", and select "Text Document" to create a new .txt file.
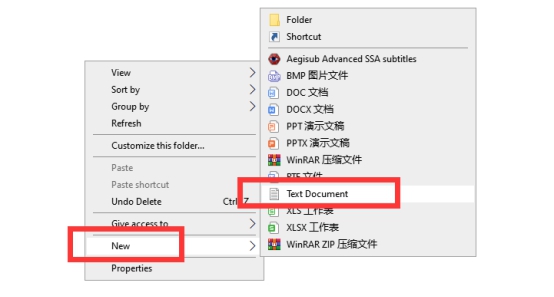
3. Name the file "ssh", as shown below:

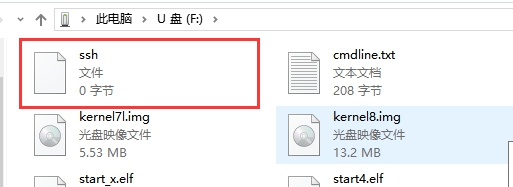
4. Then delete the suffix ".txt". We will get an ssh file without any extension. As shown below:

5. Copy this ssh file to the root directory of the SD card of the Raspberry Pi system. When the Raspberry Pi boots, it will automatically look for the file. If the file is found, it will start SSH. This process only needs to run at the first time. The Raspberry Pi will automatically start SSH when booting without searching again. Copy the ssh file to the Raspberry Pi as shown below:
3.5 Setting up Raspberry Pi WIFI Wireless Connection
Next, we also need to set up a WIFI wireless connection for the Raspberry Pi.
1. Create a new file named wpa_supplicant.conf in the root directory of the D: drive of the computer.

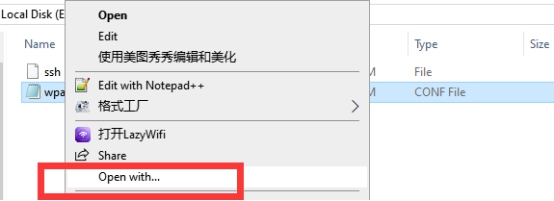
2. Click to select the wpa_supplicant.conf file, right-click on it, and select "Open with".
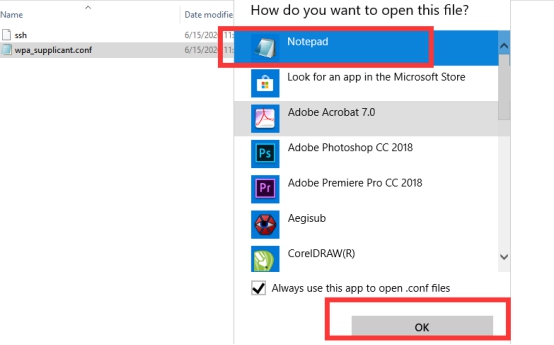
3. Select "Notepad" and click OK.
4. Write the following code in the file:
country=US ctrl_interface=DIR=/var/run/wpa_supplicant GROUP=netdev update_config=1 network={ ssid="WIFI" psk="PASSWORD" key_mgmt=WPA-PSK priority=1 } |
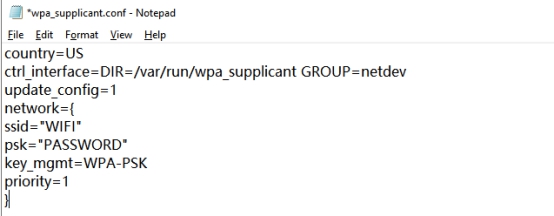
"Country" is your country code, US by default - do not change it. "ssid" needs to be changed to the name of the WIFI you want to connect; "psk" should be the password of the WIFI; no need to modify the rest.
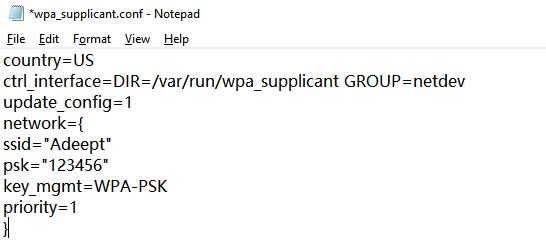
For example, our company's WIFI name is Adeept, password as 123456, and the modified wpa_supplicant.conf file will be as shown below:
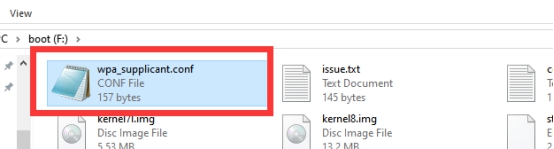
5. Save the change to the wpa_supplicant.conf file, and then copy it to the root directory of the SD card of the Raspberry Pi system, as shown below:
6. Now we can remove the SD card and put it into the "MICRO SD CARD" card slot on the Raspberry Pi development board, and use the Type-C data cable to supply power to the Raspberry Pi. The Raspberry Pi will boot and run.

3.6 Remotely Logging in to Raspberry Pi System
Before connecting Raspberry Pi via SSH, you need to know the IP address of the Raspberry Pi and the software that supports SSH.
The remote login to the Raspberry Pi is achieved through the SSH protocol, and the Raspberry Pi can be remotely logged in through the software with the SSH protocol. For example: Putty, MobaXterm, etc. It is recommended that Mac users install Putty and Windows users do MobaXterm.
Linux or Mac OS comes with SSH function, and you can also log in to the Raspberry Pi remotely through the terminal.
.6.1 Obtaining the IP address of the Raspberry Pi
Method A. Obtaining an IP address with an external display
We provide a simple and fast way to get the Raspberry Pi IP address. You need to prepare the following components:
l Type-C data cable: To supply power to the Raspberry Pi.
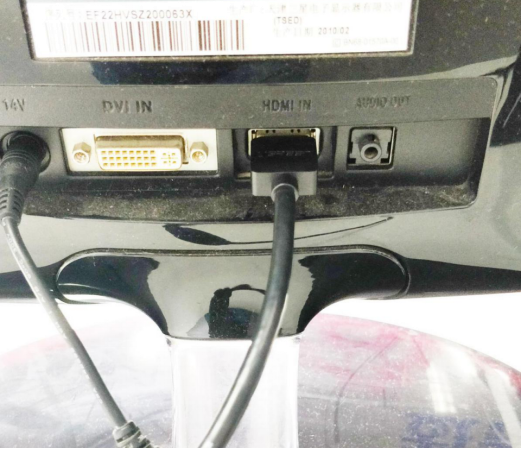
l HDMI cable: To connect the monitor.
l Mouse
l Monitor
l Raspberry Pi
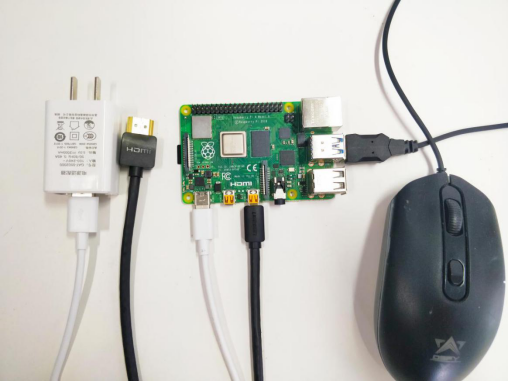
1. Connect the HDMI cable to the HDMI port of the monitor:
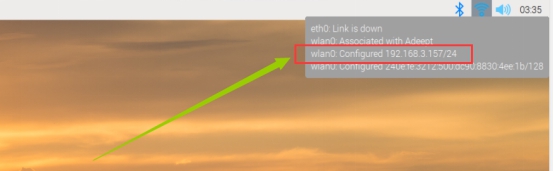
2. Turn on the monitor switch, connect the mouse to the USB port of the Raspberry Pi, and connect the Raspberry Pi to a power supplye with the Type-C cable. The Raspberry Pi will boot. After entering the system interface, move the mouse cursor to the "  " in the upper right corner, and it will display the IP address of the Raspberry Pi: 192.168.3.157 (vary from different Raspberry Pi boards). It is necessary for you to record this IP address for logging in to the Raspberry Pi system later.
3. You can also check the following IP address on the command line window of the Raspberry Pi. Type in the command as below and note the IP address down:
hostname -I

Method B. Obtaining an IP address with a mobile phone
1. Download an APP called "Fing" on your mobile, as shown below:

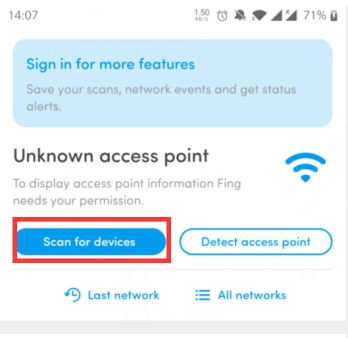
2. After the download is completed, your mobile and Raspberry Pi need to be in the same local area network, that is, connected to the same WIFI. Then tap to open "Fing", tap "Scan for devices":
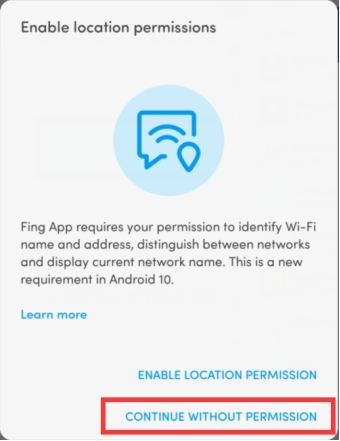
3. Tap "CONTINUE WITHOUT PERMISSION":
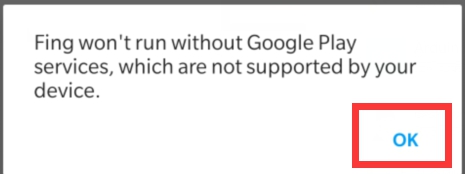
4. Tap "OK":
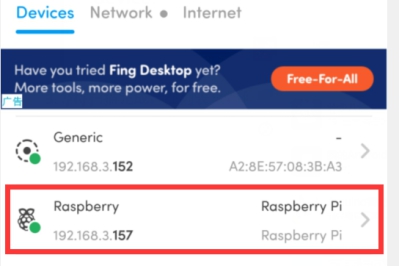
5. Wait for the scan to complete. On the list, you will find a device named "Raspberry Pi". In the lower left corner, you will see the IP address of the Raspberry Pi: 192.168.3.157. Write down this IP address.
.6.2 Remotely logging in to the Raspberry Pi system
Two kinds of software are recommended here for SSH login to Raspberry Pi. In actual use, you can just download either. Linux or Mac OS comes with SSH function, so you can log in to the Raspberry Pi remotely with the terminal without downloading software.
Putty
You need to download and install PuTTY corresponding to your computer system version, and log in to the Raspberry Pi by the tool. Click on the link below to download: https://www.chiark.greenend.org.uk/~sgtatham/putty/latest.html
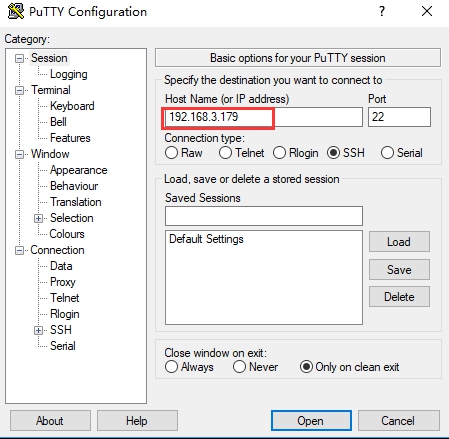
1. Run PuTTY, enter the IP address of the Raspberry Pi for Host Name, and click "Open".
For example: 192.168.3.179
2. If it prompts "Network error: Connection timed out", it means you probably entered the wrong IP address. Try entering again.
3. When the connection is normal, you will see a security warning. You can safely ignore it and click the "Yes" button. This warning occurs when PuTTY connects to a new Raspberry Pi.
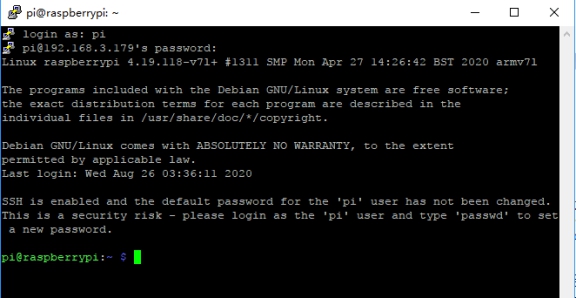
4. You will now see the usual login prompt. Log in with the same username and password as the Pi itself. The default login name of Raspbian is pi and the password is raspberry. When entering the password, the screen will not display anything. After entering raspberry, press Enter to confirm.

5. You should now have the Raspberry Pi prompt, which will be the same as the prompt on the Raspberry Pi itself.
MobaXterm
MobaXterm is a terminal tool software that can be used to remotely control the Raspberry Pi.
1. Go to the official website on a web browser and download: https://mobaxterm.mobatek.net/download.html
Choose the Free version to download.
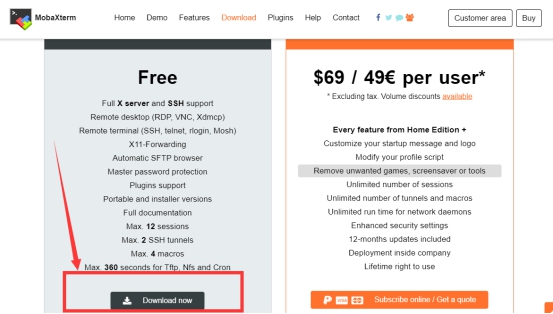
2. Download the Portable edition of MobaXterm Home Edition (current version):

3. Find the downloaded file MobaXterm_Portable_v20.2.zip, double-click on the file to open, and unzip it to get a new file.


4. Open the unzipped folder and there is a file MobaXterm_Personal_20.2.exe.

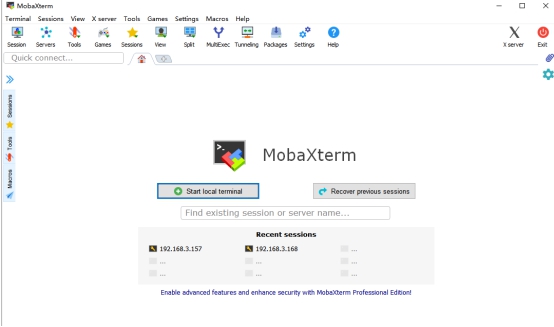
5. Double-click to open MobaXterm_Personal_20.2.exe, and the MobaXterm software will run. The interface is as follows:
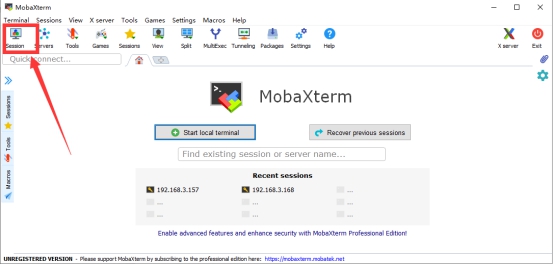
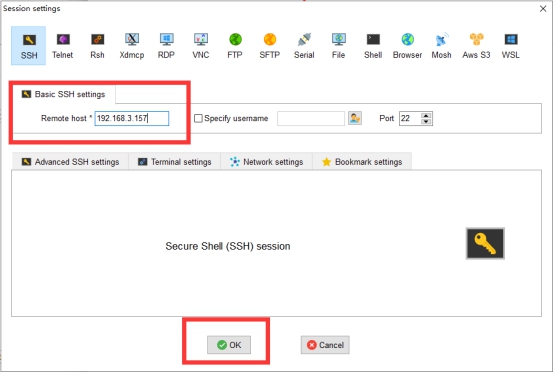
6. Click "Session" in the upper left corner.
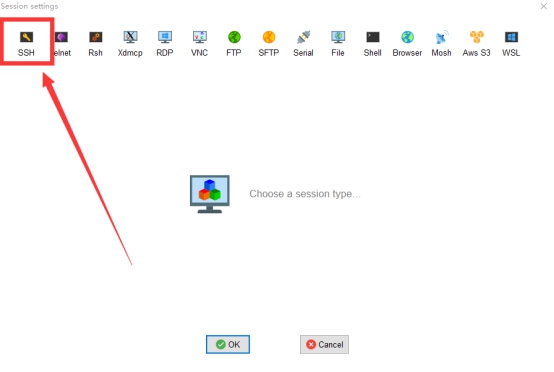
7. Click "SSH".
8. Enter the IP address of the Raspberry Pi noted down before, e.g:192.168.3.157, and click "OK" to confirm.
9. Enter the Raspberry Pi default account: pi, press Enter, and then enter the Raspberry Pi default password: raspberry. Press Enter to log in to the Raspberry Pi system.

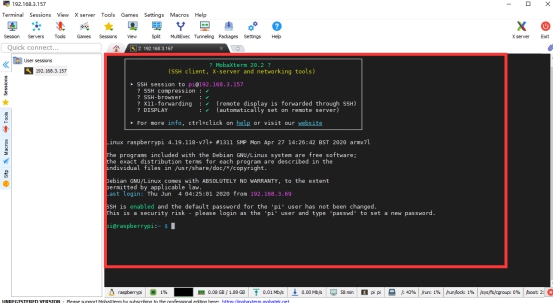
10. After successful login to the Raspberry Pi system, the following interface will appear:

11. The red box in the figure below is the command window, where you can control the Raspberry Pi by entering commands.
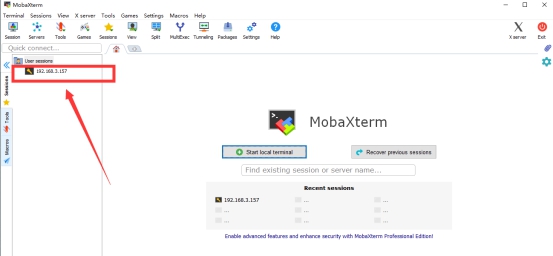
12. When you close the MobaXterm software, open it again and connect to the Raspberry Pi, you can double-click on the IP address under "User sessions" on the left: 192.168.3.157, enter the account name: pi, and you can directly connect to the Raspberry Sent.
Windows10, Linux and Mac OS come with SSH function
Steps to connect to Raspberry Pi via SSH:
1. Open a console terminal window.
2. The initial user name of the Raspberry Pi is “pi” and the initial password is “raspberry”.
3. Enter ssh pi@<IP> in the command line and replace <IP> with your Raspberry Pi IP address, as shown in the following example:
ssh pi@192.168.3.157
4. Press Enter, and the prompt "Are you sure you want to continue connecting (yes/no)?" will pop up.
5. Type in "yes", press Enter, "pi@192.168.3.157's password:" will appear. Fill in the initial password "raspberry" of the Raspberry Pi (note that it's lower case); there will not be anything changed on the screen as you type. Press Enter after the input is completed.
6. Now you have logged in to the Raspberry Pi.
3.7 Downloading Code Program to Control the Robot
l For the power supply of Raspberry Pi, please refer to this official document:
https://www.raspberrypi.org/documentation/hardware/raspberrypi/power/README.md
l Our Raspberry Pi robot driver board Robot HAT can directly supply power to the Raspberry Pi through the GPIO pins. However, since it takes a long time for the software installation in the Raspberry Pi, it is not recommended to use a battery power when installing. The Raspberry Pi robot driver board Robot HAT or camera need not be installed when installing the software in the Raspberry Pi. But before running the installed program, you need to connect the Robot HAT and the camera, otherwise the program WILL report an error.
l If you manually download the image file provided by Adeept, you only need to load the SD card into the Raspberry Pi to boot, and the program of the robot product will run automatically. You can skip this section.
Use the image file we provide If you want to update the code, you can delete the "adeept_darkpaw" file and download the product code again.
sudo rm -rf adeept_darkpaw
sudo git clone https://github.com/adeept/adeept_darkpaw.git
l All the code of our product has been open sourced on GitHub, you need to download it to the Raspberry Pi and install relevant dependencies before it can run normally. Visit https://github.com/adeept/adeept_darkpaw
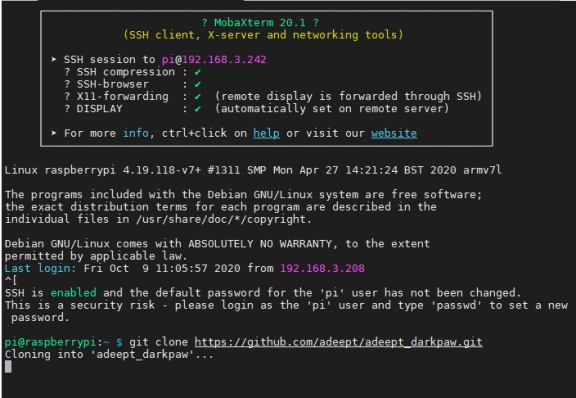
1. Now we have logged in to the Raspberry Pi. Enter the following commands in the console:
sudo git clone https://github.com/adeept/adeept_darkpaw.git
2. Press Enter to start downloading the robot program from GitHub. This process may take some time. Please wait.
Take MobaXterm as an example:
3. After the download is completed, a new folder "adeept_darkpaw" will appear with the product code. Check through the Linux command "ls".

3.8 Installing Dependent Libraries of the Program
l If you used "Manually download the image file we provide" to write the image file to the SD card, the dependent library of the robot product has been installed, so you can directly boot the Raspberry Pi to start using the robot.
l If you used "Download the official Raspbian image file" to write the image file, you can refer to this section to install the dependent libraries.
l When installing dependent libraries, sometimes it may fail due to network problems or library version issues. For those libraries that fail to install, the program will automatically retry a few times.
l After the installation is completed, the Raspberry Pi will automatically reboot. At this time, the remote login program of the Raspberry Pi via SSH will be terminated. Please log in again.
l If you encounter any problems when installing dependent libraries, please contact us: support@adeept.com
We have prepared a script to install all the dependent libraries that need to be used and set up operations such as turning on the camera and automatically running on booting.
Steps:
1. Enter the following code in the console and run the script setup.py to install the required dependent libraries:
sudo python3 adeept_darkpaw/setup.py

2. Press Enter to confirm. The following operations are automatically completed by the script program. Depending on the network environment, this process may last for from tens of minutes to several hours. Please wait.
3. After the installation is completed, the console will show the text as below:
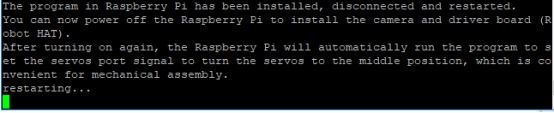
The Raspberry Pi will automatically disconnect the SSH connection and reboot then. At this time, if your Raspberry Pi connects by software such as Putty, there will be an error message "Network error: Software caused connection abort". It's normal, you can just close the window.
3.9 Check Whether Dependent Libraries is Installed Successfully
l When no error message appears when the "webServer.py" program is running, the dependent library is installed successfully.
l Only by successfully running the webServer.py program on the Raspberry Pi, can the Raspberry Pi be accessed with the IP on the browser. (After the dependent libraries are installed, the Raspberry Pi will automatically run webServer.py).
l Prepare the components required for installation, and turn off the power of the Raspberry Pi during installation.
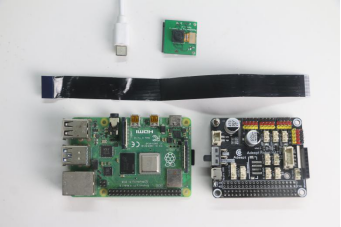
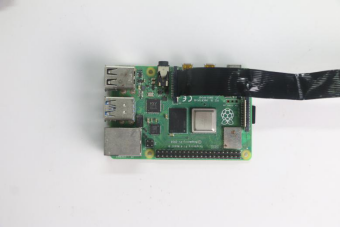
1. Connect the camera cable. Pay attention that the metal surface of the cable should be in contact with that of the Raspberry Pi (the same applies to installing the camera).
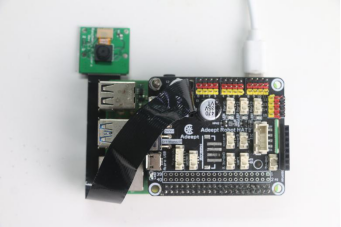
2. Install Robot HAT and camera, and connect the Raspberry Pi to a power supply.
3. After the Raspberry Pi boots (about 30-50s), you can access the Raspberry Pi with a browser.
l How to tell whether the robot has run the 'webServer.py' or not: If the WS2812-LED lights up with the breathing effect, it means the robot has booted and runs the program automatically.
l If the program is not run when the robot is booted, try to connect Raspberry Pi via SSH, manually run 'webServer.py' with code and check the errors. Refer to the Q&A below or email us for help: support@adeept.com
l Before manually running 'webServer.py', you need to end the program possibly auto running in the back end to release resources.
sudo killall python3

l Type in the following command to run webServer.py
sudo python3 adeept_darkpaw/server/webServer.py

l Open the web control interface.
1. Make sure your device is in the same local area network as the Raspberry Pi.
2. Obtain the IP address of the Raspberry Pi (refer to the software installation section).
3. Open the browser on the device (Chrome is recommended to avoid possible browser compatibility issues), enter the IP address of your Raspberry Pi in the address bar, and visit port 5000, for example: 192.168.3.44:5000
4. The web controller will then be loaded into the browser.
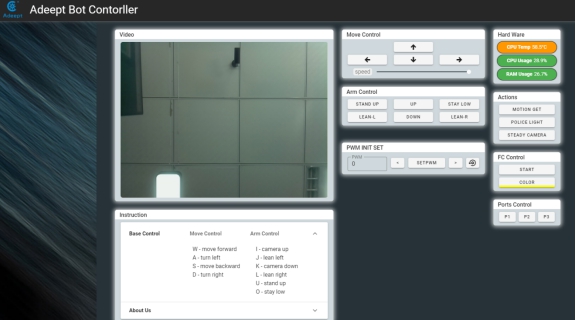
The modules on the web controller vary from products.
3.10 Creating a WiFi Hotspot on Raspberry Pi
Now the dependent library is successfully installed. After "webServer.py" runs automatically, the Adeept product will automatically turn on the hotspot when the WIFI is not connected.
The method of turning on the WIFI hotspot in the robot product uses a project create_ap from GitHub. Our installation script will automatically install this program and related dependent libraries. If you haven't run the installation script, you can use the following command to install create_ap:
sudo git clone https://github.com/oblique/create_ap.git
cd create_ap
sudo make install
1. Install related dependent libraries:
sudo apt-get install -y util-linux procps hostapd iproute2 iw haveged dnsmasq
2. Before turning on the hotspot, your Raspberry Pi cannot be connected to WIFI, and the WIFI module cannot be turned off. So when you test the hotspot function, you need to connect the necessary peripherals for the Raspberry Pi.
3. Under normal circumstances, if the robot program is not connected to the WIFI when it is turned on, it will automatically turn on the hotspot. You can use your mobile or computer to search for the WIF named Adeept_Robot. The default password is 12345678. Once the connection is successful, you can log in to 192.168 .12.1: 5000 using a browser to open the WEB application to control the robot.
4. If your Raspberry Pi is connected to peripherals, to test the Raspberry Pi's hotspot function, click on the WIFI icon in the upper right corner of the Raspberry Pi ’s desktop, click the name of the connected WIFI, choose forget, and never turn Off WIFI; if it is already in the off state, you need to turn it on.
5.When the WIFI module of the Raspberry Pi is turned on when not connected to any known network, you can enter the following command on the console to turn on the WIFI:
sudo create_ap wlan0 eth0 Adeept_Robot 12345678
"Adeept_Robot" is the name of the WIFI hotspot, and "12345678" is the password of the WIFI hotspot.
Q&A
l Errors occur with 'permission denied' prompt when I manually run 'server.py' or 'webServer.py'.
The Raspberry Pi needs the root permission to run the dependent libraries for WS2812 LED lights control.
You need to add 'sudo' to the beginning of 'server.py' or 'webServer.py' to run the program. [PATH] is the product folder path. E.g: sudo python3 adeept_darkpaw/server/webserver.py
sudo python3 [PATH]/server.py
sudo python3 [PATH]/webServer.py
l Raspberry Pi can't boot.
Remove all parts on the driver board. Only connect the board to Raspberry Pi and power supply, reboot.
Observe if the green light of the Raspberry Pi is blinking.
If the indicator does not flash or the indicator flashes at the same interval, it means that the image file has not been burned successfully, please re-burn the system.
l "Remote side unexpectedly closed network connection" shows on a popup window.
There can be error prompts during installation because the Raspberry Pi will auto reboot after the installation, which will disconnect the board.
l Raspberry Pi failed to connect a WiFi.
Please connect to the Raspberry Pi through the mouse, keyboard, and monitor, and then click the WiFi icon in the upper right corner of the Raspberry Pi interface to enter the WiFi information.
l I cannot connect to the Raspberry Pi terminal via SSH.
Please connect to the Raspberry Pi through the mouse, keyboard, and monitor, and then click on the main menu in the upper left corner of the Raspberry Pi interface, select "preferences", select "Raspberry Pi Configuration", select "Interfaces", set the SSH bar to "Enabled", and Click "OK".
l SSH can't connect, error: WARNING: REMOTE HOST IDENTIFICATION HAS CHANGED!
Type in the following command in the command line and press Enter:
ssh-keygen -R <the Raspberry Pi's IP address>
For example:
ssh-keygen -R 192.168.3.157
Then you can SSH to the Raspberry Pi again.
l Can I supply the Robot HAT and Raspberry Pi via USB?
A 2A output is required for a Raspberry Pi 3B, when at least 3A is needed for a Raspberry Pi 4. You can use the USB power for software installation and testing, but it's not suitable for high power module like servo or motor adjustment as it may result in a low voltage. It's recommended to use a battery for power here.
l "no cv2 error" occurs when I manually run 'server.py' or 'webServer.py'.
OpenCV is not installed correctly. Type in the command sudo pip3 install opencv-contrib-python in the Raspberry Pi to manually install OpenCV.
l When using a computer to copy ssh and wpa_supplicant.conf to the SD card, it prompts that there is no SD card.
If this happens, unplug the card reader, and connect it to the computer.
l Run "webServer.py" error: Could not start camera.
Check whether the camera is installed correctly:
The metal surface of the camera cable is in contact with the metal surface of the camera, and the metal surface of the camera cable is in contact with the metal surface of the camera interface of the Raspberry Pi
How to decide whether the camera is connected correctly:
Run the command in the terminal: "raspistill -t 1000 -o image.jpg".
If the camera is installed correctly, the program will not go wrong. After running the command "ls", an image file of image.jpg will appear.
If an error occurs, it means that the camera is not installed correctly or the camera is malfunctioning.