Lesson 11 Reading Data from MPU6050
In this tutorial we will learn how to read data from the MPU6050 sensor.
11.1 Components & Parts
Components | Quantity | Picture |
Raspberry Pi | 1 |
|
Robot HAT | 1 |
|
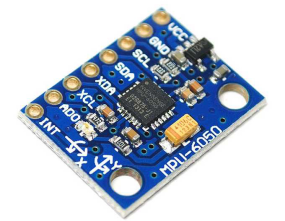
MPU6050 | 1 |
|
Camera Module | 1 |
|
Camera Flex Cable | 1 |
|


11.2 Introducing MPU6050 Sensor
MPU-6050 is the world's first integrated 6-axis Motion Tracking device. It integrates a 3-axis MEMS gyroscope, a 3-axis MEMS accelerometer, and an expandable digital motion processor (DMP), and can connect a third-party digital sensor like magnetometer, with an I2C interface. After expansion, it can output a 9-axis signal through its I2C or SPI interface (SPI interface is only available in MPU-6000). MPU-60X0 can also be connected to non-inertial digital sensors (e.g., pressure sensor) through its I2C interface.
MPU-6050 uses three 16-bit ADCs (analog-to-digital converter) respectively for the gyroscope and accelerometer, and converts the measured analog quantity into an exportable digital quantity. The gyroscope can measure angular velocity, and the accelerometer do acceleration. To accurately track fast and slow motion, the measuring range of the sensor is adjustable: range of the gyroscope is ±250, ±500, ±1000, ±2000°/sec (dps, or degrees per second), and that of the accelerometer is ±2, ±4, ±8, ±16g (gravitational acceleration).
An on-chip 1024-byte FIFO (first in first out) helps reduce system power consumption. A 400kHz I2C interface is used for the communication with all device registers. In addition, a temperature sensor, an oscillator with a ±1% variation in the working environment, and a programmable low-pass filter (LPF) are embedded on the chip.
As for power, the MPU-6050 module supports a VCC's voltage operation range of 3-5VDC.
11.3 Schematic Diagram (Wiring)
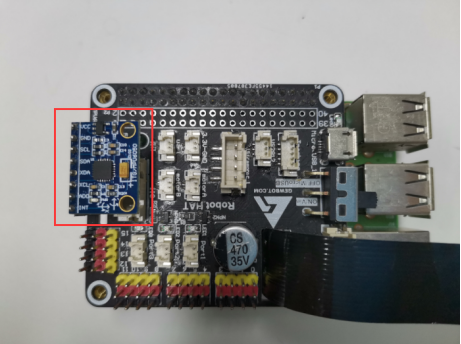
Connect the MPU6050 module to the MPU6050 port on the Robot HAT, as shown below:
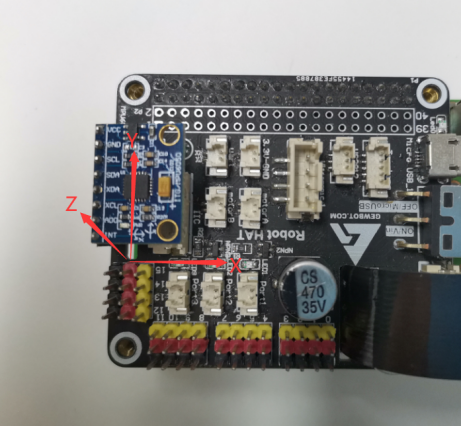
The positive direction of the X, Y, and Z axes are shown as the arrows in the following picture:
11.4 Reading Data from MPU6050
Running the Code
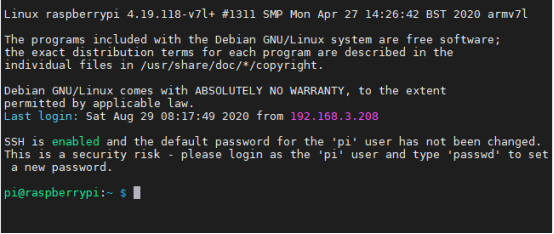
1. Log into the Raspberry Pi terminal.
2. Type in the command below and press Enter to go to the folder of the program:
cd adeept_raspclaws/server/

3. View the current content in the folder:
ls

4. Type in the command below and press Enter to run the program:
sudo python3 mpu6050Test.py
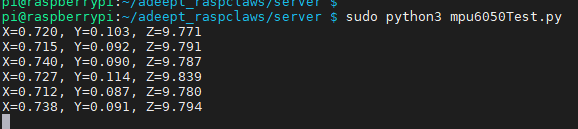
5. After successfully running the code, you can see the values of gravitational acceleration at X, Y, and Z axes.
l If the value of X is positive, it means the mpu6050 moves upwards along the X axis
l If the value of X is negative, it means the mpu6050 moves downwards on the X axis
l If the value of Y is positive, it means the mpu6050 moves upwards along the Y axis
l If the value of Y is negative, it means the mpu6050 moves downwards on the Y axis
l When the mpu6050 lies level (as shown above), the value of Z is equal to the gravitational acceleration (about 9.8)
l If the value of Z is positive, it means the mpu6050 moves upwards along the Z axis
l If the value of Z is negative, it means the mpu6050 moves downwards on the Z axis (indicating the MPU6050 is upside down)
Minor data deviation may happen.
6. Press Ctrl + C to end the program that is running.
11.5 Main Program
Refer to the mpu6050Test.py file for more details.
1. from mpu6050 import mpu6050 2. import time 3. 4. sensor = mpu6050(0x68) 5. def mpu6050test(): 6. x = 0 7. y = 0 8. z = 0 9. for i in range(0,10): 10. accelerometer_data = sensor.get_accel_data() 11. x = x + accelerometer_data['x'] 12. y = y + accelerometer_data['y'] 13. z = z + accelerometer_data['z'] 14. print('X=%.3f, Y=%.3f, Z=%.3f'%(x/10.0,y/10.0,z/10.0)) 15. time.sleep(0.3) 16. 17. if __name__ == "__main__": 18. try: 19. while True: 20. mpu6050test() 21. except: 22. pass |
The function reads the initial data of MPU6050's 6 axes and accumulate them. After the loop is completed, obtain the average value to reduce deviation.