Precautions for Assembly
Precautions for Assembly
l Many servos are used in this robot. Therefore, the assembly of servos has great impact on its performance. Before assembling the servo rocker arm, it's recommended to power on the servo and control the servo shaft to rotate to the central position, so then the rocker arm installed at a specific angle will be in the center position.
Operation steps of powering on the servo:
Boot up the Raspberry Pi.
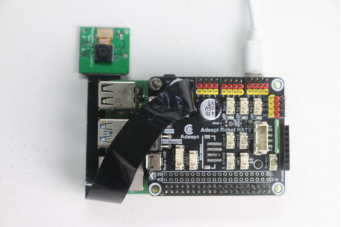
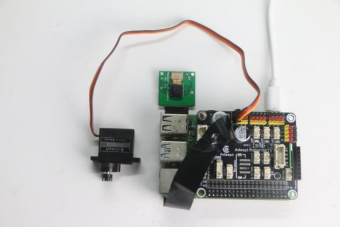
Assemble the servo. Pay attention to the direction of the port when assembling. The yellow wire is connected to the yellow pin, the red wire to the red pin, and the brown wire to the black pin.
l After the Raspberry Pi boots, it will automatically run webServer.py, and then control all the servo ports to send signals to move to the middle position. When assembling the servo rocker arm, you can connect the servo to any servo port and the servo shaft will rotate to the center position after connected. After the rocker arm is assembled at a specific angle, you can disconnect the servo from the port. Wire another servo without rocker arm and the servo will rotate to the center position.
l The Raspberry Pi will control the PCA9685 to set the signal for all servo ports as rotating to the center position a while after booting – it may take 30-50s to boot.
l The angle of all servo assembly in the document is the center position of the servo shaft rotating. Therefore, when the servo is connected to the port, it will rotate automatically to the center position; you can simply assemble the rocker arm to the shaft as instructed in the images of the document.
l Pay attention not to move the servo shaft during assembly. If you want to adjust the angle of the rocker arm, please remove it from the servo, find a proper angle and insert again.
l Note: It's not recommended to tighten any lock nuts mentioned in this document.
Precautions for Power Supply
l You may power the Raspberry Pi via a USB cable during software installation, structure assembly, and program debugging. If Robot HAT is installed, you may wire the USB cable to the USB port of the Robot HAT and it will power the Raspberry Pi via the GPIO.
l Requirement on current may vary from Raspberry Pi models. For example, the Raspberry Pi 3B needs at least 2A to boot up, and the Raspberry Pi 4 normally needs 3A. You can check specifications onside before powering the Raspberry Pi by adaptor.
l When Robot HAT is connected to a load, such as a motor or a few servos, a high-current power supply is required to connect to Vin on the Robot HAT. You can use two high-current 18650 batterie for power supply. The Adeept robot provides a dual 18650 battery box with a 2-pin interface for you to supply power to the Robot HAT.
l When USB port on the Robot HAT is used as power supply, the switch of Robot HAT does not control whether to power on or off, but only controls the power supply by Vin onside.
l Do not use both the USB port and Vin on the Robot HAT to supply power at the same time. If you need to debug the program for a long time and don’t want to remove the battery, you can set the switch on the Robot HAT to OFF, so that when you connect the Robot HAT with a USB cable, Robot HAT is powered by USB.
l If your robot reboots automatically after booting, or disconnects and reboots at the moment it starts to move after normal booting, it is likely that your power supply does not provide enough current as the robot automatically runs the program to control all servos to rotate to the center position when booting – it then drops the voltage on the Raspberry Pi and causes a reboot.
l We've tested when powering with 7.4V, the peak current of the robot would be around 3.75A, which means you need to connect batteries with a 4A output.
l You may also power the Robot HAT with high energy li-ion battery; Robot HAT can be supplied by a power source under 15V.
l You may use a USB cable for program installation and debugging, yet it's not recommended to debug high power modules like servo and motor in case of under-voltage. Battery supply is recommended for them instead.
Q&A
• Servo keeps on jittering.
The gear reducer of the servo may be broken.
• Servo does not rotate to the center position after connected to the board.
Under normal circumstances, Raspberry Pi will automatically run the webServer.py after booting, and the program will control all the servo ports to send signals to rotate to the center position. When assembling the servo rocker arm, you can connect the servo to any servo port at any time and the servo shaft will rotate to the center position after connected. After the rocker arm is assembled at a specific angle, you can disconnect the servo from the port. Wire another servo without rocker arm and the servo will rotate to the center position.
When the servo is powered on, you can gently push the rocker arm by your finger to see if it can move. If not, it means that the program is working normally; otherwise, it indicates that the program doesn't work. In this case, you can run the code [RobotName]/initPosServos.py (for [RobotName], enter the name of your robot program folder) to control the servo to rotate to the center position.
The Raspberry Pi will control the PCA9685 to set the signal for all servo ports as rotating to the center position a while after booting – it may take 30-50s to boot.
• Servo is not rotating in the right direction.
Servos are produced in different batches; thus, they may move inversely when the angle is set as the same. The program includes an interface to adjust the servo direction. Open the RPIservo.py file, find the sc_direction array in ServoCtrl, and change the value "1" to "-1" of the corresponding servo port. E.g., if the servo connected to the No.3 port rotates inversely, just change the fourth number in the array (it counts from No.0 of the array, so the fourth "1" corresponds with the third port)
If the servo connected to the No.3 port rotates inversely:
– Before change:
self.sc_direction = [1,1,1,1, 1,1,1,1, 1,1,1,1, 1,1,1,1] |
– After change: (count from No.0 of the array, so the fourth "1" corresponds with the third port):
self.sc_direction = [1,1,1,-1, 1,1,1,1, 1,1,1,1, 1,1,1,1] |
• Motor doesn't move in the right direction.
Motors are produced in different batches; thus, they may move inversely given a same signal. The program includes an interface to adjust the motor direction. Open the move.py file and you can check the following variable definition in the upper part:
Dir_forward = 0 |
If all the motors rotate inversely, simply change Dir_forward = 0 to Dir_forward = 1, and Dir_backward = 1 to Dir_backward = 0.
For any single motor, you can just change the corresponding set of variables.