Lesson 6 How to Control DC Motor
In this lesson, we will learn how to control DC Motor.
6.1 Components used in this course
Components | Quantity | Picture |
Raspberry Pi | 1 |
|
Robot HAT | 1 |
|
DC Motor | 1 |
|


6.2 The introduction of DC Motor
RaspTankPro robot products use DC motor as a power device. DC motor is a device that converts DC electrical energy into mechanical energy. It is widely used to drive various equipment, such as electric fans, remote control cars, electric windows, etc.The DC motor is very suitable as the walking mechanism of the robot.
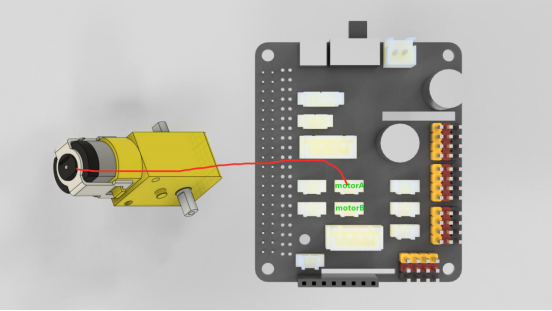
6.3 Wiring diagram (Circuit diagram)
When the DC Motor module is in use, it needs to be connected to the motorA or motorB interface on the Robot HAT drive board. The yellow wire is connected to the yellow pin, the red wire is connected to the red pin, and the brown wire is connected to the black pin, as shown below:
6.4 How to control Motor
Run the code
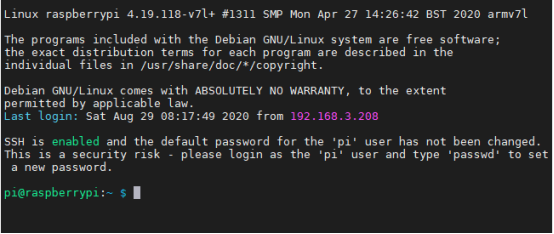
1. Remotely log in to the Raspberry Pi terminal.
2. Enter the command and press Enter to enter the folder where the program is located:
cd adeept_rasptankpro/server/

3. View the contents of the current directory file:
ls

4. Enter the command and press Enter to run the program:
sudo python3 move.py

5. After running the program successfully, you will observe that the Motor will rotate for about 1 second and then stop, and the program will also stop. If you need the motor to rotate again, you need to run the program again.
6.5 The main code program of this lesson
For the complete code, please refer to the file move.py.
1. import time
2. import RPi.GPIO as GPIO
3.
4. Motor_A_EN = 4
5. Motor_A_Pin1 = 26
6. Motor_A_Pin2 = 21
Import the dependent library, where Motor_EN = 4, Motor_Pin1 = 26, Motor_Pin2 = 21 are the parameters of the corresponding interface motorA.
1. def setup():#Motor initialization
2. global pwm_A
3. GPIO.setwarnings(False)
4. GPIO.setmode(GPIO.BCM)
5. GPIO.setup(Motor_A_EN, GPIO.OUT)
6. GPIO.setup(Motor_A_Pin1, GPIO.OUT)
7. GPIO.setup(Motor_A_Pin2, GPIO.OUT)
8.
9. motorStop()
10. try:
11. pwm_A = GPIO.PWM(Motor_A_EN, 1000)
12. except:
13. pass
Set the motor initialization function.
1. def destroy():
2. motorStop()
3. GPIO.cleanup() # Release resource
4.
Set the motor stop function.
1. def move(speed, direction, turn, radius=0.6): # 0 < radius <= 1
2. #speed = 100
3. if direction == 'forward':
4. if turn == 'right':
5. motor_left(0, left_backward, int(speed*radius))
6. motor_right(1, right_forward, speed)
7. elif turn == 'left':
8. motor_left(1, left_forward, speed)
9. motor_right(0, right_backward, int(speed*radius))
10. else:
11. motor_left(1, left_forward, speed)
12. motor_right(1, right_forward, speed)
13. else:
14. pass
Set the motor rotation function.
if __name__ == '__main__':
1. try:
2. speed_set = 60
3. setup()
4. move(speed_set, 'forward', 'no', 0.8)
5. time.sleep(1.3)
6. motorStop()
7. destroy()
8. except KeyboardInterrupt:
9. destroy()
Instantiate the object.