Lesson 7 Controlling a WS2812 LED
In this lesson, we will learn how to control a WS2812 LED.
7.1 Components & Parts
Components | Quantity | Picture |
Raspberry Pi | 1 |
|
Robot HAT | 1 |
|
3-pin Wire | 1 |
|
WS2812 RGB LED | 1 |
|


7.2 About WS2812 RGB LED
WS2812 RGB module is a low-power RGB light with an integrated current control chip. It looks like a 5050LED lamp bead, and each element is a pixel. The pixel contains an intelligent digital interface data latch, a signal shaping amplifier drive circuit, a high-precision internal oscillator, and a 12V high-voltage programmable constant current control part, which ensures that the color of the pixel light is highly consistent.
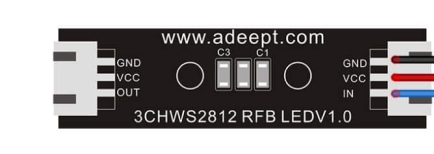
WS2812 LED is a common module on Adeept robot products. There are three WS2812 LEDS on each module. Pay attention to the direction of the signal line when connecting. The signal line should be connected to the “IN” port of WS2812 LED after being led from the Raspberry Pi. To connect another WS2812 LED, you can connect a signal wire drawn from the "OUT" port of the first WS2812 LED to the "IN" port of the new WS2812 LED.
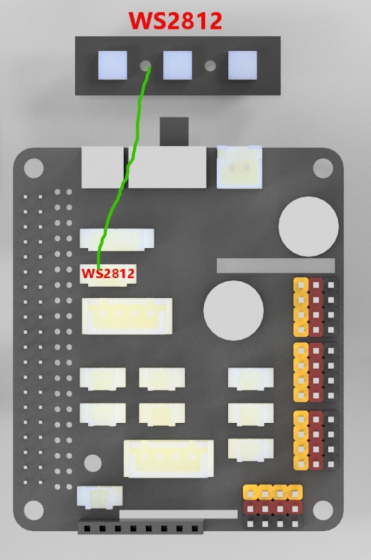
When using the Raspberry Pi to install the driver board Robot HAT, the WS2812 LED can be connected to the WS2812 interface on the Robot HAT using a 3-pin cable.
We use a third-party library [rpi_ws281x] to control the WS2812 LED. Visit at this link for more: https://github.com/richardghirst/rpi_ws281x.
If you connect the WS2812 LED to the WS2812 interface of the Robot HAT, the signal line is equivalent to connecting to the GPIO 12 of the Raspberry Pi.
7.3 Wiring diagram (Circuit diagram)
Connect the WS2812 LED's IN port to the WS2812 port on the Robot HAT driver board, as shown in the figure below:
7.4 Controlling WS2812 LED
Run the code
1. Remotely log in to the Raspberry Pi terminal.

2. Enter the command and press Enter to get access to the folder where the program is located:
cd adeept_darkpaw/server/

3. View the contents of the current directory file:
ls

4. Enter the command and press Enter to run the program:
sudo python3 LED.py

5. After running the program successfully, you can see the WS2812 alternately flashing red, green and blue lights.
6. Press the shortcut "Ctrl + C" to terminate the program.
7.5 Main Program
For the complete code, refer to the file LED.py.
1. import time 2. from rpi_ws281x import * |
Import dependent libraries.
1. class LED: 2. def __init__(self): 3. self.LED_COUNT = 16 # Set to the total number of LED lights on the robot product, which can be more than the total number of LED lights connected to the Raspberry Pi 4. self.LED_PIN = 12 # Set as the input pin number of the LED lamp group 5. self.LED_FREQ_HZ = 800000 6. self.LED_DMA = 10 7. self.LED_BRIGHTNESS = 255 8. self.LED_INVERT = False 9. self.LED_CHANNEL = 0 10. 11. # Use the configuration items above to create a strip 12. self.strip = Adafruit_NeoPixel( 13. self.LED_COUNT, 14. self.LED_PIN, 15. self.LED_FREQ_HZ, 16. self.LED_DMA, 17. self.LED_INVERT, 18. self.LED_BRIGHTNESS, 19. self.LED_CHANNEL 20. ) 21. self.strip.begin() 22. 23. def colorWipe(self, R, G, B): # This function is used to change the color of the LED 24. color = Color(R, G, B) 25. for i in range(self.strip.numPixels()): # Only one LED light color can be set at a time, so a cycle is required 26. self.strip.setPixelColor(i, color) 27. self.strip.show() # After calling the show method, the color will really change |
Build LED control class.
1. if __name__ == '__main__': 2. led= LED() 3. try: 4. while 1: 5. led.colorWipe(255, 0, 0) #All lights turn red 6. time.sleep(1) 7. led.colorWipe(0, 255, 0) # All lights turn green 8. time.sleep(1) 9. led.colorWipe(0, 0, 255) # All lights turn blue 10. time.sleep(1) 11. except: 12. LED.colorWipe(0,0,0) #Turn off all lights |
The above code will control all the WS2812 lights to switch among the three colors. Press CTRL+C to exit the program.
Refer to the code below to control a single light. "i" is the serial number of the light connected to the signal line from the driver board and starts from 0. "R, G, B" is the brightness corresponding to the three color channels:
LED.strip.setPixelColor(i, Color(R, G, B))
LED.strip.show()
Note: You need to use the Color() method to pack the RGB value, and then pass it to setPixelColor().