First, you need to create a new .py file and place it in the same folder as raspArmS.py. The code described below is written in the newly created .py file.
15.1 How to call API functions in the project
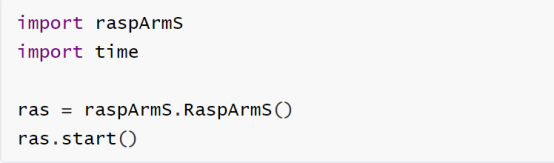
Import raspArms,the object that instantiates and controls the robotic arm is ras, call the start() function in raspArmS.py with ras, you don't need to input any parameters, call the start() function to control the motion of the robotic arm.
15.2 xyzInput([x, y, z])
【effect】:
xyzInput([x, y, z]) can control the end point of the robotic arm to move to a certain point (the end point of the robotic arm is roughly the point where the chuck clamp is located).
【Call example】:

【Parameter Description】:
1. [x, y, z] is the coordinate point of the Cartesian coordinate system where the end point is located.
2. When the x value is 0, the end point of the robotic arm is the point directly in front of it, and the x value becomes larger, and the end point shifts to the right; the x value becomes smaller, the end point shifts to the left.
3. The y value is the position of the end point relative to the front and back of the robot arm: if the y value becomes larger, the end point position will shift forward; if the y value becomes smaller, the end point position will shift backward
4. The z value is the position of the end point relative to the upper and lower positions of the robotic arm: if the z value becomes larger, the end point position will shift upward; if the z value becomes smaller, the end point position will shift downward.
15.3 servoAngInput(angleInput)
【effect】:
Controlling each servo of the robotic arm to rotate a certain angle.
【Call example】:

【Parameter Description】:
The angleInput parameter is an array of four servo angles.
For example, when the parameter angleInput is [10, 20, 30, 40]:
It means to control A servo to rotate 10°, B servo to rotate 20°, C servo to rotate 30°, and D servo to rotate 40° (all the above degrees are relative to the initial position of the servo).
【pay attention】:
If the parameter angleInput is [0, 0, 0, 0], it means to control all the servos to rotate to the initial position.
15.4 servoInitSet()
【effect】:
Setting the neutral position of the servo.
【Call example】:

【Parameter Description】:
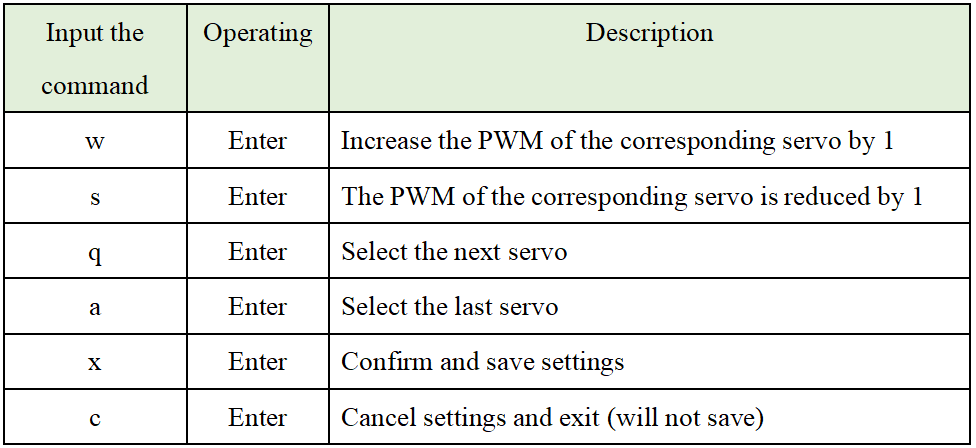
There is no need to write parameters when calling servoInitSet(), but you need to enter commands in the console to adjust the position of the servo. Refer to the table below:
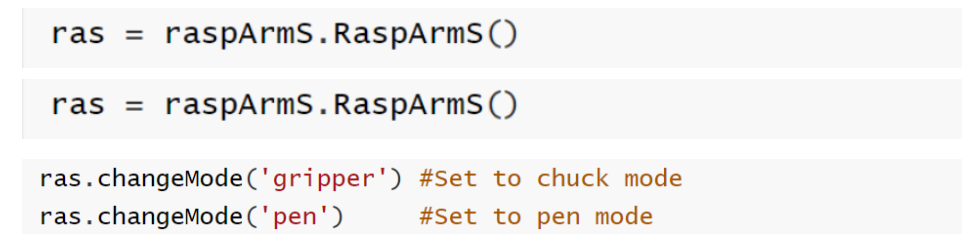
15.5 changeMode(' ')
【effect】:
Changing the working mode.
【Call example】:
【Parameter Description】:
Special note: The working mode selection needs to cooperate with the corresponding mechanical structure assembly form to operate normally. There are two structural forms of the robotic arm, one is a "mechanical arm" that can grip objects, and the other is a "writing pen robotic arm" that can write and draw. For details, please refer to "Lesson 10 RaspArm-S Assembly Tutorial".
1. In the writing pen mode, Rudder D will try its best to automatically maintain the aluminum alloy parts that connects to it and maintain an angle with the ground.
2. In the chuck mode, D servo is used to control the opening and closing of the chuck.
15.6 changeSpeed(speedInput)
【effect】:
Changing the speed of the servo.
【Call example】:

【Parameter Description】:
1. The range of the parameter speedInput: 0 <speedInput <= 100.
2. The default value is 100.
3. This setting affects the running speed of the moveXYZ (newPos) function of 15.7
15.7 moveXYZ(newPos)
【effect】:
Controlling the robotic arm to slowly move to a new position.
【Call example】:

【Parameter Description】:
1. The parameter newPos is an array of new positions, such as [0, 0, 0, 0].
2. This function will cause the program to block, and it will jump out when ras.globalCommand =='stop'.
15.8 gripper(command)
【effect】:
Controlling the chuck of the robotic arm.
【Call example】:

【Parameter Description】:
1. When the parameter command is "catch", the mechanical arm chuck is clamped.
2. When the parameter command is "loose", the mechanical arm chuck is released.
3. When the parameter command value is between 0-90, the chuck of the mechanical arm forms a certain angle, 90 is clamping, and 0 is loosening.
15.9 planGoes(planList)
【effect】:
The robotic arm automatically repeats the scheduled task.
【Call example】:

【Parameter Description】:
1. The parameter planList is an array composed of each target point position, for example: [[90, 140, 0, 90], [-90, 140, 0, 0], [0, 140, 90, 0]]
2. This function will cause the program to block, and it will jump out when ras.globalCommand =='stop'.
15.10 simpleMoveStart(axis, direction)
【Effect】:
Controlling the simple movement of the robotic arm. (If the robotic arm is converted into a PTZ, you can use this function to control the movement of the PTZ in real time)
【Call example】:

【Parameter Description】:
1. The parameter axis is used to select the desired motion axis, which can be: ‘X’, ‘Y’, and ‘Z’.
2. The parameter direction is used to select the control direction, which can be: ‘+’ or ‘-’.
3. This function will not block the program, and the robot arm will start to move after the call is completed.
【Pay attention】:

1. The parameter axis is used to select the motion axis that you want to stop. It can be: ‘X’, ‘Y’, and ‘Z’.
2. After an axis starts moving, this function needs to be called to stop the axis.