In this lesson, we will carry out an interesting experiment to make a music player with a Micro:bit.
15.1 Components to be prepared

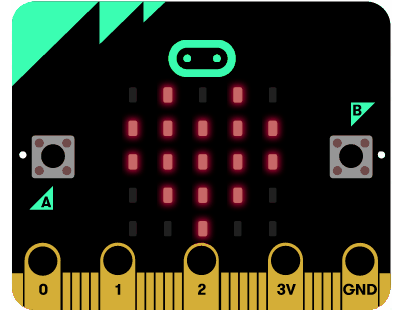
15.2 LED display
The front LED display of Micro:bit consists of 25 5x5 lattice LEDs.
25 LEDs arranged in a 5x5 grid make up the display for showing pictures, words and numbers.
15.3 How it works
Your BBC micro:bit can be programmed to make a wide variety of sounds - from single notes, tones and beats to your own musical compositions.
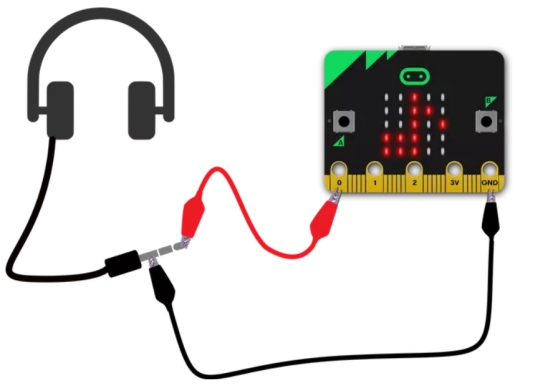
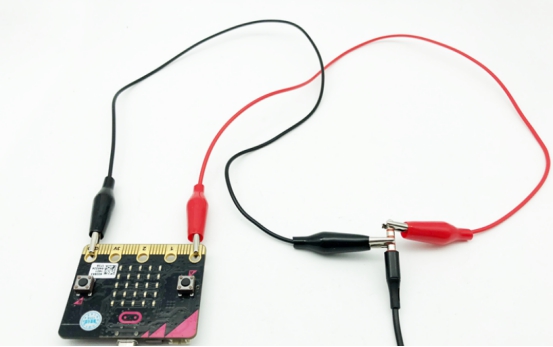
1.To make sounds with micro:bit, attach headphones or a speaker. Clip the tip of the headphone plug to pin 0 on micro:bit. Clip the longer part of the headphone plug to the GND pin on micro:bit.
2.Use this program to make your micro:bit play one of its built-in tunes when you press button A.
3.The gold pins on the bottom of the micro:bit are used for inputs and outputs. Here we use pin 0 as an output. The micro:bit sends pulses of electrical signals from pin 0 when it plays the tune. The headphones must also be connected to the GND pin on the micro:bit to complete the electrical circuit.
More projects about music are available in the following link:
https://www.microbit.org/projects/make-it-code-it/?filters=8c2e3990-4b3b-4925-8972-9cdc60e49f10
15.4 Circuit
Connect micro:bit and PC with a Micro USB cable. Clip the tip of the headphone plug to pin 0 on micro:bit. Clip the longer part of the headphone plug to the GND pin on micro:bit.
The real object connection diagram is as follows:

15.5 MakeCode programming
We will use an online MakeCode Editor to complete the experiment in this lesson, as shown below.
15.5.1 Start programming
(1) Log in to the website
1. You need to enter the URL in the address bar of Google Browser:
https://makecode.microbit.org/
2. After the website is successfully opened, the interface as shown below will appear:

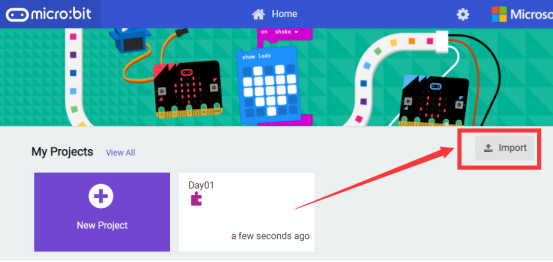
(2) Import a project
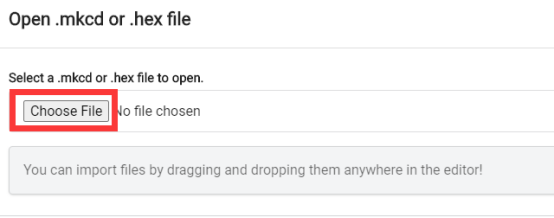
1. In the HOME interface, click the "Import" button to import the external ".hex" file:
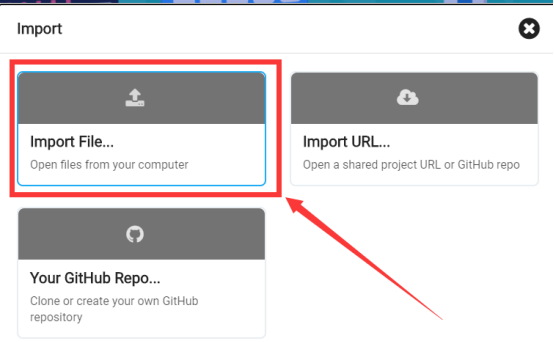
In the pop-up dialog box, select the "Import File", as shown in the following figure:
Click the "Choose File":
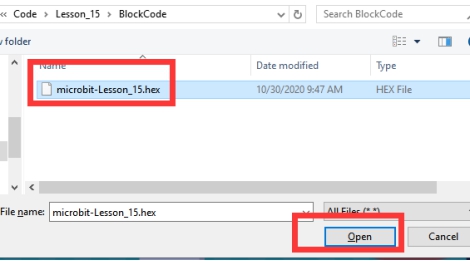
Find the code file for this lesson:
BBC_Microbit_Sensor\Code\Lesson_15\BlockCode
Select the file in ".hex" format and click the Open:
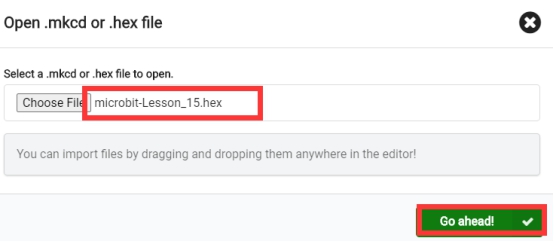
2. Notice whether the file has been loaded into the following window, and then click the "Go ahead!" button, as shown in the following figure:
3. Open the file successfully, as shown in the following figure:
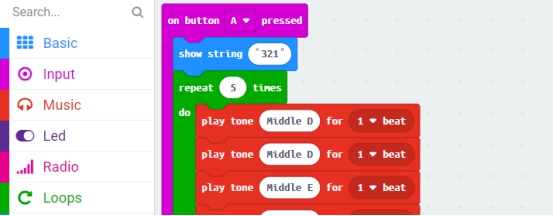
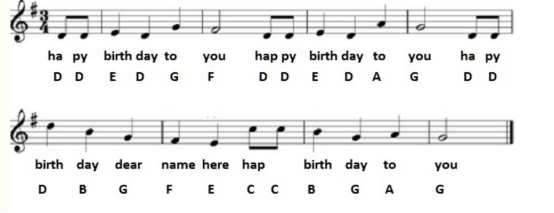
[The music score is shown below]:
15.5.2 Run the program
1. After the program is written, connect micro:bit and PC with a Micro USB cable.
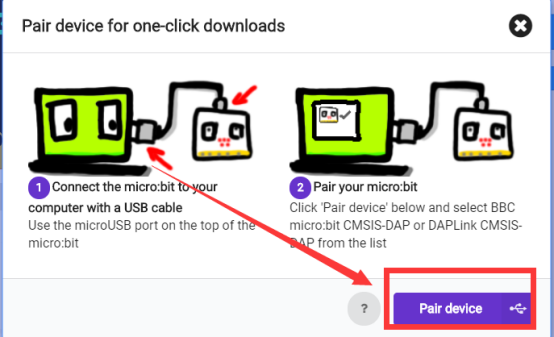
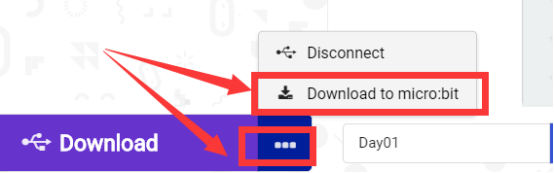
2. After micro:bit is connected to the computer, you need to first "Pair device". Click the  button on the right of
  in the lower left corner, and then click the
  option, as shown in the following figure:

Then click  in the lower right corner:
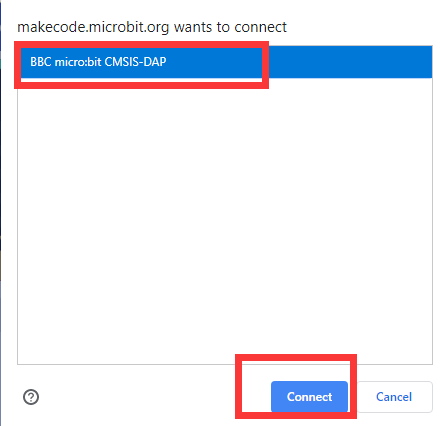
Then the following dialog box will pop up, select  , and then click
After the device is successfully paired, the  button changes to
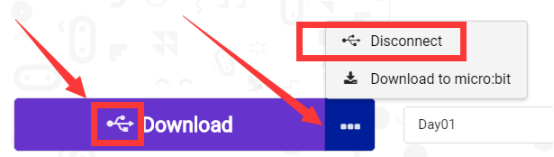
3.Then click the  button to directly download the program into the Micro:bit. After the download is finished, your Micro:bit will restart and run the program you just downloaded. Press the button A, connect your headphones to the Micro:bit and test whether the playing sound can be heard, as shown in the following figure:
[Note]:
If Micro:bit doesn't respond after clicking the  , you need to click the
  button on the right of the
  , and then click the
  , and observe the situation of the Micro:bit again, as shown in the following figure:
If you have problems, please send us an email: support@adeept.com
15.5.3 Learn the code program
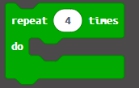
In the program, we use the following instruction blocks, which are explained as follows:
Block | Function |
| This is an instruction block that can edit various musical tempos. You can adjust the tempos by pressing |
| This is an instruction block that repeats the loop, and the number indicates that the loop is repeated four times. |

 .
.
15.6 Python programming
15.6.1 Run the program
1.Connect micro:bit and PC with a Micro USB cable.
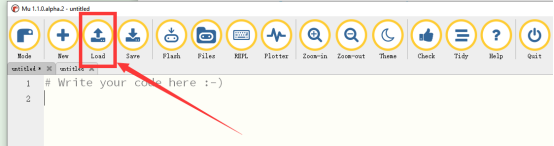
2. Open the Mu Editor installed on the computer, and click the button [Load] in the upper left corner to open the source code program of this lesson:
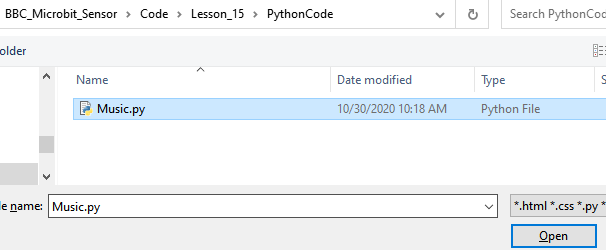
Find the code file for this lesson:
BBC_Microbit_Sensor\Code\Lesson_15\PythonCode
Select the file in ".py" format and click the Open:
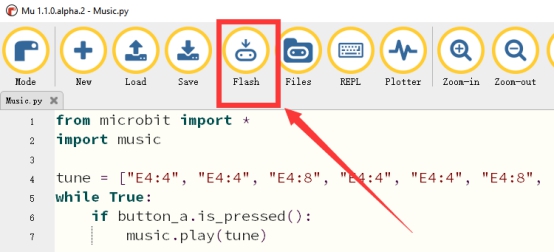
3. Click the [Flash] button to download the program to Micro:bit, as shown in the following figure:
4.After the program is downloaded, your Micro:bit will restart and run the program you just downloaded. Press the button A, connect your headphones to the Micro:bit and test whether the playing sound can be heard, as shown in the following figure:

15.6.2 How it works
Your BBC micro:bit can be programmed to make a wide variety of sounds - from single notes, tones and beats to your own musical compositions.
1.To make sounds with micro:bit, attach headphones or a speaker. Clip the tip of the headphone plug to pin 0 on micro:bit. Clip the longer part of the headphone plug to the GND pin on micro:bit.
2.Use this program to make your micro:bit play one of its built-in tunes when you press button A.
3.The gold pins on the bottom of the micro:bit are used for inputs and outputs. Here we use pin 0 as an output. The micro:bit sends pulses of electrical signals from pin 0 when it plays the tune. The headphones must also be connected to the GND pin on the micro:bit to complete the electrical circuit.
More projects about music are available in the following link:
https://www.microbit.org/projects/make-it-code-it/?filters=8c2e3990-4b3b-4925-8972-9cdc60e49f10
If you have problems, please send us an email: support@adeept.com
15.6.3 Learn the code program
The source codes are as follows:
1 2 3 4 5 6 7 8 9 10 11 12 13 14 | from microbit import * import music
tune = ["E4:4", "E4:4", "E4:8", "E4:4", "E4:4", "E4:8", "E4:4", "G4:4", "C4:4", "D4:4", "E4:8", "F4:4", "F4:4", "F4:4", "F4:4", "F4:4", "E4:4", "E4:4", "E4:2", "E4:2", "E4:4", "D4:4", "D4:4", "E4:4", "D4:8", "G4:8", "E4:4", "E4:4", "E4:8", "E4:4", "E4:4", "E4:8", "E4:4", "G4:4", "C4:4", "D4:4", "E4:8", "F4:4", "F4:4", "F4:4", "F4:4", "F4:4", "E4:4", "E4:4", "E4:2", "E4:2", "G4:4", "G4:4", "F4:4", "D4:4", "C4:8"] while True: if button_a.is_pressed(): music.play(tune) |
More information about the Musical Notation is available in the following link:
https://microbit-micropython.readthedocs.io/en/v1.0.1/music.html
(1) Import a music library.
2 | import music |
(2) When the button A is pressed, the music in the tune will be played.
13 14 | if button_a.is_pressed(): music.play(tune) |
(3) In the tune, the edited tempos are stored. For example, A1:4 refers to the note “A” in octave 1 that lasts for four ticks (a tick is an arbitrary length of time defined by a tempo setting function - see below). If the note name R is used then it is treated as a rest (silence).
4 5 6 7 8 9 10 11 | tune = ["E4:4", "E4:4", "E4:8", "E4:4", "E4:4", "E4:8", "E4:4", "G4:4", "C4:4", "D4:4", "E4:8", "F4:4", "F4:4", "F4:4", "F4:4", "F4:4", "E4:4", "E4:4", "E4:2", "E4:2", "E4:4", "D4:4", "D4:4", "E4:4", "D4:8", "G4:8", "E4:4", "E4:4", "E4:8", "E4:4", "E4:4", "E4:8", "E4:4", "G4:4", "C4:4", "D4:4", "E4:8", "F4:4", "F4:4", "F4:4", "F4:4", "F4:4", "E4:4", "E4:4", "E4:2", "E4:2", "G4:4", "G4:4", "F4:4", "D4:4", "C4:8"] |