Overview
In this lesson, we will collect the potentiometer data by programming the Arduino UNO Board, and then send the data to the Processing through serial communication to change the size of a circle.
Components
- 1 * Arduino UNO
- 1 * USB Cable
- 1 * 10kΩ Potentiometer
- 1 * Breadboard
- Several jumper wires
Principle
The experiment consists of two parts: first, acquire the data from Arduino; second, process the data.
Arduino key function:
●write()
Writes binary data to the serial port. This data is sent as a byte or series of bytes; to send the characters representing the digits of a number use the print() function instead.
Syntax:
Serial.write(val)
Serial.write(str)
Serial.write(buf, len)
Parameters:
val: a value to send as a single byte
str: a string to send as a series of bytes
buf: an array to send as a series of bytes
len: the length of the buffer
Returns:
byte
write() will return the number of bytes written, though reading that number is optional
Processing key function:
●Name: size()
Description:
Defines the dimension of the display window in units of pixels. The size() function must be the first line of code, or the first code inside setup(). Any code that appears before the size() command may run more than once, which can lead to confusing results.
The system variables width and height are set by the parameters passed to this function. If size() is not used, the window will be given a default size of 100x100 pixels.
Syntax:
size(w, h)
size(w, h, renderer)
Parameters:
w int: width of the display window in units of pixels
h int: height of the display window in units of pixels
renderer
String: Either P2D, P3D, or PDF
Returns:
void
●Name: println()
Description:
The println() function writes to the console area, the black rectangle at the bottom of the Processing environment. This function is often helpful for looking at the data a program is producing. Each call to this function creates a new line of output. More than one parameter can be passed into the function by separating them with commas. Alternatively, individual elements can be separated with quotes ("") and joined with the addition operator (+).
Before Processing 2.1, println() was used to write array data to the console. Now, use printArray() to write array data to the console.
Note that the console is relatively slow. It works well for occasional messages, but does not support high-speed, real-time output (such as at 60 frames per second).
Syntax:
println()
println(what)
println(variables)
Parameters:
what Object, String, float, char, boolean, or byte: data to print to console
variables Object[]: list of data, separated by commas
Returns:
void
●Name: background()
Description:
The background() function sets the color used for the background of the Processing window. The default background is light gray. This function is typically used within draw() to clear the display window at the beginning of each frame, but it can be used inside setup() to set the background on the first frame of animation or if the backgound need only be set once.
An image can also be used as the background for a sketch, although the image's width and height must match that of the sketch window. Images used with background() will ignore the current tint() setting. To resize an image to the size of the sketch window, use image.resize(width, height).
It is not possible to use the transparency alpha parameter with background colors on the main drawing surface. It can only be used along with a PGraphics object and createGraphics().
Syntax:
background(rgb)
background(rgb, alpha)
background(gray)
background(gray, alpha)
background(v1, v2, v3)
background(v1, v2, v3, alpha)
background(image)
Parameters:
rgb int: any value of the color datatype
alpha float: opacity of the background
gray float: specifies a value between white and black
v1 float: red or hue value (depending on the current color mode)
v2 float: green or saturation value (depending on the current color mode)
v3 float: blue or brightness value (depending on the current color mode)
image PImage: PImage to set as background (must be same size as the sketch window)
Returns:
void
●Name: fill()
Description:
Sets the color used to fill shapes. For example, if you run fill(204, 102, 0), all subsequent shapes will be filled with orange. This color is either specified in terms of the RGB or HSB color depending on the current colorMode(). (The default color space is RGB, with each value in the range from 0 to 255.)
When using hexadecimal notation to specify a color, use "#" or "0x" before the values (e.g., #CCFFAA or 0xFFCCFFAA). The # syntax uses six digits to specify a color (just as colors are typically specified in HTML and CSS). When using the hexadecimal notation starting with "0x", the hexadecimal value must be specified with eight characters; the first two characters define the alpha component, and the remainder define the red, green, and blue components.
The value for the "gray" parameter must be less than or equal to the current maximum value as specified by colorMode(). The default maximum value is 255.
Syntax:
fill(rgb)
fill(rgb, alpha)
fill(gray)
fill(gray, alpha)
fill(v1, v2, v3)
fill(v1, v2, v3, alpha)
Parameters:
rgb int: color variable or hex value
alpha float: opacity of the fill
gray float: number specifying value between white and black
v1 float: red or hue value (depending on current color mode)
v2 float: green or saturation value (depending on current color mode)
v3 float: blue or brightness value (depending on current color mode)
Returns:
void
●Name:ellipse()
Description:
Draws an ellipse (oval) to the screen. An ellipse with equal width and height is a circle. By default, the first two parameters set the location, and the third and fourth parameters set the shape's width and height. The origin may be changed with the ellipseMode() function.
Syntax:
ellipse(a, b, c, d)
Parameters:
a float: x-coordinate of the ellipse
b float: y-coordinate of the ellipse
c float: width of the ellipse by default
d float: height of the ellipse by default
Returns:
Void
Note:
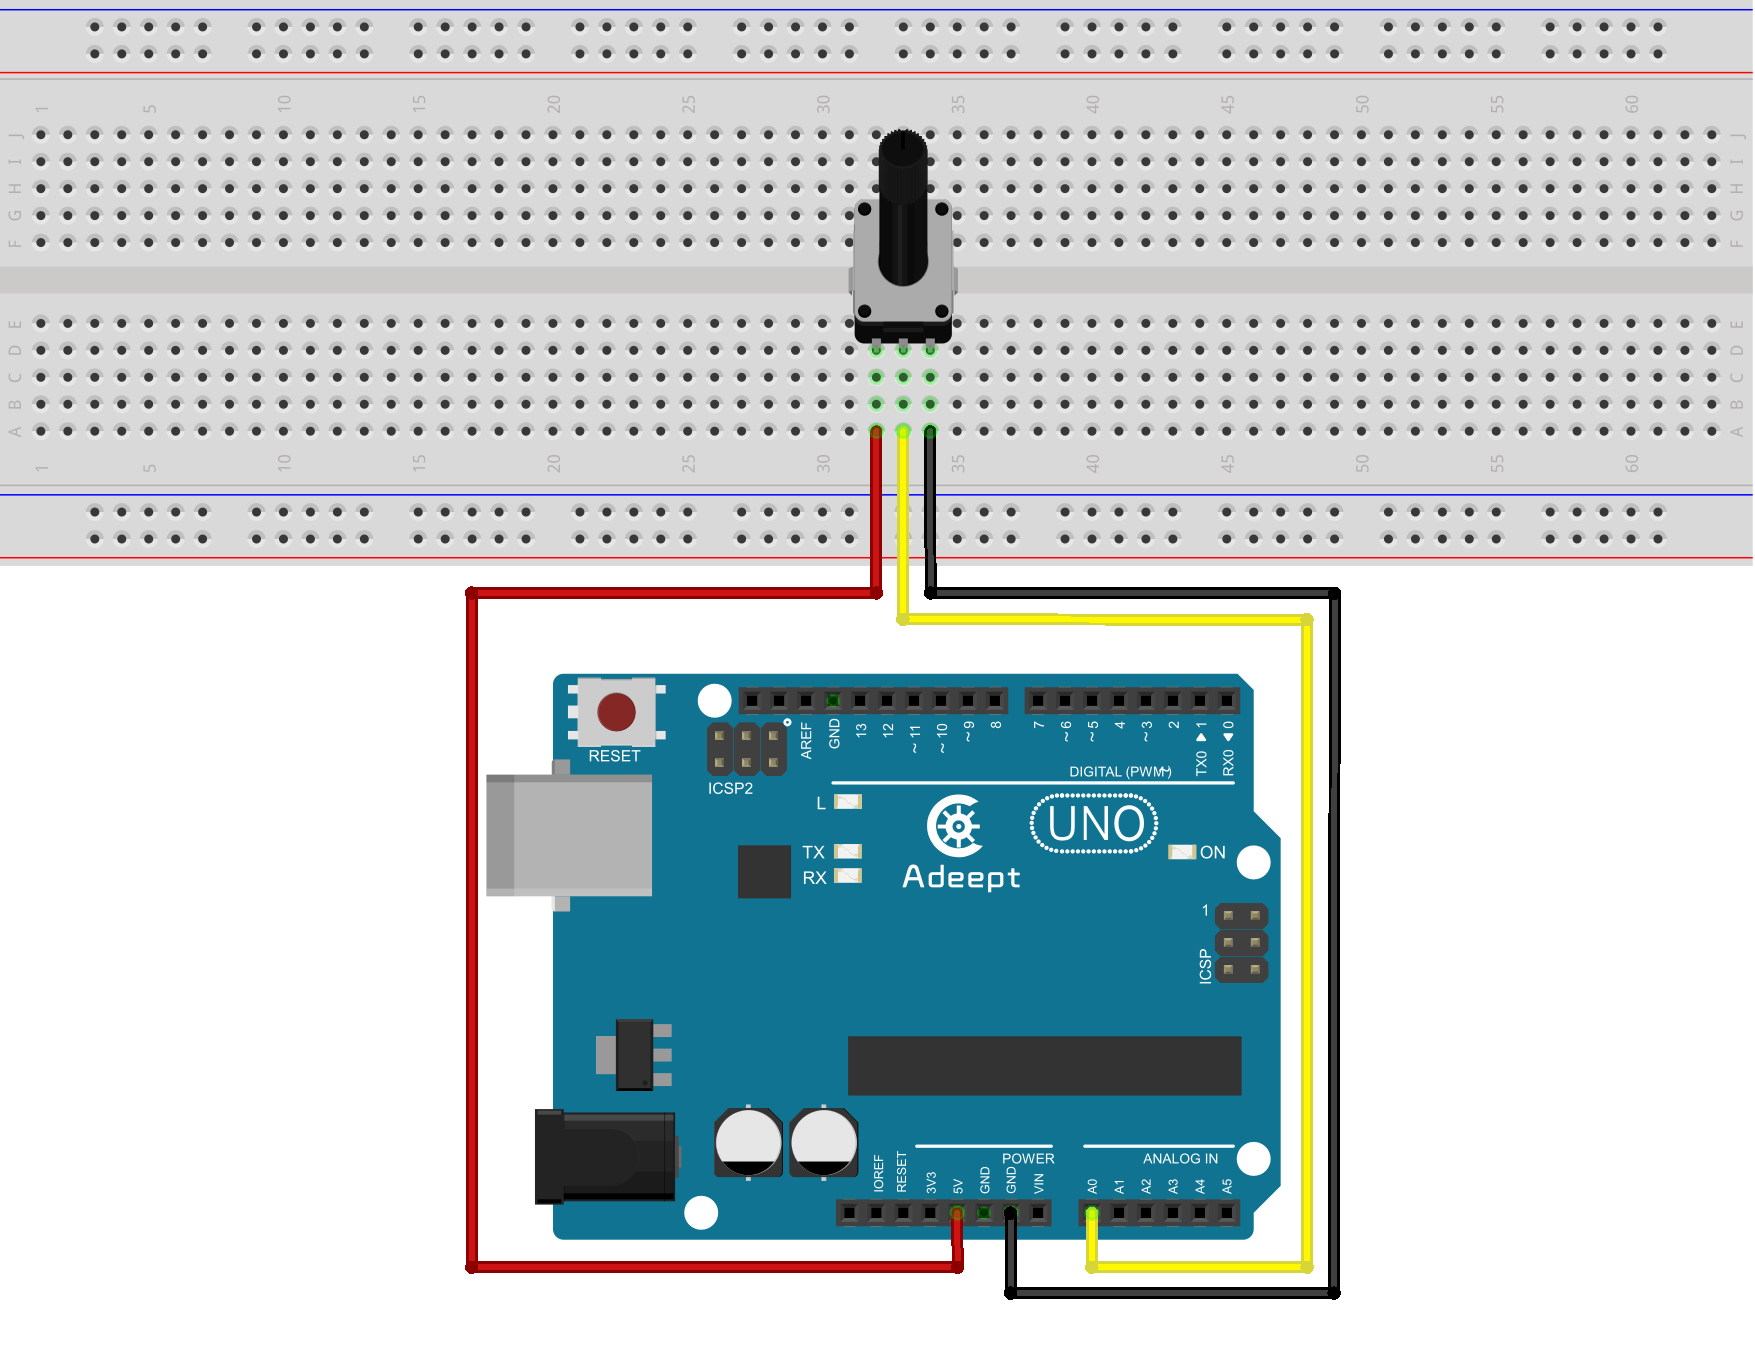
1. In this experiment, my Arduino UNO board is connected to my computer port COM26. But it may differ in your case. So please adjust it according to your actual situation.
2. If Processing prompts that you need to install the related function library, please do it.
Procedures
Step 1: Build the circuit
Step 2: Program
![]() _34_Potentiometer_Processing.ino
_34_Potentiometer_Processing.ino
/***********************************************************
File name:   34_Potentiometer_Processing.ino
Description: Arduino and processing interactive
             The size of the potentiometer voltage control red circle on the PC
Website: www.adeept.com
E-mail: support@adeept.com
Author: Tom
Date: 2015/05/02
***********************************************************/
int potPin = 0; // define UNO board A0 pin connect the potentiometer

void setup() {
  // Start the serial port, baud rate to 9600
  Serial.begin(9600);
}

void loop() {
  // Read the potentiometer voltage
  int sensorValue = analogRead(potPin);
  //Because the processing 'serial.read()' only support the value between 0-255,
  //so you need to put a scale of 0-1023 numerical scale between 0-255
  int Voltage = map(sensorValue,0,1023,0,255);
  Serial.write(Voltage);
  delay(100);
}
Step 3: Compile the program and upload to Arduino UNO board
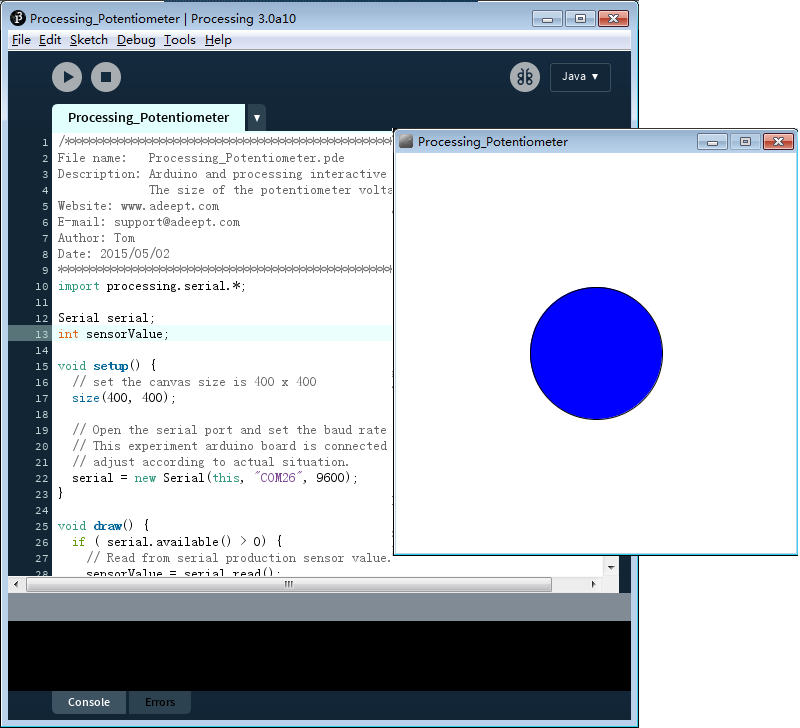
Step 4: Run the Processing software (Processing_Potentiometer.pde)
Now, turn the knob of the potentiometer, and you will see a blue circle size to change on the computer.